Trouble casting tobacco leaves

Signed-In Members Don't See This Ad

ZanderPommo

Member
Joined
Oct 14, 2009
Messages
1,526
Location
Tenino, Washington
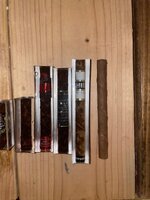
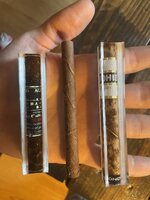
Owner of our BJJ gym ordered 3 cigar themed pens incorporating his own cigar bands. I want to cast them using real tobacco. I understand there are other ways to attach a label to a pen but I want to make this way work unless it proves to be completely impossible. I'm having serious trouble trying to cast tobacco leaves. The tobacco discolors significantly as though it's undergoing a chemical reaction and being "soaked" dark and translucent. FYI, neither coating with CA or coating with modgepodge caused this type of discoloration until it was cast.

Here is what I've tried that made no discernible difference:
Baking bone dry vs air drying for a day
Painting the tubes vs direct to brass
Alumilite CS vs Liquid diamonds

What seems to have made a small difference:
Coating with CA.
(This left some areas light but some still became dark and formed a "splotchy" look. The Cohiba blank is the one that utilized a CA coating. I know CA doesn't jive well with Alumilite but I'm just trying to see what can be done to protect it from this reaction.)

What I have yet to try but plan on doing next:
Casting modgpodge coated one (it's coated but not yet cast)
Coating with clear nail polish

Since LDs didn't perform any better I'm going to be focused on using Alumilite clear slow going forward with the experimentation. The universal factors so far have been:
Tobacco glued to tubes with Gorilla glue spray adhesive (and same with the labels)
Preheating the molds to ~130*
Casting under 60 PSI
Demolding after 4-5 hours

So far none of the blanks have changed since being demolded. Meaning, what I saw when I opened the pressure pot is what I'm still looking at. In the picture I have one tube that is how it looks pre-casting. I love the look and I'm trying to preserve it in the final product.

Anyone tried this before? Any advice or theories?

Thanks yall!
 

Attachments

  • IMG_5988.jpeg
    IMG_5988.jpeg
    368.2 KB · Views: 66
  • IMG_5993.jpeg
    IMG_5993.jpeg
    291 KB · Views: 62
Signed-In Members Don't See This Ad
Several years ago, we used a CA to adhere the leaf to a bare tube before encapsulating with polyester resin (Silmar 41). The leaf was moistened to reduce crumbling during the process. Memory serves that it was about a 50-60% success rate. Abandoned for the success rate.
 
Plants lose color when they dry, I am not aware of a process to prevent that because the moisture must come out completely for casting. Maybe reach out to Flower Girl Blanks as she casts a LOT of dried flower and similar things. She may be able to assist you with finding a way to do this more efficiently.
 
Several years ago, during a class at Arrowmont, Curtis Seebeck and Barry Gross dried and then cast shredded tobacco leaves in Alumilite Clear Slow which were then eventually turned into pens, IIRC. I'm not sure how well whole leaves or whole cigars would do as there will likely be some small amount of moisture left in the leaves/cigars; moisture and Alumilite Clear/Clear Slow are avowed enemies.
 
I made a batch of tobacco leaf pens several years ago. I watched YouTube videos to see how cigars are rolled. Used my Ulu knife to cut around the big veins. I did paint the tubes, did not do any oven drying. As you learned, wrapping the tubes is the easy part. After a few failed attempts because of discoloring after casting, I tried spraying with a clear enamel. That got close and probably would have worked if I have given it 3-4 coats of clear spray.

What did work was to smear a coat of ProPaste over everything. ProPaste is thick two part epoxy that stays where you put it. I found it when looking at supplies for making fishing rods. With the wrapped tube completely encased in epoxy with no discoloration I cast them in Silmar 41. I would not recommend Alumilite. I hardens quick, so that may help with the discoloring, but it won't shine enough for me.

I displayed them in a wood cigar box, they looked good, got a lot of attention, but were slow selling.
Hmm this gives me several things to try, thanks Chasper. Enamel coatings and/or a layer of thinner epoxy prior to casting. I'll give those a shot
 
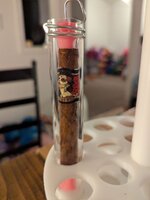
Well, it looks like crap but this is still just a test piece and I solved the problem I needed to solve! This was two coats of modge podge. I'm also going to try nail polish because I think it'll be a better outcome if it also protects the tobacco.

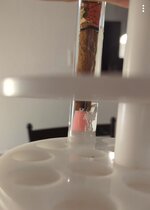
Side note, can you give me any tips on avoiding whatever caused these bubbles at the bottom (second picture) @JohnU ? Love the casting system but I just received it and am completely new to vertical clear casting. 60psi for 4.5 hours. Cant wait to get it figured out, it's super clever and will make things very efficient for me.
 

Attachments

  • IMG_6020.jpeg
    IMG_6020.jpeg
    167 KB · Views: 37
  • IMG_6017.jpeg
    IMG_6017.jpeg
    162.1 KB · Views: 34
Side note, can you give me any tips on avoiding whatever caused these bubbles at the bottom (second picture) @JohnU ? Love the casting system but I just received it and am completely new to vertical clear casting.
I occasionally have those issues. I believe the air comes from inside the brass tube, under the bottom tapered plug and along the delrin base where the clear tube fits. The thinner the resin, the less they will be. I'm not totally sure on how to avoid them but I warm side B up to 90-100° ,with a heat light bulb, prior to mixing so the resin is thinner and mixes quicker, allowing me to get it under pressure quicker, without using up a lot of my working time. A couple times I've also placed a block of wood under one side of the rack to tilt it while I pour, to help air rise out, but I don't now with thin resin. With thinner resin I still get some bubbles but they are always low on the bottom plug and removed when trimming up the blank. I hope this help . Don't hesitate to reach out.
 
I don`t have that casting system , seldom cast clear , and mostly do larger items , but my approach is to determine the volume of the piece and the volume of the mould to that height . Subtracting one from the other gives the resin volume required . Add 5 or 10 % . Pour it into the mould , then push the object into the resin .
 
I occasionally have those issues. I believe the air comes from inside the brass tube, under the bottom tapered plug and along the delrin base where the clear tube fits. The thinner the resin, the less they will be. I'm not totally sure on how to avoid them but I warm side B up to 90-100° ,with a heat light bulb, prior to mixing so the resin is thinner and mixes quicker, allowing me to get it under pressure quicker, without using up a lot of my working time. A couple times I've also placed a block of wood under one side of the rack to tilt it while I pour, to help air rise out, but I don't now with thin resin. With thinner resin I still get some bubbles but they are always low on the bottom plug and removed when trimming up the blank. I hope this help . Don't hesitate to reach out.
John, when you heat Part B to thin it, does it dramatically decrease the time to get to the "gel" stage? By "gel" stage in referring to the temperature where you would pour that colors remain somewhat seperate.
 
I occasionally have those issues. I believe the air comes from inside the brass tube, under the bottom tapered plug and along the delrin base where the clear tube fits. The thinner the resin, the less they will be. I'm not totally sure on how to avoid them but I warm side B up to 90-100° ,with a heat light bulb, prior to mixing so the resin is thinner and mixes quicker, allowing me to get it under pressure quicker, without using up a lot of my working time. A couple times I've also placed a block of wood under one side of the rack to tilt it while I pour, to help air rise out, but I don't now with thin resin. With thinner resin I still get some bubbles but they are always low on the bottom plug and removed when trimming up the blank. I hope this help . Don't hesitate to reach out.
Thanks! I did warm side B (saw you recommended this to someone else) but only by putting it in some warm water so not much. I think I might have been a bit messy on the pour, hopefully that was the issue. Excited to do further experimenting.
 
John, when you heat Part B to thin it, does it dramatically decrease the time to get to the "gel" stage? By "gel" stage in referring to the temperature where you would pour that colors remain somewhat seperate.
That really depends on how hot you get it. I only strive to hit that 90-100°. I stir the cup after 10 min and shoot a temp to see the progress. You'll feel how much thinner the resin is getting as you go. If you get it too how, then let cup sit for 10-15 min to allow the heat to dissipate. The temp will drop but the resin will stay thin for a while.

I wouldn't use the word "drastically". Warm resin will cure quicker because it reaches that curing temp quicker… but if the resin is thinner, it mixes quicker. So I may reduce my working time a little but I cut my mixing time in half. I also mix resin with an electric drill. I find I have more working time to pour because I don't spend as much time mixing.

When I clear cast I don't wait for any certain temp and pour the resin as soon as it's mixed. This allows me to get the resin in the mold at its thinnest state. You will probably still have to wait for your mixed resin to reach temp for color casting.
For clear casting that makes sense to pour after mixing.

My question was targeted more to color casting. I understand if you don't want to share your process. I'm not casting now, but I am trying to research and build a general idea of what to expect.
 
For clear casting that makes sense to pour after mixing.

My question was targeted more to color casting. I understand if you don't want to share your process. I'm not casting now, but I am trying to research and build a general idea of what to expect.
If you use Alumilite White, don't heat anything. The working time is less than 2 min and can be very short for the project. If needed, put side B (of Alumilite White only) in the fridge to cool it down and extend the working time.

When getting started I would suggest using Alumilite Clesr Slow Urethane resin. It has a 12 min working time. Plenty of time to mix, color and pour. You'll probably be waiting for the resin to reach temp (100° +-) to pour for color separation. You can heat side B of it up to 90-100° for easier mixing. Side A will already be thin and a lower temperature so it won't get hot and core too quickly. So some small experimental pours when you get started to get the feel for it.
 
Thanks John. That confirms everything I've found suggested to start in casting. I've been tempted to look at both PR and epoxy to cast some before getting a pressure pot. My research tells me that while possible to use these materials and pressure pot is still beneficial. I know you do personally use PR for some casting, and it gives a very best polish, it can be hard to turn (chippy). I haven't seen many casting pen stuff in epoxy, but other turning forms use it often, and not all with a pressure pot.
 
yes, I like PR for some casts, but it's a longer process and smells. I mix 2-3 drops of MEKP per ounce of resin. Some use more but the more you use the harder/ chippier the blank will be. It takes 18-20 hours to cure and will be sticky on the surface for a day or so. That's just its quality that allows you to do multi pours over itself. I still wouldn't pour it too thick and even though it doesn't require a pressure pot, I always use one as a precaution to help eliminate air bubbles. I feel it's better to be safe than sorry.
 
Nail polish is a no-go. It doesn't protect the tobacco. I have several more experiments in multiple stages of development right now but so far, believe it or not, Mod Podge is the only thing protecting the tobacco.
The problem is that it leave shiny spots where it built up a bit thicker. Next up to cast is a water thinned version of mod podge, as well as liquid polyethylene coated and liquid shellac coated.
The poly is already out of the lineup but I'm casting it anyway to see if maybe spray poly will be promising, but otherwise it's already distortion the tobacco. Shellac one looks ok.

These first two are Mod Podge on top of nail polish. Close but not there yet. Also a random label cast to prove I usually know what I'm doing. Then the "next up" rack and a few other failed attempts with nail polish and CA. Also also, those are my fiancée's hands in some of those, I don't paint my nails. Not for free anyway. 😂
IMG_6203.jpeg
IMG_6205.jpeg
IMG_6204.jpeg
IMG_6191.jpeg
IMG_6175.jpeg
 
Back
Top Bottom