Please help me with my sanding/finishing skills

Signed-In Members Don't See This Ad
Chris,
I remember my first acrylic blank. I sanded the same as a wood blank up to 600 grit. I was very disappointed with the result. But then I was introduced to Micromesh. What a difference. I start sanding with a good quality sandpaper. I use Mirka, expensive but well worth it, sanding up to 600 grit. I then switch to Micromesh. Micromesh starts at 1500 and goes all the way to 12000. After the last grit I apply a coat of hut ultra gloss. What a difference. I hope there is something here you can use and can't wait to see your finished blanks.

Seven
 
Signed-In Members Don't See This Ad
For "acrylics" I start at 400 or 600 with Abranet mesh, then go to micro mesh 1500-12000.
I only wet sand, no dry sanding on plastics.

I turn, sand & polish all at the same speed - about 2200-2500. I use carbide tools & as I get close to final size, I cant the blade about 30 deg & take extremely light cuts. If I do that part right, I can sometimes start sanding at 1500 or 1800.
 
My first "acrylic" blanks were inlace acrylester. Glad I was wearing a face shield for the first blank. But once I learned how to turn them, I was very disappointed when I started turning other cast blanks. Didn't know what happened but couldn't get that same shine and sparkle. Finally figured it out. Have yet to turn a hybrid so I am listening.


Sent from my iPhone using Penturners.org mobile app
 
Lots of info being thrown around here and some I am shaking my head at like the starting with 80 grit paper and 150 grit paper. Man if any pen needs to start at those grits there is a problem with turning techniques to begin with. Unless you are using the sandpaper to turn the blank down and no other turning tools should be no need to start that rough of a grit. I don't sand flat work with 80 grit paper.

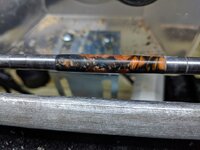
I have a question after looking at the links provided what are we looking at?? Is that a wood with blue acrylic segmented in there?? Is that a spiral design or just biased cut segments?? That will have a different effect on what you can do and what you should do.

Chris the last photo you shown that you said you are getting better is showing me another problem developing and that is contamination of the blue in the wood grain. Is this on purpose?? I am not getting this blank. People are giving you answers to something totally different than what you are showing. We need to take a step back here.

Here is an example of acrylic and wood being used together. No way was I sanding and polishing the acrylic and then sealing and CA the wood and then polish out again.

Howdy,

That is a standard wood pen blank that I drilled the middle of, spiral cut on the lathe and then cut in 2 segments and filled with GREEN resin(lol). The contamination was not intentional but it was more of an experiment so I just decided to finish. It was cast with a slim line tube in mold if that makes a difference.

Thanks

OK Chris so this is basically a hybrid. The thing is you have mixed 2 materials and they are treated differently when finishing or they can be. As you sand the blue acrylic you are now contaminating the deep grain of the wood used, as you can see from your photos. It is going to be a bear to get that blue dust out of that grain because now if you use a wire brush you again will add scratches to the acrylic. You can sand the blank and get most scratches out of the acrylic which you seemed to do but as I mentioned you created another problem. But also there is a second problem and not sure if you are noticing it yet. But with the 2 different materials they sand at different rates. In other words the acrylic can be harder than the soft wood. This leaves ridges next to the acrylic. As you sand the wood it pulls sanding wood dust onto the acrylic this can cause the scratches you are seeing. Will explain below haw to combat this.

I will say this again with all sincerity and I showed you one of my examples, that the answer to your problem is not sanding but doing the tool work needed to get a finished look without tool marks or sanding scratches and the best tool that I know of is a skew. People here can scoff at this but it is the most important tool in the turning bag of tricks. Along came carbide tools and they too can now do the same and get you the finish you are after. You eliminate the sanding dust in the wood and the scratches in the acrylic.

Now if you do not want to listen to me and that is fine at least I will give you another alternative that may help somewhat. You need to take another layer off the blank and from the view of the profile you have plenty to work with. Do not worry about taking too much off the very ends because you can always build that up. After you get the blank back down to pristine looking (even if it has scratches in the acrylic) you now need to seal the wood. This is best done with thin CA. A few coats will do for now but maybe needed to reapply after you start sanding. You want to keep the grain solid so that it easier to clean out later by either air or just a wipe down.

Now when you go to sand do not sand with the sandpaper in your fingers. Wrap it around a block of wood so that the sandpaper is flat at all times in relation to the blank. I know you have many round curves but make the block small enough to accommodate the curves. Start with no less than 400 grit paper and as mentioned above paper quality does matter. Poor quality paper the micro particles break off and become trapped under the paper. Good quality paper the particles break but a sharp edge on the sanding particles is always there. keep watching the wood portion and if you see the grain filling make sure you can wipe off the dust or blow it off. If it gets to the point you can not you need to add more thin CA. Try to get the acrylic to no scratch stage as quick as you can with the least amount of sanding.

Then top coat with your normal finish technique. I like 2 to 3 coats thin and then 3 coats med. Now you are at the point where the entire blank is equal and you get scratches out as normal.

There is alot more work to a blank like this tha a full acrylic or full wood blank.Until you get comfortable with tools and your technique improves you will go through this.

This is my opinion and I have shared my knowledge as to the work around. Others can have different methods so do what you may with this. Hopefully there is something in here that can help you. good luck.
 
ALL of what JohnT wrote is very noteworthy. And this warrants repeating, if you don't mind John:
"the answer to your problem is not sanding but doing the tool work needed to get a finished look without tool marks or sanding scratches and the best tool that I know of is a skew. People here can scoff at this but it is the most important tool in the turning bag of tricks. Along came carbide tools and they too can now do the same and get you the finish you are after. You eliminate the sanding dust in the wood and the scratches in the acrylic.

It seems like many people cannot fathom that the tool can smooth wood better than sandpaper, but it can. AND do it without contaminating segmented sections of different kinds or colors.

I learned the technique that John mentioned quite by accident some years ago when I needed to smooth a segmented blank that had silver solder pieces in the wood. Sandpaper smeared the solder like it was pencil lead. I decided to see how sharp I could get my HSS scraper tool (before carbide inserts came along). When I turned the blank with silver solder dots in it, - it came out perfect, Very smooth, not needing ANY sanding and ready for a finish to be applied.

Turned but not sanded:
http://www.penturners.org/photos/images/940/1_3wd_4seg.jpg

Finished; Finish was sanded with MM but the blank was not touched with sandpaper.
IAP Home - Photos - 30 Pieces of Silver

The wood/metal blank was a product of the tool, not sandpaper.

One more suggestion, and I often say this to those trying to achieve something new: Practice, practice practice. Don't try to make a pen, try to perfect a certain aspect until it can be repeated with confidence, then move on to another part. Then you will be proud of the pens you make. I had trouble getting a good CA finish consistently. One day about 2 months after starting, I got some cheap pine 2x4 cut off and made about a dozen blanks. I didn't try to make a pen, but focused on turning to size and then finishing. I spent several hours just finishing. Even after that I still learned much more but i learned the basics and how to repeat it. Best practice I ever did.

Thanks again for the help guys. I spent all night tonight just playing with my skews. I tried a few pieces of scrap wood and tried for the smoothest finish I could get. After that I grabbed one half of a blank that I blew out the other end of and just kept messing it up and making it smooth again. Think I did pretty good all things considered. This is how it looked when I was done with it. Keep in mid I was only trying for a smooth finish and didn't care about shaping or any other aspect.
 

Attachments

  • MVIMG_20180327_223309.jpg
    MVIMG_20180327_223309.jpg
    217 KB · Views: 177
Last edited:
To get a 40X Loupe scratch free finish I sand radially then laterally with 400 grit only. Clean with a tack cloth. Buff radially then laterally with Oil Free Ultra Fine Steel Wool. Clean with tack cloth. Polish with Hut Ultra Gloss.
 

Attachments

  • #1E - Bloodwood, Wenge, Ash and Oak Cast in Polyester Resin.jpg
    #1E - Bloodwood, Wenge, Ash and Oak Cast in Polyester Resin.jpg
    415.4 KB · Views: 155
ALL of what JohnT wrote is very noteworthy. And this warrants repeating, if you don't mind John:
"the answer to your problem is not sanding but doing the tool work needed to get a finished look without tool marks or sanding scratches and the best tool that I know of is a skew. People here can scoff at this but it is the most important tool in the turning bag of tricks. Along came carbide tools and they too can now do the same and get you the finish you are after. You eliminate the sanding dust in the wood and the scratches in the acrylic.

It seems like many people cannot fathom that the tool can smooth wood better than sandpaper, but it can. AND do it without contaminating segmented sections of different kinds or colors.

I learned the technique that John mentioned quite by accident some years ago when I needed to smooth a segmented blank that had silver solder pieces in the wood. Sandpaper smeared the solder like it was pencil lead. I decided to see how sharp I could get my HSS scraper tool (before carbide inserts came along). When I turned the blank with silver solder dots in it, - it came out perfect, Very smooth, not needing ANY sanding and ready for a finish to be applied.

Turned but not sanded:
http://www.penturners.org/photos/images/940/1_3wd_4seg.jpg

Finished; Finish was sanded with MM but the blank was not touched with sandpaper.
IAP Home - Photos - 30 Pieces of Silver

The wood/metal blank was a product of the tool, not sandpaper.

One more suggestion, and I often say this to those trying to achieve something new: Practice, practice practice. Don't try to make a pen, try to perfect a certain aspect until it can be repeated with confidence, then move on to another part. Then you will be proud of the pens you make. I had trouble getting a good CA finish consistently. One day about 2 months after starting, I got some cheap pine 2x4 cut off and made about a dozen blanks. I didn't try to make a pen, but focused on turning to size and then finishing. I spent several hours just finishing. Even after that I still learned much more but i learned the basics and how to repeat it. Best practice I ever did.

Thanks again for the help guys. I spent all night tonight just playing with my skews. I tried a few pieces of scrap wood and tried for the smoothest finish I could get. After that I grabbed one half of a blank that I blew out the other end of and just kept messing it up and making it smooth again. Think I did pretty good all things considered. This is how it looked when I was done with it. Keep in mid I was only trying for a smooth finish and didn't care about shaping or any other aspect.

Without a doubt using the skew will give you the best finish, however learning how to use the skew correctly can be a challenge to get super smooth cuts.
Check out the master of the Skew ,Alan Lacer who has several you tube item to review from use ,to how to sharpen.
I can tell you if you can master the skew most of your finish problems will be gone.

cheers
Charlie
 
Sorry but what Charlie is saying is just so true. It is really not that hard. We practice to become perfect in all aspects of making a pen so why not do the same with the very tool that can make us better in those other aspects too. Good luck and happy turning.
 
I have only been turning for about a year. Watched another turner sand every other grit the pen length wise while turning the spindle by hand to remove the scratches. He also told me to not apply as much pressure on the higher grit. This method seems to take care of those little lines for me.
 
Back
Top Bottom