Todd in PA
Member
A few people commented that I "catch" the light just perfect in my pen photos, and I'm humbled to receive such bits of praise. I said I would share my setup, and it's finally been warm enough to take some photos. This is a trick. And an easy one. I will share it with those of you who want your pictures to look like just like this with very low effort. I promise.

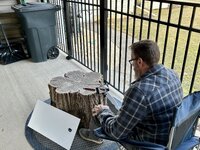
Here is my setup.

Not fancy or complicated. I'm in the carport where I get good full-spectrum outside light, but no direct sun. A log. iPhone. Tripod. The tripod came with a bluetooth clicker (that's kinda important). 2 pieces of white Correx.

Now I pick up one of the pieced of Correx and block the light coming from behind the pen. Then I grab the other piece of Correx and reflect the light onto the shade-side of the pen facing the camera. I move that board around until I get the reflection I like. I'm not catching a good reflection by accident. This is the trick!! The clean white rectangle of light on the pen is the clean white rectangle in my hand. It's literally that straightforward. Here's what it looks like when I snapped the photo above.

I taped the bluetooth clicker to the back of the Correx so I can hold the reflectors and click the shutter at the same time.

POST PRODUCTION is done right on my iPhone. For these photos, I went into edit mode then tap the magic wand to get some general levels. Then I usually usually bump up the Brilliance (+40), reduce the highlights (-20), decrease Shadows (+25), increase black point (+18), and then Vignette 100%. I would be embarrassed to hear a real photographer's opinion of these levels, but that's what looks good to my eye. Here's the rest of my photo shoot.


Happy shooting! I'm looking forward to seeing your photos after reading!
Here is my setup.
Not fancy or complicated. I'm in the carport where I get good full-spectrum outside light, but no direct sun. A log. iPhone. Tripod. The tripod came with a bluetooth clicker (that's kinda important). 2 pieces of white Correx.
Now I pick up one of the pieced of Correx and block the light coming from behind the pen. Then I grab the other piece of Correx and reflect the light onto the shade-side of the pen facing the camera. I move that board around until I get the reflection I like. I'm not catching a good reflection by accident. This is the trick!! The clean white rectangle of light on the pen is the clean white rectangle in my hand. It's literally that straightforward. Here's what it looks like when I snapped the photo above.
I taped the bluetooth clicker to the back of the Correx so I can hold the reflectors and click the shutter at the same time.
POST PRODUCTION is done right on my iPhone. For these photos, I went into edit mode then tap the magic wand to get some general levels. Then I usually usually bump up the Brilliance (+40), reduce the highlights (-20), decrease Shadows (+25), increase black point (+18), and then Vignette 100%. I would be embarrassed to hear a real photographer's opinion of these levels, but that's what looks good to my eye. Here's the rest of my photo shoot.
Happy shooting! I'm looking forward to seeing your photos after reading!

