New Stick Fast Polishing system

Signed-In Members Don't See This Ad

gingerwood

Member
Joined
Jun 10, 2009
Messages
198
Location
Bloomington, MN
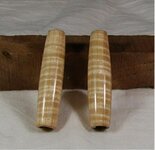
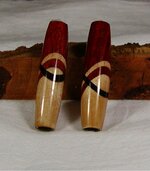
I just recieved the new stickfast polishing system last week and tried it out for the first time over the weekend, I must say that I was disappointed. I needed to micromesh through the last 4 grits and hit it with plastic polish to get an acceptable shine.

I have to wonder if the weather has anything to do with it. The video warned against generating too much heat, but I'm wondering if I wasn't generating enough. It seems like most of the people using/demoing the product were in the south, up there here temps this weekend where in the upper 50s to the mid 60s. I did get a better result when I sped up my lathe and applied more pressure.

On the plus side, my blanks wern't glued fast to my bushings when I was done. (I've got a dead center on order). Obviously this calls for more experimentation. I just hope the weather cooperates. The end of my turning season is in sight :(
 
Signed-In Members Don't See This Ad
Mickie, sorry to hear that. So far I've received rave reviews, but that being said sometimes thing just don't work out for some reason. Please let me know if the next time you try it you get the same results and I will refund your purchase price including shipping.

John at TMI sent me this note last Friday on a problem some have had but that doesn't seem to be what your experiencing. As this is a new product I invite all who are using it to PM me with any problems and we will do our very best to find the answer to the problem and my policy is to fully refund if we can't.
Mods I just didn't know of any other way to answer this so if you think it's improper I fully understand.
This is a copy of the e-mail I received from TMI:
A issue that some new pen turners are having with the finishing system. If they do not final sand the CA Finish smooth and leave pockets because of the wood grain the Satin Polish will stay in those pockets and look like white specks… the answer is to just re-sand until the white specks are gone, put another CA Finish coat on if necessary, then sand and polish again. If the pocket is substantial, CA Wood Finish Medium just that location until full – activator between layers.
 
Did you watch the video Roy has on his site about the stick fast system?
I've always used higher speeds on ca finishes and I had always struggled with getting a good shine. The stick fast has totally changed my mind on ca.
Slower speeds, smooth the ca out before the spritz of activator, repeat.
400 abranet, then polish slowly. I think I remember something about excess heat turning the ca back to a liquid and coming off on the polishing paper towel, maybe that is happening? Or you aren't getting a smooth application?

Anyhow, sorta related, my activator malfunctioned and wouldn't spray.
Roy had a new one sitting one my nightstand less than 48 hours later. Wow.

Watch the video and give it another try.
 
Sorry for your problems, Mickie.

The new Stick Fast system has become my favorite finish. As Roy's post suggests, it is very important to sand the CA finished wood blank with 400 grit sand paper and make sure to cross sand (with the lathe off) with dry 400 grit paper until you can feel no ridges.

I know, I know. Dry sanding a finished CA wood blank with 400 goes against everything i was ever taught about CA finishes. But the "demo" method works flawlessly for me.....EVEN ON MY NEMISIS, cocobolo!

I hope this helps.
 
My biggest problem with the new system is related not as much to the product as to my inability to sand properly. I keen sanding through the layers with the 400 abranet. On the video he sands off what looks to be a fair amount, but even using thick coats I keep finding a way to hit wood before I remove the all the shine. Next time I will try 600 grit abranet until I can get a feel for when to stop.
 
And...as David's post says, I have much better success with application speeds of 500-800 RPMs. Exactly the opposite (higher speeds) that worked well for conventional CA finishes.
 
My experience is that the system can work, but not using the instructions provided. In addition, the special CA worked no better than the CA I already had. While I doubt very much if its a factor, the accelerator I used was from Mannie, not what ships with the system.

Here's what I tried.I first used the system as instructed, sanding to 400 grit using Abranet, then the satin and gloss compounds. I got a great shine, but holding the barrel up to the light I could still see evidence of sanding marks. I should note that I made sure to polish for a longer time than the guy in the video just to make sure I was not shortchanging that step.

Re-sanded with 400 grit Abranet, cross sand with 400 grit Abranet, re polish with satin and gloss compounds. Got better results than the first trial, but some sanding marks were still there

Ran the same two tests using CA from Mannie. Got pretty much the same finishing results.


Here's what did work:
Sand with 400 grit Abranet; followed by 600 grit Abranet; then wet sand using 1000, 1500, 2000; followed my polishing with the satin then gloss compounds. This left a gloss shine with absolutely no evidence of sanding scratches...this is my definition of a mirror shine. This process worked weather I used the CA that came with the system, or Mannie's CA.


Conclusion:
You...strike that....I can get a gloss shine using this system or using regular CA, but I cannot eliminate all of the scratches left by 400 grit Abranet. I believe the abrasive size transition from 400 grit Abranet to the polish is just too high...no different than going from 100 grit sandpaper to 400 grit, skipping the grits in between. For me, the good news is that the extra sanding steps only added about 90 seconds to the finishing process.

Kudos to you guys who can stop sanding at 400 grit, your technique is a heck of a lot better than mine.

Final thoughts
Mechanical buffing does kick the already acceptable shine up a noticeable notch.

I made no attempt to compare the effectiveness of the polishing compounds to Novus or anything else. I may do that on my next batch of pens.
 
Timbo, what you are seeing sounds a lot like what I've been experiencing. Sanding it down a few more grits before polishing was going to be my next step. I see that you are also a northerner. What kind of conditions have you been working in?

I've been applying a slow speeds, I don't seem to have any problem with the polish going away on me, it's just scratchier than I get with pure ca then sanding through the grits. And the scratches were more obvious when I was polishing it as slower speeds than at higher. I'm not quite willing to give up on the product yet. I'll try again this weekend (I'm losing light as well as heat and there's not enough time to turn after dinner any more )
 
Last edited:
I did a Timberbits, Roman Harvest with DI, had much the same problem with 400 grit after polishing with the kit polishs still had sanding marks. The results were better than my normal way but still had the sanding marks. I am going to another with Amboyna and see what happens. I was fast and simpler. I need to improve my sanding technique.
 
Guy's I've sent a link of this post to John at TMI. I as most of you know don't do a lot of wood but my old CA finishes were according to some pretty good. I just a few days ago made a cholla cactus pen and used the stick fast for the first time my self.
In prepping the blank I used 300 micro mesh, the 400 then 600, Cross sanded after each. The started with my 1500 micro mes and when through all grits cross sanding after each one. This is my standard procedure.This gave me a baby' but smooth blank. Now I used the Stick Fast system as Russel had demoed on the video. The blank turned out with a glass like shine no sanding marks at all . I'm just thinking out loud but were any sanding lines still visible when y'all started your CA finishing. The reason I ask is before this system we always sanded after each coat of CA but with this system we don't.
I also will try this on a few more wood blanks, some softer than Cholla.
From what I'm reading here is that every agrees that this better than their normal way just having problems with sanding, so lets see if after the 400 grit we can take another 60 seconds and lightly wet sand with MM.
I know we each sand differently, some with more pressure some less some cross sand deeper etc.
 
Last edited:
Timbo, what you are seeing sounds a lot like what I've been experiencing. Sanding it down a few more grits before polishing was going to be my next step. I see that you are also a northerner. What kind of conditions have you been working in?

I've been applying a slow speeds, I don't seem to have any problem with the polish going away on me, it's just scratchier than I get with pure ca then sanding through the grits. And the scratches were more obvious when I was polishing it as slower speeds than at higher. I'm not quite willing to give up on the product yet. I'll try again this weekend (I'm losing light as well as heat and there's not enough time to turn after dinner any more )

Ginger - My shop is in my basement so weather is not an issue for me. Try this: Apply CA at ~800, sand at ~1200.

Supplies:

If you don't have 400 and 600 grit Abranet, get some. It's important because the grit size is very consistent, its unlikely to leave a stray deep scratch. I usually get it on Amazon.com pretty cheap.

Next, go to your local automotive store and pick up some 1000, 1500 and 2000 grit wet/dry sand paper. Cut your sanding products into strips 3/4" wide.

Get some tack cloth if you don't already have some. If you don't have a woodworking store nearby, Home Depot or Loews will have it.

Get a spray bottle for water...the kind that Windex and other spray cleaners come in. The dollar store has them.

Finishing:
Apply your CA as you normally would.

Start sanding with your 400 grit Abranet. With the lathe running lightly remove the sanding dust with the tack cloth. Stop the lathe, check very carefully for any shiny spots...especially the ends of the blank. Sand some more if you find any. Do not go to the next step until no more shiny spots are left.
Sand with 400 grit parallel to the blank with the lathe off. Don't apply a lot of pressure, and sand just enough to remove the circular scratches.

Now move to 600 grit. Sand until you remove all the scratches left by the 400 grit. Now sand parallel to the blank as before, just enough to remove the circular scratch pattern.

Now for wet sanding. Cover the lathe bed with a cloth to protect it from getting wet. Start with 1000 grit, sand just enough to remove the 600 grit scratches. Check by spraying the blank with water to remove the sanding muck, then dry with a paper towel. When you're happy with how it looks, go on to 1500, the 2000 grits. Be sure to spray clean the blank thoroughly between grits.

Now polish with the Satin, then the gloss polish. Don't let the polish dry up while polishing, use a little water to keep it wet. Rinse the blank well between the Satin and Gloss polishing steps.

I hope this works for you. Good luck.
 
Having used the system for about 6 pens, I'm pretty pleased overall. My first attempt had to be reworked, as I applied too much pressure while sanding the CA to prep for polish. Since then I have been using a lighter touch and all have turned out well.

One thing I've done differently since observing Russell do a closed end pen demo at our latest IAP meeting, to which he applied the Stick-Fast finish, is to sand beyond the 400 grit. I now dry sand to 1800 grit MM. Even Russell commented that he was was now sanding to 1500 MM, which he didn't do in the demo video. I'm just taking his advice one step farther.

My only complaint --- The polish needs to come in a different type dispenser than what is presently used. All too often I had to fight to get the polish through the nozzle, and when it did come out it shot out a large amount. I'm now just removing the caps and getting a dab on the towel. Maybe it's just the small bottles, and the larger ones work better?
 
I was unaware of this thread till John @ Stickfast sent the link last night. I may be able to help since I am the one that did the video. I used the same piece of abernet that is sent with the kit, it has been well worn. That may play into the lack of sanding marks that the finish has in it. I can assure all that there is no 1 way to apply the finish that is right. This discussion has been tried with no real winner. The wrong way is when it gives us a problem. If you sand through the finish DON'T sand back to the bare wood unless you have polish in the grain. Just simply apply more ca over the entire blank and refinish like normal. If I can help in ANY way I am happy to do so. I have tried several different methods for applying the finish and the method in the video is the easiest. It will not hurt to sand farther than 400 grit. I have sanded all the way up to 12K mm and there is no real difference than the video has shown. I have not been paid to do the video and I am just trying to show how simple this finish can be. I am talking to John about doing a more detailed video and we will try to get one out as soon as our schedules permit. If you have questions PM me and I will do my best to help. Russell
 
Russell, Thanks!!!!!!!!!!!


I was unaware of this thread till John @ Stickfast sent the link last night. I may be able to help since I am the one that did the video. I used the same piece of abernet that is sent with the kit, it has been well worn. That may play into the lack of sanding marks that the finish has in it. I can assure all that there is no 1 way to apply the finish that is right. This discussion has been tried with no real winner. The wrong way is when it gives us a problem. If you sand through the finish DON'T sand back to the bare wood unless you have polish in the grain. Just simply apply more ca over the entire blank and refinish like normal. If I can help in ANY way I am happy to do so. I have tried several different methods for applying the finish and the method in the video is the easiest. It will not hurt to sand farther than 400 grit. I have sanded all the way up to 12K mm and there is no real difference than the video has shown. I have not been paid to do the video and I am just trying to show how simple this finish can be. I am talking to John about doing a more detailed video and we will try to get one out as soon as our schedules permit. If you have questions PM me and I will do my best to help. Russell
 
Apples to Apples compare.

I decided to do a little experiment and did two tubes in maple.

One was my old ca technique (BLO, 1 coat thin, 7 coats med, sand through all the grits, hit it with huts polish)

The second was the new system, but with extra sanding (BLO, 1 coat thin, 5 coats med, 400, 600 & the first two pads of micromesh (wet), then the polishes).

I think that the extra sanding made all the difference (unless it was the fact that it was 75 degrees instead of 60), the straight CA might be *slightly* better, but that might just be the extra two coats and I don't see any scratching like there was before.

The one on the right is CA, the left the new stickfast system
 

Attachments

  • apples to apples.jpg
    apples to apples.jpg
    41.8 KB · Views: 262
Last edited:
Try Dry Sanding!

I decided to do a little experiment and did two tubes in maple.

One was my old ca technique (BLO, 1 coat thin, 7 coats med, sand through all the grits, hit it with huts polish)

The second was the new system, but with extra sanding (BLO, 1 coat thin, 5 coats med, 400, 600 & the first two pads of micromesh (wet), then the polishes).

I think that the extra sanding made all the difference (unless it was the fact that it was 75 degrees instead of 60), the straight CA might be *slightly* better, but that might just be the extra two coats and I don't see any scratching like there was before.


Mickie:
If you are "up" to one more test, humor me and repeat your second test EXACTLY, EXCEPT DO NOT USE WATER with the 400, 600 or the two MM pads.

I've tried every way I could think of to mess up the finish. The only times that I got results that dropped to the level of regular CA was when I wet sanded.

My THEORY is that the abrasive polish needs a little "tooth or grit" to be effective. Wet sanding produces a "slurry". I get MUCH better results by dry sanding.

Respectfully submitted.
The one on the right is CA, the left the new stickfast system
 
Other that dry sanding, the only two things that I do differently with Stick fast are:

1. Omit BLO (but I never used it , anyway)
2. I use 2 coats of the thin CA. In order for the Stick Fast to produce stunning results, THE FINISH MUST BE COMPLETELY "FLAT". The two thin coats makes it easier for me to flatten out the finish, without dry sanding through the finish.
 
Ok Andy, I'll see if I can try your technique tomorrow. I've got two more tubes that have been turned, but not finished. They are laminates that have bloodwood in them, so I won't be using BLO anyway (I just used it on the maple because I like what it does to the color).

How many coats of the medium are you using?
 
Last edited:
Apples to Apples take 2

Ok, tonight I used Penman's technique. No BLO tonight because I don't want to turn the bloodwood orange.

Left: Usual CA technique (left a ca tag on the end) - Sand to 600, 1 coat thin, 7 coats medium, dry sand 320, 400, 600. Micromesh wet through the grits, finish with a coat of huts polish.

Right: New Stickfast: Sand to 600. 2 coats thin, 5 coats medium. Dry sand 400, 600, mm1500, mm1800, satin polish, gloss polish.

I think that the stickfast system wins tonight, you can see a couple of places on the CA where the deep ridges weren't quite sanded out. The new system goes on much more smoothly and I don't worry that I'm going to sand through trying to get the ridges out.
 

Attachments

  • apples to apples3.jpg
    apples to apples3.jpg
    80.1 KB · Views: 257
I have just started using the kit. Having leveling problems with the medium c/a.always did blo and got a smooth glass like finish but had a lot of wait time. Any suggestions on the leveling issue? Cold temps effect this process?
 
Back
Top Bottom