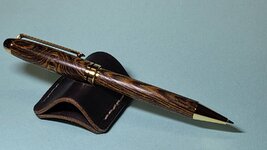
Natural Pen Finishing Help Please

Signed-In Members Don't See This Ad

d_bondi

Member
Joined
Jun 19, 2023
Messages
727
Location
Utah
Background:
  • I am working on my first kitless pen that is wood with ebonite sleeves and section.
  • The pen is constructed but has not been not finished
  • The wood is Goncalo Alves or Tigerwood
  • The barrel and cap are sanded to 800 grit
Until now, I have used CA finish almost all of the time, but with this one, wood is making me think that something more natural looking/feeling would be more appropriate. I'll probably leave the ebonite matte or satin (as you see it now) which I think may complement the more natural finish on the wood I am looking for. I like the look of the pen now, but the wood is completely unprotected.

So here is the ask... what recommendations do you all have for a finish?

Thank you in advance, and here are a few pictures...

David
 

Attachments

  • 117BDB00-4491-4F58-91CB-AFB8D746C755_1_102_o.jpeg
    117BDB00-4491-4F58-91CB-AFB8D746C755_1_102_o.jpeg
    251.6 KB · Views: 151
  • 784F12DB-EEA6-4778-B4CA-6430A5EB181C_4_5005_c.jpeg
    784F12DB-EEA6-4778-B4CA-6430A5EB181C_4_5005_c.jpeg
    49.6 KB · Views: 147
  • 21094B26-B80C-4BC5-98C5-0698503463A3_1_102_o.jpeg
    21094B26-B80C-4BC5-98C5-0698503463A3_1_102_o.jpeg
    277.2 KB · Views: 147
Signed-In Members Don't See This Ad
Beautiful, beautiful! That wood is amazing. I haven't tried it, but I wonder about friction polish. I think I've read on here that it leaves a more natural finish.

Did you fully line that with ebonite, or partially? I'm just wondering how you got that lovely slight taper. We find that a challenge when fully lining, did you step your ebonite down to get that?
 
Last edited:
Beautiful, beautiful! That wood is amazing.
Thank you Michele.

I agree, the wood is amazing and I'm sure it would look amazing with a CA finish, but I hate to cover the texture.
I'm so glad we have this amazing group to draw upon.
 
Considered a satin poly? With some thinned, real fine coats, it might maintain the look the pen has now, or closely enough. If you keep the finish thin enough, you might be able to maintain the wood texture feel to a degree as well.
 
Thank you Michele.

I agree, the wood is amazing and I'm sure it would look amazing with a CA finish, but I hate to cover the texture.
I'm so glad we have this amazing group to draw upon.
My guess is they must be partially lining the cap and body.
 
My guess is they must be partially lining the cap and body.

Yes, the sleeves are stepped. I made the sleeves from 18mm Japanese ebonite, drilled tapped, cut tenon, threaded, etc... but left full diameter, then step drilled the cap and barrel blanks. After that, I put the sleeves on the mandrels and turned them down to fit into the drilled blanks.

This is the one I didn't drill a relief hole in the ends of the sleeves and had to brute force squeeze clamp them in while the epoxy cured.

Here is a pic of them before gluing.
 

Attachments

  • IMG_1471.jpeg
    IMG_1471.jpeg
    161.5 KB · Views: 97
Last edited:
Considered a satin poly? With some thinned, real fine coats, it might maintain the look the pen has now, or closely enough. If you keep the finish thin enough, you might be able to maintain the wood texture feel to a degree as well.
That is a good idea Jon.
I think I did that with some chisel handles a while back. I'll have to look and see if it was satin or semi-gloss and look more closely at the chisel handles, I think that they were ash.
 
I preferred a few coats of wipe on poly. Just enough to close the pores, but they could still be felt and seen. I used a slow speed mandrel spinner under a heat lamp and could do second coat is 45-60 minutes. Inside of a closed box so dust would not get onto the finish. It take longer, but I liked the results. And doing segmenting, poly is a tad more flexible than CA, so less possibility of joint cracks in the future.
 

Attachments

  • 03C6CA5D-5D18-4007-8B71-659BE3E279CB_1_201_a.jpeg
    03C6CA5D-5D18-4007-8B71-659BE3E279CB_1_201_a.jpeg
    222 KB · Views: 75
I would also recommend friction polish. I have used the Semi-Gloss and Super Gloss from PSI. I usually use 3 coats of Semi-Gloss followed by three coats of Super Gloss. It results in a very nice sheen while complimenting the grain in the wood at the same time.
 
To me, when the specific wood feel of a particular pen is wanted, I would consider light coats of wipe-on poly as already mentioned. If time were not an issue, I would try 100% tung oil two or three wipe on coats daily for a week and let it cure for two or three of week, or even a month. Tung oil seals and water proofs wood finishes and makes many woods look exquisite!

I will also say that way back when (on this forum) - I experimented with CA finish and then backing down to 3600 micro mesh which gave good protection but also left a matt finish.
http://www.penturners.org/forum/showthread.php?t=32496&highlight=shine
 
You could apply a couple layers of ultra thin ca. It will seal the wood pours from holding dirt and oil but keep the texture as long as you don't fill them in. If you want it to look more satin, knock the ca shine down with some extra fine steel wool. I would avoid friction polish. It will look nice for a short while and then wear off.
 
I would spray with satin lacquer. Simple and holds up well. Coats melt into each other as opposed to poly where you need to sand between coats for better adhesion and if it dries slow will pick up dust nibs. I am a fan of Deft lacquer.
 
I have never made a kit less pen yet, but perhaps in the future. My experience with finishes is with Myland's Friction Polish which is liked by some and disliked by many.
With your pen assembled, your option to use Friction Polish is unlikely as the application is applied at higher speeds. I've had success with Myland's but took years to perfect.
I've also had success by mixing 1 part Shellac, 1 part Boiled Linseed Oil and 1 Part Methyl Hydrate (denatured Alcohol is another option but can't find it where I live)
This application is different than friction polish. I wasn't successful applying the mixture at high speeds on the lathe, but applied the mixture to the finished blank by hand on the lathe in a left to right motion back and forth motion with a folded piece of paper towel that works well and leaves a satin finish. Six coats to begin with, let it dry overnight and repeat if needed.
What I like about the recipe is that it can be applied with a pen assembled to refresh the finish.
 
Do your CA sand to a gloss then work your way back down the grits until you find the finish you like.
Yes, I do. Taking to a shine lets me know that there are no anomalies or pits or scratches, then I simply sand the shine off with the highest grit that does not shine. 4000MM, if I remember correctly will give a sheen or a hint of a shine.
 
file:///C:/Users/alan/Downloads/Achieving%20success%20with%20melamine%20as%20a%20pen%20finish.pdf

Very few members on the UK penturners forum use CA as a finish.
A popular method giving a natural feel and that is durable is melamine lacquer.
The instructions are above.
Hope this helps.
 
file:///C:/Users/alan/Downloads/Achieving%20success%20with%20melamine%20as%20a%20pen%20finish.pdf

Very few members on the UK penturners forum use CA as a finish.
A popular method giving a natural feel and that is durable is melamine lacquer.
The instructions are above.
Hope this helps.
Hello Alan and thank you.
Unfortunately the link doesn't work for me.
 
Beautiful pen! I love the wood and design. I agree it would be a shame to cover up that beautiful texture.

I haven't tried a lot of finishes, but my go to finish for that would be Pens Plus.
 
My 2 cents: perhaps you should stop sanding at 400 grit where the wood would be open to taking on a coat of finishing material. Sanding to 800 or more just closes the "pipes" and keeps the finish out! P.
 
I would likely try one of two methods that have worked for me in the past. The first is Doctor's Woodshop's Pens Plus friction polish followed by Renaissance wax and the second is Yorkshire Grit abrasive paste followed by the YG polishing paste and Hampshire Sheen microcrystaline wax (either sating or high gloss).
 
You could apply a couple layers of ultra thin ca. It will seal the wood pours from holding dirt and oil but keep the texture as long as you don't fill them in. If you want it to look more satin, knock the ca shine down with some extra fine steel wool. I would avoid friction polish. It will look nice for a short while and then wear off.
I like this idea John.

I have been using the Starbond Superfast Thin (2-3 Cps), but based on all the rave reviews of the GluBoost product here on IAP, I just ordered a GluBoost starter kit and the Ultra Thin from ExoticBlanks. I appreciate the YouTube videos.

You can probably see from the pictures I posted that the poors are pretty deep. I'm assume that the ultra thin will get down deep into the wood and pours just fine.

Do you think that after knocking down the shine with extra fine steel wool there will still be shine in the pours? This is something I would not want. Just wondering because during a typical CA finish, I know when I am done with the first grit when there are no longer any shiny spots (the valleys) in the finish.
 
Last edited:
A BIG Thank You to all of you who responded with your thoughts on this!!

It would be really interesting to turn enough blanks of the same material and give each and every one of them a try and compare the outcome. I won't kid myself, I know I'll never get around to doing that ;), BUT would be really interesting to be able to make that comparison. I do have all of the ideas listed out for future reference. I have used some of them in the past and will definitely give some of the others a try.
 
I like this idea John.

I have been using the Starbond Superfast Thin (2-3 Cps), but based on all the rave reviews of the GluBoost product here on IAP, I just ordered a GluBoost starter kit and the Ultra Thin from ExoticBlanks. I appreciate the YouTube videos.

You can probably see from the pictures I posted that the poors are pretty deep. I'm assume that the ultra thin will get down deep into the wood and pours just fine.

Do you think that after knocking down the shine with extra fine steel wool there will still be shine in the pours? This is something I would not want. Just wondering because during a typical CA finish, I know when I am done with the first grit when there are no longer any shiny spots (the valleys) in the finish.
I would think you would be fine since they are low areas in the grain that it would be hard to get them shiny in the finishing process. I would try just using the first 6 grits of micro mesh so you don't bring the finish to a high gloss.
 
I would think you would be fine since they are low areas in the grain that it would be hard to get them shiny in the finishing process. I would try just using the first 6 grits of micro mesh so you don't bring the finish to a high gloss.
Thanks John. I'll wait until I get my GluBoost from ExoticBlanks and try a couple coats of the Ultra Thin and see how that goes.
 
Afternoon,
I would as a rule considering the wood you've used, stop sanding at 240 and feel the wood, my aim being to still be able to feel the pores. Then I'd burnish the wood. After a wipe with meths, to clear the dust I'd apply the first coat of finishing oil. Which I prefer to Tung oil as it dries a lot faster, but still needs time to cure. The following day I'd use 400 paper to just 'kiss' the surface to roughen it - but only very lightly. Wipe with meths and apply the next coat of oil - repeating twice more, leaving the pen to cure overnight (longer if it's in a cold workshop) each time. Usually I end up with a matt finish (which I prefer), or if the customer wants a gloss finish I'll sand to 12000, or less depending on the level of gloss. I differ from the norm in that I don't like the 'super shiny' almost plastic sleeve finish on wooden pens, and I certainly go with the 'CA is a glue - go stick with it' camp. Yes - the finish will wear off, as will any other finish. I use one of my own pens most days and it has stood up quite well to use.
I've also used Phil's method (melamine lacquer) as well.
Chriscb
Thank you Chris, this sounds like something I would like to give a try.
I read somewhere that it takes up to 30 days to fully cure, but it sounds like from your process above that it is dry enough to handle over night.

I have a couple of questions for you.
  1. After the initial sanding what do you burnish the wood with, shavings?
  2. When you apply the finishing oil, do you do it on the lathe with the lathe running or just wipe on the stationary pieces?
  3. Do you rub it in and/or burnish it in with a rag or shop towel?
  4. If you are after just the matte finish, is there anything you do after the final coat?
It sounds like it takes patience which is definitely not my strong suit, but they say, good things come to those who wait.

Thanks,

David
 
Morning David,
1- yes, buy only from the same 'source'. Other wood shavings could end up causing scratches.
2 - always with the lathe stationary. First coat is quite liberal, any excess wiped off after a few minutes. Repeat at least 3 more times, but not using so much oil.
3 - umm.... not rubbing exactly, more like evenly spreading. I tend to use any lint free material. Dust is a real pain when using oil.
4 - after the last (fourth) coat I tend to leave the pen for two days to make sure the oil is fully cured, but clearly that would be less if the ambient temperature is high. So, after the pen has sat for a few days I'll mount the pen on the lathe, using mandrels and whilst the pen is spinning slowly, using a finger tip, feel for any dust or other other imperfections on the surface. I'd tend to sand with 3000 paper to reduce the imperfections, but neither too heavy or for too long as the matt finish will be lost.
Patience is indeed a prerequisite, and I've no doubt that others here will have 'faster' methods, but this works for me.

Chriscb
 
Background:
  • I am working on my first kitless pen that is wood with ebonite sleeves and section.
  • The pen is constructed but has not been not finished
  • The wood is Goncalo Alves or Tigerwood
  • The barrel and cap are sanded to 800 grit
Until now, I have used CA finish almost all of the time, but with this one, wood is making me think that something more natural looking/feeling would be more appropriate. I'll probably leave the ebonite matte or satin (as you see it now) which I think may complement the more natural finish on the wood I am looking for. I like the look of the pen now, but the wood is completely unprotected.

So here is the ask... what recommendations do you all have for a finish?

Thank you in advance, and here are a few pictures...

David
I saw a few comments recommending GluBoost and then knocking back the finish a bit to get what you want, and I would agree with that. But you also can go half way with another possibility by using a CA glue combined with boiled linseed oil (BLO). I have used it a bunch on wood pens that need more 'feel'. You apply by keeping a small cloth soaked with oil while you dribble the CA on the pen body and then wipe it with the oiled rag. Some others reverse that, soak the rag with BLO, wipe the wood with it and then apply CA using the same rag. The oil gives the wood better 'feel' and the CA adds durability. There is an article in the resources on techniques for this written by Fred Munday -https://content.penturners.org/library/techniques/ca-blo.pdf

Good luck- nice work!
Kevin - NJTurner
 
Morning David,
1- yes, buy only from the same 'source'. Other wood shavings could end up causing scratches.
2 - always with the lathe stationary. First coat is quite liberal, any excess wiped off after a few minutes. Repeat at least 3 more times, but not using so much oil.
3 - umm.... not rubbing exactly, more like evenly spreading. I tend to use any lint free material. Dust is a real pain when using oil.
4 - after the last (fourth) coat I tend to leave the pen for two days to make sure the oil is fully cured, but clearly that would be less if the ambient temperature is high. So, after the pen has sat for a few days I'll mount the pen on the lathe, using mandrels and whilst the pen is spinning slowly, using a finger tip, feel for any dust or other other imperfections on the surface. I'd tend to sand with 3000 paper to reduce the imperfections, but neither too heavy or for too long as the matt finish will be lost.
Patience is indeed a prerequisite, and I've no doubt that others here will have 'faster' methods, but this works for me.

Chriscb
Thanks for the additional details Chris.
I will pick up some Tung Oil and test this method, and my patience ;)
 
I saw a few comments recommending GluBoost and then knocking back the finish a bit to get what you want, and I would agree with that. But you also can go half way with another possibility by using a CA glue combined with boiled linseed oil (BLO). I have used it a bunch on wood pens that need more 'feel'. You apply by keeping a small cloth soaked with oil while you dribble the CA on the pen body and then wipe it with the oiled rag. Some others reverse that, soak the rag with BLO, wipe the wood with it and then apply CA using the same rag. The oil gives the wood better 'feel' and the CA adds durability. There is an article in the resources on techniques for this written by Fred Munday -https://content.penturners.org/library/techniques/ca-blo.pdf

Good luck- nice work!
Kevin - NJTurner
Thanks Kevin, I'll look up the article and maybe search for a YouTube video.

I have heard of this method before, but my brain struggles with the concept of CA and BLO together. We are conditioned to make sure we start finishing with an oil free surface so this one seems counterintuitive.
 
I have had good success with Doctor's Woodshop products applied according to these processes presented in this video on YouTube by the Doctor himself. I have a Padauk keychain with big open grain that I finished with it in January 2022.. Considering daily use and the abuse that keychains get for the past 2 years It still looks pretty good. It's obviously a little darker, a little less shiny, and the grain looks a little more pronounced (maybe partially due to the lighting), but all-in-all, not too bad.

Essentially the process was:
Wet sanding using Doctor's Woodshop Walnut Finishing Oil as the "wet" ingredient.
Applying 3 thin coats of Doctor's Woodshop Pens Plus friction polish.
And, Finally, applying one coat of Doctor's Woodshop Microcrystal Wax (but I used the liquid version instead of the paste wax).

Here are some pictures comparing it when it was new in January 2022 and how it looks today.

Dave

January 2022
IMG_2453 Cropped.jpg
IMG_2454 Cropped.jpg

March 2024
IMG_4234 Cropped.jpg
IMG_4235 Cropped.jpg
 
I have had good success with Doctor's Woodshop products applied according to these processes presented in this video on YouTube by the Doctor himself. I have a Padauk keychain with big open grain that I finished with it in January 2022.. Considering daily use and the abuse that keychains get for the past 2 years It still looks pretty good. It's obviously a little darker, a little less shiny, and the grain looks a little more pronounced (maybe partially due to the lighting), but all-in-all, not too bad.

Essentially the process was:
Wet sanding using Doctor's Woodshop Walnut Finishing Oil as the "wet" ingredient.
Applying 3 thin coats of Doctor's Woodshop Pens Plus friction polish.
And, Finally, applying one coat of Doctor's Woodshop Microcrystal Wax (but I used the liquid version instead of the paste wax).

Here are some pictures comparing it when it was new in January 2022 and how it looks today.

Dave

January 2022
View attachment 370347
View attachment 370348

March 2024
View attachment 370351
View attachment 370352
Thanks Dave, it is interesting how much more obvious the pours are 2+ years later. Perhaps it is the lighting. I have the Doctor's Woodshop stuff and need to give it a try.
 
Thanks Kevin, I'll look up the article and maybe search for a YouTube video.

I have heard of this method before, but my brain struggles with the concept of CA and BLO together. We are conditioned to make sure we start finishing with an oil free surface so this one seems counterintuitive.

Thanks Kevin, I'll look up the article and maybe search for a YouTube video.

I have heard of this method before, but my brain struggles with the concept of CA and BLO together. We are conditioned to make sure we start finishing with an oil free surface so this one seems counterintuitive.
Dave - I agree. It seems very strange, but it works! The BLO seems to allow the finish to soak into the wood more and the CA surfaces and hardens providing durability. I would try it on some scrap wood first to get a technique to do the application that works for you. Just give it a few days to dry before you work it farther, because the oil needs way more time to dry vs the CA.
 
Background:
  • I am working on my first kitless pen that is wood with ebonite sleeves and section.
  • The pen is constructed but has not been not finished
  • The wood is Goncalo Alves or Tigerwood
  • The barrel and cap are sanded to 800 grit
Until now, I have used CA finish almost all of the time, but with this one, wood is making me think that something more natural looking/feeling would be more appropriate. I'll probably leave the ebonite matte or satin (as you see it now) which I think may complement the more natural finish on the wood I am looking for. I like the look of the pen now, but the wood is completely unprotected.

So here is the ask... what recommendations do you all have for a finish?

Thank you in advance, and here are a few pictures...

David
David ,

Not related to your question though , what are dimensions of the wooden blank ? Do you use threaded ebonite inserts before turning or just ebonite / resin material into the wood and then thread and turn ? Kindly comment
 
David ,

Not related to your question though , what are dimensions of the wooden blank ? Do you use threaded ebonite inserts before turning or just ebonite / resin material into the wood and then thread and turn ? Kindly comment
Mohan,

The wood blank I started with was 1" x 1" x 6".
At a high level my process is:
  1. Cut and machine (drill, tap, cut tenon, thread, etc...) ebonite sleeves 18mm ebonite but leave full 18mm diameter.
  2. Cut and drill wood blanks.
  3. Using mandrels, turn machined ebonite sleeves to fit into drilled wood blanks.
  4. Make sure to drill small hole in end of sleeves so that any trapped air or excess epoxy has somewhere to go.
  5. Epoxy sleeves into wood blanks, clamp overnight.
  6. Turn cap and barrel to desired shape.
If you look up above in the thread I posted a picture in post #6. This photo is right before step 5.

Hope this helps.

David
 
Signed-In Members Don't See This Ad
I did a pen/pencil set (slimline pro with paduk blanks) about five years ago and used a friction finish on it. I use the pencil fairly frequently, and the finish is still holding up. The pencil has darkened a bit more, but it's also had a lot more exposure to light.

I just use the "odie's shine juice": equal parts boiled linseed oil, denatured alcohol and shellac. I've heard good things about the Myland's brand friction finish as well. Will probably try it next time I do a friction finish because my shellac has gone off.
 

Attachments

  • 20240528_132148.jpg
    20240528_132148.jpg
    583.2 KB · Views: 56
Back
Top Bottom