Laser Pen Kit Directions

Signed-In Members Don't See This Ad

Bob Roehrig

Member
Joined
Aug 11, 2015
Messages
25
Location
Venice, Florida
Hello All,
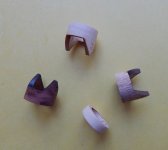
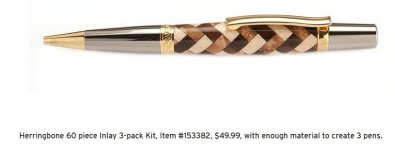
I was recently gifted a Laser cut pen kit from the wife of a recently deceased member. I have never done a pen with a Laser kit and find it a total Chinese Jig saw puzzle to say the least. I have no assembly directions and to me it's an impossibility without a set to guide me. Looking for anyone that may have a set of directions or can steer me on a possible "plan B" to get this pen assembled and turned. Here's the information I've dug up thus far. The member bought this pen kit around 2015 from Woodcraft Supply Co. The part number and description on the package reads: 20pc Herringbone Inlay Kit 3pk # 153383. I recently called Woodcraft for information and they told me they no longer carry that model but they believe was provided to them by a third party vendor named Huddleston which as far as I can see does not exist any longer either. I did find an older picture on the Woodcraft web site that I will share below to show the pen when finished and give a bit more redundant information. Thanks in advance.....beautiful pen and sure would love to know how to go about it's construction.
 

Attachments

  • Herringbone Pen.JPG
    Herringbone Pen.JPG
    23.6 KB · Views: 64
Signed-In Members Don't See This Ad
Presumably any laser cut kit would be assembled in the same manner, regardless of the pattern. Could you just use another set of instructions for clues on how to assemble yours?
 
This appears to look not like your normal laser pen. Each piece is 3D and each one different than the other. They are numbered but then again I don't even have any idea what tube size to use that will fit properly. Style of pen could also be determined if I knew the tube diameter required. If I keep digging, I'm sure something will come up to get me started. Have a few more untried ideas left to work on.
 
At first, I found this Link It made me chuckle when I saw the website.
But,
Dale Lynch assembled one back in 2013.
Here is the post from within this site
Herringbone Inlay Kit

You might DM him for some info if he is still an active member.
Wow, thank you very much for your detective work in coming up with a contact for me. I certainly hope the DM I just sent gets through. It would sure be great if he has some directions, but I do realize it was 12 years ago. I will keep trying if I get no response. Thank You Very Much!
 
These were made by Lazerlinez a company sold to McKenzie Penworks. He is a member/vendor here. Might check with them if they still have any info on the herringbone assembly. Good luck in your search.
 
These were made by Lazerlinez a company sold to McKenzie Penworks. He is a member/vendor here. Might check with them if they still have any info on the herringbone assembly. Good luck in your search.
Thank you for the timely information. Guess that's why I could not any longer find any info on Lazerlinez. Everyone is either going out of business or selling off to other company's......have to get a program to keep track nowadays.....HA. I'll check this first thing tomorrow and keep my fingers crossed. Really appreciate the heads up on this.
 
When it rains it pours. After spending some time sorting out the little laser cut pieces as per the directions that McKenzie Pen Works sent I came up with a few pieces that are not mentioned in the directions. I'm attaching them below for all to see in hopes someone will know what to do with these. I'm positive they do not belong with this kit but then again they sure look like they are possibly starting and ending points for the other laser cut pieces. They told me this was not going to be easy......HA!
 

Attachments

  • Laser Pen Parts.JPG
    Laser Pen Parts.JPG
    230.4 KB · Views: 27
Well... off the top of my head you shouldn't have two of the same numbers in any kit. My guess is that since you got it second hand you've got some pieces and parts from more than one kit in the bag...
 
Believe your absolutely correct. Someone threw these in from another kit because there is no metion of parts like this in the information you sent me yesterday. Kind of Ashamed since I'm so close on this one. There's like two little pieces missing in each of the 3 kits. You wouldn't happen to know if seperate pieces can be ordered to complete a kit like this? Would hate to throw out all of this over a couple pieces :-(
 
I'll check and see but no guarantee it would match what you have.... different woods, etc. We're not making that particular one right this minute because it requires special equipment on the laser that we've not had a chance to learn. Will look and see if there are any pieces... would need to know which ones might be missing though.
 
That would be great......Any wood color would do since with all the other colors I don't think it would stand out.
Pieces I need to complete the kits:
3 each of #19
3 each of #17
1 of #5


I'll keep my fingers crossed and really appreciate your taking the time to check on this.
 
And you're sure they're all the 20 piece Herringbone blank? Constant had something like 150+ designs at one point... many with numbered pieces :) Can't guarantee anything, but we'll eyeball the various pieces we have.
 
Hello All, still on the path of trying to get some of those missing pieces to the Laserlinez kit that I purchased 10 years ago. Tim from McKenzie was of great help and did get me the assembly directions for the kit, but so far has not been able to find the missing few pieces I need. I'm now at the point where I'm wondering that since I only need a piece or two to complete each kit, possibly I can just carve these out using my dremel and othe tools I have. I've attached a picture of what the little pieces look like for all to see. Hate to throw out some really nice kits just because there missing a piece or two. Attaching a picture of what the little pieces look like. Comments Appreciate.........Thanks
DSCN3609.JPG
 
How about assembling what you have on a tube and then filling in the missing piece with crushed turquoise, ground coffee beans, metal shavings (like from a key maker machine) or even a similar colored saw dust? This type of inlay can really look good on turned items and might be a solution rather than trying to fabricate a match by using a dremel.
 
How about assembling what you have on a tube and then filling in the missing piece with crushed turquoise, ground coffee beans, metal shavings (like from a key maker machine) or even a similar colored saw dust? This type of inlay can really look good on turned items and might be a solution rather than trying to fabricate a match by using a dremel.
Yes, good ideas and one that I've previously given some consideration to. Inlace in Turquioise also was a thought. The pieces as you see in the picture I posted don't look all that hard to make and since I only need one or two for each kit it may be do able. Probably going to keep inlay material as my plan B and first try to carve one out. I certainly make many chips with my woodturning but there just not thick enough. Thanks for the input and will definitely keep it in consideration.
 
You could ask Brian Ochoa (ochoabrian here and also found on Facebook).

He has done a lot of laser cut blank and may be able to cut the pieces you are missing. IIRC he has done some herringbone blank similar to what you are showing here.
 
You could ask Brian Ochoa (ochoabrian here and also found on Facebook).

He has done a lot of laser cut blank and may be able to cut the pieces you are missing. IIRC he has done some herringbone blank similar to what you are showing here.
Thanks Steve.....just contacted Brian and will see what he thinks or recommends......appreciate you contacting me.
 
Back
Top Bottom