Bottle stopper finishing questions.

Signed-In Members Don't See This Ad

Sev3en

Member
Joined
Nov 7, 2014
Messages
9
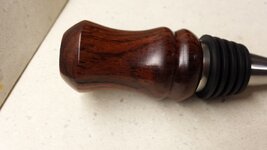
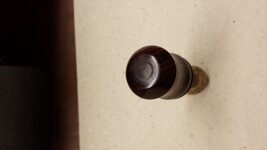
This was my first bottle stopper and I had so much fun working it out. It was made from Cocobolo.

2 things:
First is, after I parted off the top and went through my abranet grit progression (wet sanding with walnut oil) I could not get rid of the circles seen in the pic. What is the best way to finish the area that gets parted off?

Second thing, the pic shows a crack along one of the grain lines. I found this as I was finishing up the turning. I filled it with CA and sanded it down but was still visible. What if anything should I have done to improve the appearance and strength?

Cheers.
 

Attachments

  • CocoboloBottle1.jpg
    CocoboloBottle1.jpg
    101.6 KB · Views: 252
  • CocoboloBottle2.jpg
    CocoboloBottle2.jpg
    65.3 KB · Views: 245
Signed-In Members Don't See This Ad
you need to get yourself a bottle stopper mandrel or use some type of cobochon to glue up on top as long as its turned to size. The cracks in the wood become the centerpoint when you fill them with a contrasting crushed stone ( crushed turquoise ) and CA
 
AS Ethan said, if you use a stopper mandrel to hold the blank via the threaded hole in the bottom, you can easily put a smooth finish on the top.

Stopper mandrels are not expensive, and you can actually make one from a scrap of wood and a 3/8x16 bolt. Or if you have a Jacobs chuck that you can mount in your headstock, just cut the head off a bolt and mount it in the chuck. (Be sure to use a drawbar.)

In a pinch, you can power sand the top of the stopper to remove the ring, but that's not an ideal solution because you will almost inevitably leave an edge where the turned surface meets the sanded surface.

As to the crack - it's not visible in the picture. How wide is it? Is it full of CA so that the surface is truly smooth? Is it possible that you see the crack because YOU know it's there, but someone else looking at the stopper won't see it unless you point it out?

Cracks have to be filled, but there are two approaches to doing that. One is to try to make the crack disappear by filling it with something that matches the surrounding wood. Cocobolo has dark streaks - so coffee grounds (used and dried) might be a good filler. Another option is the dust that you can make by crumbling the swarf from end-grain drilling a dark wood. Epoxy is probably better for making a filler for wide cracks than CA because it is a bit less brittle and may offer longer working time when you are blending it with some kind of filler. For thin cracks, you can often get away with wet-sanding the piece using CA to create a slurry from the sanding dust - the dust/CA slurry will fill the cracks. If you simply apply CA to the cracks, it will dry as a clear plastic that may or may not reflect the color of the surrounding wood.

The other way to fill cracks is to use a filler that contrasts with the surrounding wood. Obviously, a light-colored wood filler in colobolo will stand out, but as William said, using something that results in a radically different color can add interest to the finished piece.
 
Last edited:
Hi
Couldnt the cracks be caused by too much heat geing generatd when sanding to remove circle before the wet sanding
willie


Yup - that's quite possible.

Another reason why using a mandrel to get the smoothest possible finish on the exposed surfaces of the stopper makes sense - that avoids the need for especially aggressive sanding.

Of course, the other point there is to just not sand so aggressively - slow down the lathe, don't force the abrasive into the wood, etc.
 
In my experience the best way to remove the rings is to just have the right touch with the turning tools you are using (gouge, skew, etc....). That mostly comes with practice.

In terms of getting rid of those kinds of rings with sandpaper, I have had better luck with micro mesh than the 150/240/320/400/600 grit sandpapers.
 
I do have a mandrel to turn these. The blank was just to long and so I parted off the excess.

The crack can be seen in the first pic running top to bottom of the stopper, close to the table.

I really like the idea of contrasting color in the crack. Next time I'll spend more time working on it.

Time to get practicing.

Thanks for all the advice.

Cheers
 
Back
Top Bottom