Bee Faerie Complete

Signed-In Members Don't See This Ad
See more from workinforwood

workinforwood

Member
Joined
Mar 1, 2007
Messages
8,173
Location
Eaton Rapids, Michigan, USA.
This is my intarsia project, the Bee Faerie. Designing an intarsia can be more difficult than actually making one. This design took me several weeks to draw. First I spend several weeks just thinking about what it is I am trying to accomplish. Then I take several photographs. Then I sit down and I draw the design. There is hours of forethought involved in a proper design, that we will get to shortly.

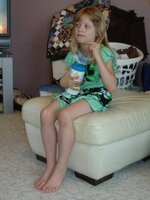
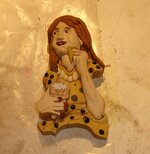
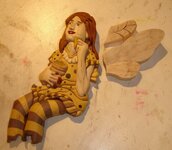
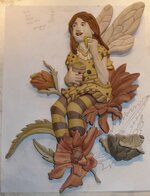
I really like to focus on people. People are the most relatable subject matter, because the viewer themselves are people. People are animate and have expressions that can change with just the slightest touch of a pencil. In picture 1, I have my idea, and I take my model and pose them into an exact position. Then I take several more photographs, especially of the face from different angles. The first photo is the design, the rest are for future shaping or carving of the design. I like to have a model because it allows me to use a ruler to keep the proportions correct. The scenery around the faerie is several more photo's from around the house, flowers and leaves and actual bee's from different directions. Possibly up to a hundred photographs to chose from.

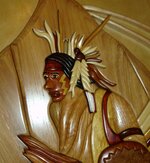
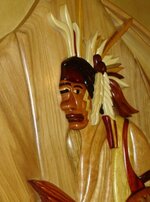
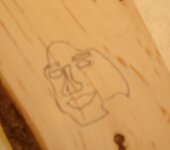
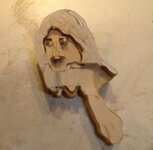
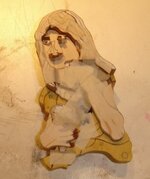
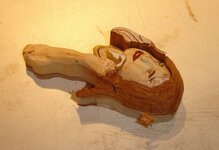
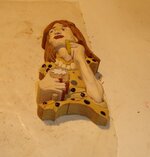
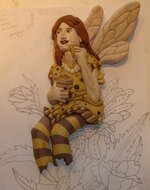
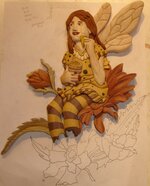
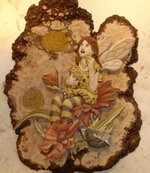
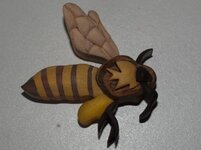
During the design process, you must see into the future. Visualize what is the highest and the lowest points in the picture. Also, you must visualize what people will see from an angle. In pictures 2 and 3, you see a very common mistake. Because so many people are afraid of faces, people tend to draw them from the side. No face should be drawn straight on, because that is not natural, but a side shot is actually more difficult to pull off than a slightly skewed head on shot. In pic 2, the face looks ok. In pic 3, you see the face from the side..oh no it looks like speed vision! Then there is an additional problem, if there is nothing beside the face, then the face can not be elevated. Elevating is when you cut a thin piece of wood close to the same size as the face and glue it below to make the face stand more proud. If there is nothing beside the face, you will see the spacer.

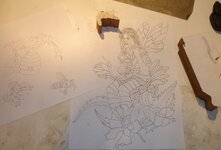
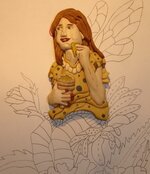
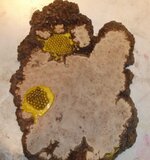
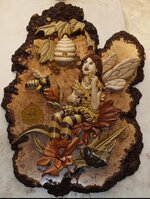
Viewing pic 4, this is the completed design. The highest elements are the face, the hand and the bee hive it is holding, the other arm and the legs. The hand is a single piece and therefore easily cut from a single thicker peice of wood. The bee hive is completely surrounded and therefore can be cut at only 3/4 thick and a spacer installed below it. The face is the most complicated and when you look at it, you will see that it is completely surrounded by hair and body. The eyes stay inside the face unlike pic 3 where the eye escapes the face. I use dash marks to signify carving profiles. Her nose is/will be actually part of the face piece, not a seperate cut. The flower pedals where she sits..those pedals cup, and the dashes represent the deepest area and direction of the cupping.

Finally, there is the size. This picture is not large. Size matters and when it comes to impressing people, small is the ticket. The faerie design is actual size only 8.5x11. There will be a bee or two and the other leaf designs you see will be placed up top sort of like a frame. The entire picture will be 500 maybe more pieces, but only in 10x18" area. Smaller pieces are more challenging to cut, and they can be a bit more challenging for shaping, but because the size is small, the overall shape is far easier to make realistic. Shaping a hand that is 12" long and 3/4" thick is far more difficult than a hand that is 1" by 3/4". You can't get the profile from the larger piece, it just won't happen unless you want the 12" hand to be 6 inches thick and that is rediculous. I am into refined artwork, not slabs of wood that are un-managable.

This picture is copyright, Jeff Powell, 2009. It is for educational study only, and for use by the copyright holder only.
 

Attachments

  • sample4.jpg
    sample4.jpg
    54.4 KB · Views: 559
  • sample6.jpg
    sample6.jpg
    90.2 KB · Views: 596
  • sample7.jpg
    sample7.jpg
    73.7 KB · Views: 432
  • sample5.jpg
    sample5.jpg
    58.7 KB · Views: 540
Last edited:
Signed-In Members Don't See This Ad
I have a couple of questions. First, how do you decide on how many pieces or different colors you want to use in the finished product? And second, why do you say that people are afraid of faces?

Thanks,

Brian
 
For colors, I have decided the main colors while thinking about the actual design. The main colors being yellow and black. For all the other colors, I dig through my wood piles, starting in the smallest scrap sections first, pulling out dozens of different colors and make my decisions based on what I have and how much I have.
People are afraid of faces because they believe they are difficult to shape. The nose in particular, which truly is the most difficult part. It all comes down to shaping, no matter how you look at it. This is why I believe most intarsia people stick with animals. An animal face is far less complex than a human face. An animal can have more pieces, more wrinkles and all that, but animal faces are far more forgiving. Human faces are refined, regardless of whether they depict a beautiful woman or a grizzly old man. Male faces can be harder to pull off than female faces too. Keep in mind as well, everything I say is my opinion on the subject at hand. It is how I feel from my personal experiences over 20 years of woodworking. My word is not the only law in town.
 
Brian, this is just a guess and my understanding if the meaning of being afraid of faces. I would edit the comment from People are afraid to "Artists are afraid" of faces. the example shows just how wrong you can go with trying to do a face if you do not think it out carefully. I know that faces even in sketching have the same sort of problems. It is more often a problem that something is over done or overdrawn in that case. How often have you heard people say "I can draw such and such, but not people" The feel, Spirit, or emotion of a figure and particularly a face is altered by very subtle details. this tends to make them difficult to do.
Sorry Jeff, I don't mean to steal your podium.
 
If you made the model in picture 1, that's your best to date. If the intarsia comes out half as nice, it will be a beauty.
 
I think something else that throws the example in pics 2 and 3 off is the angle. The angle is weird, causing the head to look too far forward. And the thick edge definately does not help. The bee faery drawing looks much better. I agree about the nearly head on angle thing.
 
tooling

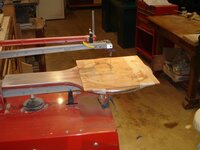
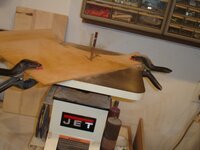
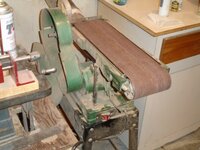
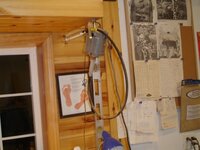
These are the 4 basic tools I use that accomplish almost everything start to finish.
1 ..obviously a scroll saw. Notice on top of the table, there is a thin piece of plywood taped to the table. This is to create a zero clearance table for cutting very small pieces. If a small piece fell through the hole, it would be lost. Also, it is unsafe to cut a small piece dangling over a large opening, just like it would be on an tool. The saw won't take a finger too quickly but it does still bite.
2 ...a spindle sander. This tool is invaluable. It also has a zero clearance top added..just plywood clamped on. There is no need to get fancy with these tools by building fancy zero clearance jigs. Jigs like these get eaten up and need to be replaced..a simply piece of plywood taped on only takes 30 seconds. The jet was my choice because it has a 1/4" spindle which is the spindle I use the most. It is used to fine tune parts together and to verify or make square, parts that have been cut on the saw. In intarsia, all cuts must be square to the table or they will not fit together. Sometimes the blade might bow in a cut..the blade is too dull, wood is too hard, user error..the spindle sander fixes the issue.
3 ..a large stationary belt sander. A table top version 1/3 hp is not going to get the job done. You need something bigger 3/4 hp or more. Machine does not have to be expensive or super quality, it just has to have some power. It is used for shaping and de-burring.
4 ...a rotary tool. Doesn't have to be fancy like mine, but a rotary tool adds big time to your shaping ability. I prefer a tool that has a small hand piece over trying to hold a bulky dremel. You can buy all kinds of bits cheap at Harbor Freight. They don't last as long..but they are cheap and disposable.
 

Attachments

  • tool1.jpg
    tool1.jpg
    60.5 KB · Views: 221
  • tool2.jpg
    tool2.jpg
    52.5 KB · Views: 204
  • tool3.jpg
    tool3.jpg
    67.8 KB · Views: 188
  • tool4.jpg
    tool4.jpg
    61.2 KB · Views: 212
Tune up

Before you do anything, your saw has to be tuned. It's too simple. Take a piece of wood and plunge a cut straight into it. Flip the wood over and make another cut about 1/8 beside the first cut. Now measure the distance between the cuts at the top and at the bottom. If the distances are the same no matter where you measure, then the saw is square. Using an actual squaring tool is not accurate on a scroll saw. On a scroll saw you have two variables that defeat the measuring device. You have teeth on a blade that are offset to one side, and you have user habit. The teeth being offset causes the blade to push more to one side than the other. The user is stronger in one arm over the other and thus has a tendency to push a certain way when he cuts. Therefore, the blade might measure off by a degree but cut perfectly square every time.

Proper cutting techniques take practice. Let the blade cut the wood rather than forcing the wood through the blade. Turning involves turning the wood, not the blade. You must rotate like you are spinning a compass. Let the speed run medium to medium low, not fast. Too fast causes heat build up, burning, fast dulling of blade, loss of control of cut. I turn mine way down and it thumps thumps thumps like a Harley idling..then I slowly work up the dial until the thumping and vibrating stop and that's where I stop. For my machine, that's about 35% on the dial. Tension is your final tune up. You push on the front of the blade with your finger. You should not be able to push beyond 1/8" back without using a heck of a lot of force. A flimsy blade is going to bow while cutting and then break. I very rarely ever break a blade. Generally I am just tossing dull ones away. Blades break from low tension, too much speed and incorrect cutting techniques.
Blade selection. Always use the biggest blade you can reasonably get away with for the job. Just because they make an 8/0 blade, doesn't mean you need it. All my intarsia is cut with a #9 skip tooth blade. My pen scrolling is cut with a #5 skip blade. These are the blades I am most comfortable with.
 

Attachments

  • tuneing.jpg
    tuneing.jpg
    29.5 KB · Views: 191
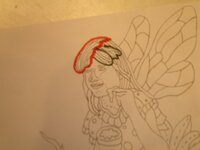
I always tell people, Intarsia is like Chess. You have to organize yourself and plan several steps ahead. My personal preference is to sectionalize things into more manageable groups. I like to begin with the most complicated section first. I like to plan my cuts into groups whenever possible. The face is usually the most difficult task. I cut out the eyes, eyebrows and mouth first. The eyes are three pieces and they are glued together. Eyes are always smooth and flush, so they can be glued together and shaped later as a single piece. All the pieces around the face should then be cut out. If you have done intarsia before, you know that saw kerf is a constant problem. Pieces being cut lose a fractional amount due to kerf which can throw everything off size at best. In the first picture, I have cirlcled three groups of hair. Each circled area will be cut as a group. Because they are cut as a group, they will fit back together perfectly, but the outer diameter will be smaller. To make up for this, I extend the outside line a bit, altering the pattern slightly as I trace it so that when it is cut out and re-assembled, the shrunken size is similar to the pattern size.
Each time you cut a piece or group of pieces, remove the burrs off the bottom and then tape the peices together. Tape must not be into an area where another piece will be fitted though. Useing the drum sander, test all the edges to be sure they are still square. If the ends of a group of pieces are to be flush with one another, simply flush them together with the drum sander.
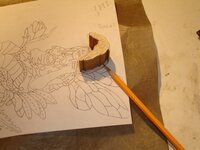
pic 2. This is the sytem I use. Trace and match. You cut out a piece. You place the tracing paper and pattern back onto the wood of choice. You place the already cut piece/s on to the pattern. You trace against the existing part and then the new lines that complete the part. Tracing gives you a better fit and allows you to manipulate the pattern slightly just in case you start to go off base. Perhaps you missed the line on the last part and cut in or out too much..tracing and matching along with a slight artistic liscense repairs the problem.
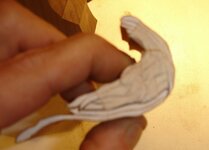
pic 3 is how a group should fit together. They are nice and tight. A hair line gap here and there is ok and will be completely unseen in the completed project. Don't expect every single piece to be seemless, just real close is the goal. If there is a slightly larger gap than wanted, simply use the drum sander to fine tune the fit.
 

Attachments

  • sample8.jpg
    sample8.jpg
    28.9 KB · Views: 171
  • sample9.jpg
    sample9.jpg
    55 KB · Views: 168
  • sample10.jpg
    sample10.jpg
    57 KB · Views: 187
This is inlaying the face. All of the outside pieces have been cut. You fit the face to go into the piece rather than trying to fit all the pieces to the face. This is the most critical time. The pattern and tracing paper are secured to the wood because they MUST NOT MOVE. If they move, you have to start all over with the face again. The nose is not a separate piece, but is still traced on. Have plenty of sharp pencils ready. The inside face parts are traced..place them on the pattern in the right locations and trace them through. Then place the taped up mass of parts over the pattern and trace it into place. Remove the pattern and darken up the lines by re-tracing everything again but this time right on the wood. The lines are dark enough on the wood from the tracing paper to know where to position the existing parts, but you want the lines nice and dark, crisp and you are verifying that no shifting occurred. Cut out the inside holes first. You stay inside the lines, removing just a teeny amount of line as you cut. You cut the inside parts first and fit them before you cut out the entire face. This is because if you mess up the fit of an inside part, you can start over having completed less work. The parts should fit tight but not so tight you have to hammer them in. If will push in fine but only go halfway down the hole and then get stuck..well that means the hole isn't square inside. That is no problem. The parts don't have to go all the way through the hole and they are still usable. I'd just call that a taper fit and be happy. The part will be shaped not as thick is all, and will still glue in the hole fine. Nobody can see the back of the picture when it is done.

What side of the line to cut? The proverbial question.... Well, I can't speak for all styles, only for my own. With trace and match, what side of the line depends on how the part is traced. Imagine a solid circle. You trace the circle on to a piece of wood. You want to cut the wood so the circle goes tight into the hole. You cut inside the line..barely removing any line as you cut. This is because the pencil rides on the outside of the circle and the lead leaves a line like a kerf. If you cut the entire line away, the hole is too big.
Ok..but now you have a piece of wood with a circle cut out of it and you want to cut a new circle to put in the hole. You trace the hole, you cut away the entire pencil line. This is because the pencil kerf is inside the part.
 

Attachments

  • sample11.jpg
    sample11.jpg
    73.1 KB · Views: 144
  • sample12.jpg
    sample12.jpg
    22.4 KB · Views: 123
  • sample13.jpg
    sample13.jpg
    44.7 KB · Views: 159
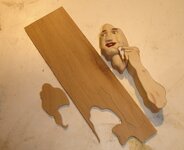
After cutting out the face, I went back to the body and completed cutting most of the body pieces down to the bottom frills of the dress. I did not cut the frills. The frills will be cut and matched after the main piece is shaped, sanded and assembled. The idea is to capture the main shape of the faerie without having too many extra pieces laying around, which can become more confusing. A puzzle is easiest assembled when it contains less pieces, and intarsia is basically a puzzle. I always try and make my intarsia in groups. So I make the face and body, then I'll work on the legs, the wings will be a seperate group, and each flower will become a seperate group. The leaves will be cut last to fill in the missing blanks. This is all about organization and forethought. You have to decide how many pieces are the minimum required to cut and shape a section.

She looks odd like this...but hey, the best part comes next!
 

Attachments

  • sample14.jpg
    sample14.jpg
    58.3 KB · Views: 151
Shaping

I love this part, and I'm not kidding. Shaping is how you bring the intarsia to life. You can make a flat intarsia and round the edges and technically it is an intarsia, but it won't maintain it's visual interest for long...too boring. Intarsia requires tons of sanding. I love this part. I sit back in my chair, turn on the Discovery channel and start sanding away...hand sanding. I try and hold the pieces with a clothespin clamp whenever possible, so as not to fatigue my fingers.
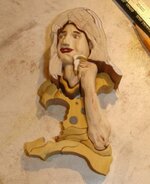
Anyhow...shaping begins with the face. Everything will revolve around that. Using a large agressive cone<tapered carbide point bit otherwise known as a typhoon bit>, the face angles are cut. The face angles hard to the right, almost flat where the nose/mouth area is and then hard to the left. The nose area is not cut.
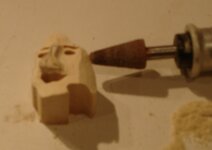
The bit is changed to a smaller tapered carbide point bit, and the features are roughed in. Begin by gouging out the cheek and then the eyes. The eyes will be deeper than the cheek. Then rough out the chin. Finally, bring the arch of the nose down flush with the forehead.
The bit is now changed again to an even smaller smoother bit, a flame shaped aluminum oxide stone bit. This bit is used to refine the shape and remove the cut marks of the typhoon bit.
Finally I use a very small round carbide cutter to shape the nose features, undercut the nostril and the nostril holes. From here, the face is sanded by hand to smooth it out.

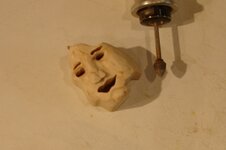
Add the mouth, eyes, neck and eyebrows into the mix. For example. Take the mouth and stick it in the hole. Use a sharp pencil and trace the profile off the face on to the side of the mouth. With the big belt sander, grind the mouth almost to the lines but not quite. Using the spindle sander, put a very small taper on all the sharp edges. Do a dry test run to check how it looks. If you are pleased, then you simply hand sand the pieces and glue them into the hole. I use an old dull scroll saw blade as a glue applicator in the hole. It doesn't take that much glue to glue the pieces in the holes. Too much glue will squeeze out making a big mess. The neck is shaped and glued on.
 

Attachments

  • sample15.jpg
    sample15.jpg
    43.1 KB · Views: 129
  • sample16.jpg
    sample16.jpg
    43.9 KB · Views: 126
  • sample17.jpg
    sample17.jpg
    52.2 KB · Views: 116
  • sample19.jpg
    sample19.jpg
    52 KB · Views: 156
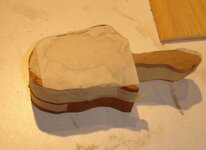
The face should be one of the highest pieces in the picture. I am using 2 spacers to jack up the image. Like I said before, I can cut thin plywood and place it below an area to raise it up, as long as there are no exposed edges. The face is completely surrounded by other pieces, thus jacking is good. I trace the face on to a piece of 1/8 plywood and cut it out inside the lines. A perfect fit is not necessary, as long as the spacer doesn't stick out beyond the sides of the head, all is good. I don't glue the spacer on yet. I install the arm and the honey. These pieces will need a single jack. I trace this group of pieces on and cut out a spacer. Now I glue the first spacer only to the back of the head. Once that is dry, I place the second spacer under the head and re-install the arm and honey..no gluing, just placing parts.
I need to know where the lowest part of the body will be. The lowest is the clothing below the arm. This is where the butt is located, so the body tapers down to that point then takes off back outwards for the legs..a typical sitting position. I decide that 3/8 is a good thickness for that area and so I use my ruler and mark that position on the side of the piece. Using my beltsander, I grind that piece into what I believe it's shape will be. A piece of tape is cut and all the clothing pieces in that general area are taped together from the bottom only. Carefully, I use a carbide cutter in my rotary tool to shape the dresses curves around the legs, the lowest part of the dress tapers in to the body, the upper part of the dress tapers down..basically developing a V shape at her midruff. Knowing basically how these peices will be shaped, I am able to transfer the thicknesses to the arm. I draw on the side of the arm to angle it up to the wrist then back towards the face. Everything is just roughed out.
This is as far as I made it today. All the body pieces will require roughing out, then they will all be hand sanded. All the edges of the pieces will be rounded over. Rounding over an edge does not mean some big dramatic roll over. I put a very small taper on the edges with my power sander or carver and then hand sand them to be smooth. It only takes a small round over to accentuate shadows. Shadows are a very important part of intarsia. Shadows hide minor flaws while at the same time bringing different shades to the natural colors of the woods chosen due to how light reflects. Just this little bit of shaping has really transformed the piece so far.
 

Attachments

  • sample20.jpg
    sample20.jpg
    77.3 KB · Views: 120
  • sample21.jpg
    sample21.jpg
    36.9 KB · Views: 151
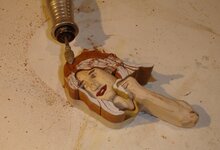
Now I'm shaping the hair. I take a big piece of tape and tape everything together from the bottom and then remove any tape from the top. I wrap a thin strip around the hair close to the bottom to help hold everything together. Using a small typhoon bit, I carve out just the general shape of how it should look. It's quite simple and basic. Common sense should say that the hair will round over the further out from the head it becomes, being that a head is round.

Having everything shaped together into roughly how it will be displayed, makes shaping the individual pieces much easier.

I was recently told by someone that his shaping was not very dramatic because the only tool he has to shape with is a Dremel and therefore I should commend him for his accomplishments. As you can see, I am not using a Dremel, I'm using a Foredom, but it's the same type of tool. A rotary carver. Most of my shaping is done with a rotary tool and then fine tuned and cleaned up with a belt sander. I suppose if I didn't have the belt sander, I would just have to start at a lower grit of sandpaper for my hand sanding, not a huge deal. No tool is going to do a faster and more versatile job than a power carver.
 

Attachments

  • sample22.jpg
    sample22.jpg
    54.8 KB · Views: 118
  • sample23.jpg
    sample23.jpg
    79.9 KB · Views: 130
  • sample24.jpg
    sample24.jpg
    65.6 KB · Views: 158
After the hair is roughed out, I now fine tune it with my belt sander. Remove all the tape, of course. I simply tune and install small sections at a time. The pieces are edge glued together. It does not require very much glue and they will hold together very well. You take a small section and you clean it up on the sander to remove the typhoon marks. check the shape by putting it where it goes..make adjustments and when it looks right, you put a quick bevel on the edges, hand sand the bevels to be round and glue them together. Then you start the next section of hair, even if it's just one or two hair pieces at a time. You can use a pencil to scribe profiles on to the sides of the pieces you are matching against to help you to not oversand. When the hair is complete..start working on the body pieces using the same basic principals.

You see here..the hair and some body pieces completed. And a shot on an angle to see the level of dimension achieved. The black stuff on her dress is inlace. The spots on her dress are simply drill holes maybe half way through the wood and filled with black inlace and now simply need to cure. They will be flawless polka dots that fit flush with the dress.
 

Attachments

  • sample25.jpg
    sample25.jpg
    64.6 KB · Views: 116
  • sample26.jpg
    sample26.jpg
    83.4 KB · Views: 147
  • sample27.jpg
    sample27.jpg
    63.6 KB · Views: 139
And this is how she looks with the first subsection complete. Personally, I think she looks really great. Her face has a bit of a pudgy look that in my opinion works well with the fact that she is stuffing herself with honey. It's almost like a characiture..and it just kinda worked out that way. I'm not an awesome experience carver by any means. This is only about the 6th face I've ever carved, which is part of the reason I keep going back to them so much..they are a real challenge. Usually I have to scrap my first few attempts, but this time things went quite smoothly, and I am liking the final result. As things come together, it will all look even better. It is always difficult to imagine something that is only partially complete, but I have confidence it will be pretty great!

The honey is gold alumilite with yellow pearl.
 

Attachments

  • sample28.jpg
    sample28.jpg
    78.6 KB · Views: 137
I know..she's slow slow slow, but progress is happening. I do have a day job!

I just finished the wings, and now the Faerie is complete. The wings are super simple, because they are bee wings. Bee wings would be light in color and all the same color with shadows, so therefore they can all be cut from one piece. I traced the outside of the wings on the maple and then cut out the entire wing, 1 upper wing which is the further back wing, then the other wing is cut as 2 pieces and upper and a lower. The wings are then shaped to basically the final size. The largest piece was laminated before shaping using another piece of maple to make it extra thick which allows for more angle when shaped and at the same time prevents a plywood spacer from being visible. Once shaped, I just draw in the veins. It's not like they have to be exactly the same as the pattern. Then I cut the veins out, and re-assemble all the pieces. They are guaranteed to be a perfect tight fit this way and they are already shaped. I just put a tiny bevel on every edge to introduce a shadow, hand sand and glue them all together. Then I use the drum sander to smooth the outsides flush. Because they were cut, the saw kerf brings the pieces slightly closer together, so all the inside fits perfect, but the outside is just slightly out of flush but is quickly and easily sanded to be so. And that's that...next time I get to start the flowers.
 

Attachments

  • sample29.jpg
    sample29.jpg
    96.6 KB · Views: 127
  • sample30.jpg
    sample30.jpg
    35 KB · Views: 123
Finally, I had a chance to complete some more pieces. She's really starting to grow on me now. After each flower piece is cut, they are all shaped with a belt sander to obtain the basic profile. Then each piece is carved down the center to cup the petals using a typhoon carving bit and finally hand sanded and glued together.
I also started working on this backer slab that I am going to use. I really like this little slab because it has a rustic natural look which is what I am going for here, and it looks like Michigan! I traced a couple Bee Hives in locations that will not be covered by the main picture and then carved out the holes almost to the bottom but not all the way through. The hives were placed in the holes and filled with clear Inlace and yellow pearlex.
 

Attachments

  • sample31.jpg
    sample31.jpg
    81.3 KB · Views: 146
  • sample32.jpg
    sample32.jpg
    40.6 KB · Views: 133
Jeff
I had thought about trying something like this but realize that it is way over my head. My respect goes to you. That is a lot of work and the result is just amazing.
 
Looking really great Jeff. After our chat tonight, I had to take a look-see, and glad I did. Can't wait to see the end result. Tell your model the Capt. says she is what is making this project rock.
 
Thanks guys...I got a lot done this week. Added the last two flowers. Just so everyone is on the same page, everything is glued together, but not everything is glued together. Planning is part of sectionalizing things. Anything that can be glued together should be glued together, and anything that can be left separate because it will be a hindrance to progress or is simply fragile, should not be glued to the main body. So, the fairy is completely glued together, including the flower at her feet and the flower she sits on, so If I pick it up, it all is picked up. The wings are glued together, but not glued to the fairy. The flower on the left is all glued together but not to the fairy. The leaf pieces are all glued but not to the fairy. All these little parts will be glued to the fairy only prior to gluing to a backer.
 

Attachments

  • sample34.jpg
    sample34.jpg
    88.4 KB · Views: 152
Jeff,
amazing work. also saw your Gekco pen in one of my magazines. You are truly an artist and it is an honor to own some of your pen blanks.
 
The main body of the picture is now complete. It is no longer needed to match any of the remaining pieces and so it is glued to the backer.

Only about 115 pcs to go!
 

Attachments

  • sample35.jpg
    sample35.jpg
    44.7 KB · Views: 150
Here she is 95% complete...just working on the finish and waiting for her name plate to arrive. Basically though..what you see is what you get! Hope you guys like her...she is 500+ pieces, the background is about 10x14, Enjoy.
 

Attachments

  • Finishsample.jpg
    Finishsample.jpg
    53.4 KB · Views: 177
Jeff, simply gorgeous work. I had a show last weekend and was showing a "dragon" to a prospective buyer and was hyping it as being made by the world-renowned scrollsaw artist, Jeff Powell!
 
I first saw this piece on your website, and looked at it for a long time, drinking in how wonderful the artwork was and how masterful the construction, and marveling at how much time it must have taken.

I absolutely love the theme of a faerie helping herself to a bit of stolen honey......it is truly a work of art.

If I had one small knock on any part of the entire piece, it is the first thing that struck me; her jaws being a tiny bit too "pudgy". It just seems to take away from the childlike and feminine nature of the little faerie, although I know you explained that it went with the story of her "stuffing herself" with the delicious honey.

Of course, for a piker like me to critique your beautiful work makes me feel a bit like a janitor watching Leonardo da Vinci laying out the drawing for a painting and saying-- "Hey buddy, I don't like the shape of that one woman's cheeks!

LOL.

Incredible work....and most of all, THANK you for sharing with all of us how it was created.

Fascinating.
 
Jeff, That was an amazing journey. I am actually shocked at how fast it was done. Nothing like making a pen of course but in my thinking it would take a lot more time to make all those small pieces. It is also by far one of the best pieces I have ever seen.
 
Signed-In Members Don't See This Ad
Jeff,

You did not spend nearly as much time on this project as I did on the brass! Seriously though, this is absolutely amazing. Your patience level far exceeds mine. I hope you get some "down time" to enjoy the holidays!
 
Back
Top Bottom