Advise

Signed-In Members Don't See This Ad
What are thoughts on sanding the tubes, I have seen many videos where people do? Is there a reason or process behind sanding the tubes?
 
Signed-In Members Don't See This Ad
What are thoughts on sanding the tubes, I have seen many videos where people do? Is there a reason or process behind sanding the tubes?
Always rough them up. That is what you are looking to do to give the adhesive some tooth to grab onto. You do not want to sand smooth. You waste your time then. It is a practice that can not hurt. Some people get away with not doing it but why take the chance.
 
CA finishing, recommended coats per fill n finish and thin?
What about using denatured alcohol, I seen a video where they use it to do cleaning?

Your question on CA finishing is likely to get a plethora of answers - including mine :). Anyhow, with regular (non - GluBoost) CA, I clean the blank with Denatured Alcohol, let it dry very well (usually only takes mine a minute or two since my shop is in a climate controlled room). Then I apply 3 or 4 thin coats of Thin CA (depending on how dense the wood is) with a folded up piece of Viva Signature Cloth paper towel leaving 90 seconds (90 second egg timer) in between for them to dry - no Activator/Accelerator. I follow this with 8 to 10 thin coats of Medium CA with a short burst of Activator/Accelerator between coats.

By thin coats I mean only 1 or 2 drops on the paper towel and after applying there is more CA absorbed by the paper towel than gets on the blank. I also use a new piece of paper towel for each application and I fold it in such a way that there are no exposed "cut" edges of the paper towel touching the blank to reduce the risk of any kind of paper towel lint from getting into the CA. And, I apply it with my lathe running at about 500 RPM.

For GluBoost I do pretty much the same thing, except at around 200 RPM (or slower) and I start with one coat of Thin followed by about 4 to 6 coats of Medium, finishing with another 3 to 4 coats of thin.

I think the Denatured Alcohol just removes any surface oils and also since Denatured Alcohol is hydroscopic, it should also have a slight drying effect. Some people use Acetone for this purpose, but I prefer Denatured Alcohol just because it is not as nearly as aggressive of a solvent as Denatured Alcohol. (PS Acetone works great though as a soak for the HDPE non-stick bushings in to remove the CA that does stick to them).

Please realize that these are only the regimens that I use because they work for me with all things considered, my shop environment, my choice of materials, the pressure my finger applies to the blank, etc. etc. I'm sure you will develop a regimen that works best for you with whatever materials you wind up preferring.

Regards,
Dave
 
I have never tried CA finish I have only used Shellawax or Crystal coat for my wood finishing and plastic polish or Novus for my acrylics in the past. Now that crystal coat is no longer available I use Shellawax for wood. I just recently purchased a buffing machine with buffing wheels as my lathe is too small to hold any buffing wheels.
 
I have never tried CA finish I have only used Shellawax or Crystal coat for my wood finishing and plastic polish or Novus for my acrylics in the past. Now that crystal coat is no longer available I use Shellawax for wood. I just recently purchased a buffing machine with buffing wheels as my lathe is too small to hold any buffing wheels.
In addition to CA, I also use Doctor's Woodshop products applied according to the processes presented in this video on YouTube by the Doctor himself. Essentially the process is:

1) Wet sanding using Doctor's Woodshop Walnut Finishing Oil as the "wet" ingredient.
2) Applying 3 thin coats of Doctor's Woodshop Pens Plus friction polish.
3) Applying one coat of Doctor's Woodshop Microcrystal Wax (but I used the liquid version instead of the paste wax).

The finish has held up quite well for me even on things like keychains that get daily handling.

Regards,
Dave
 
I am so grateful to have this amazing form with the most amazing and knowledgeable people, thank you so much for putting up with all my questions.
 
Have any of you fine turning friends used Spectraply blanks before? I have a lot of Dymondwood that I inherited from my pawpaw and I know the plant burnt down several years ago and I didn't know if it was similar to each other or if they are different.
 
Have any of you fine turning friends used Spectraply blanks before? I have a lot of Dymondwood that I inherited from my pawpaw and I know the plant burnt down several years ago and I didn't know if it was similar to each other or if they are different.
I think the two are similar in construction. Spectraply uses dyed lamininations in a broader array of vibrant colors where Dymondwood typically used wood species like colors. Other than that, I don't know if the Spectraply laminations are just dyed or if they are resin impregnated (like stabilized) or not. I am pretty sure that Dymondwood was resin impregnated. - Dave
 
I got all my additional pieces for my lathe, and none of them fit, I'm very sad about it. I ordered a new tailstock directly from Sherline from the book I got with my lathe and it will not fit on my slide. The drill chuck threads are way too big to fit. I'm not sure what else I can do.
 
Can you post pictures of the tailstock and the lathe bed and why it doesnt fit? Drill chucks come in many sizes, both what they will hold and what size threads they have to mount with, and how accurate they are. Your Tailstock would probably have the 3/8-16 threads. It s possible to salvage the drill chuck if you can buy an "MTO" to the chuck thread size you have. Look on the box or any information with the chuck and see if it states the thread size. It may be 3/8 it may be 1/2 or even metric.
 
This is the original tailstock
 

Attachments

  • 20240818_093051.jpg
    20240818_093051.jpg
    322.3 KB · Views: 22
  • 20240818_093101.jpg
    20240818_093101.jpg
    292.5 KB · Views: 22
  • 20240818_093110.jpg
    20240818_093110.jpg
    404.4 KB · Views: 19
The MT1 tailstock I purchased from Sherline for my lathe, the 3rd photo is as far as it will go on the slide.
 

Attachments

  • 20240818_093223.jpg
    20240818_093223.jpg
    280.9 KB · Views: 28
  • 20240818_093230.jpg
    20240818_093230.jpg
    255.7 KB · Views: 25
  • 20240818_093332.jpg
    20240818_093332.jpg
    375.2 KB · Views: 25
New tailstock on the left and original on the right they measure the same but the new one will not go on my slide.
 

Attachments

  • 20240818_093306.jpg
    20240818_093306.jpg
    300.3 KB · Views: 29
This is my headstock and the Chuck I purchased from PSI, even with the adapter it still will not fit
 

Attachments

  • 20240818_093130.jpg
    20240818_093130.jpg
    408.7 KB · Views: 24
  • 20240818_093133.jpg
    20240818_093133.jpg
    336.3 KB · Views: 25
  • 20240818_093419.jpg
    20240818_093419.jpg
    318 KB · Views: 22
  • 20240818_093426.jpg
    20240818_093426.jpg
    287.6 KB · Views: 21
Have you loosened the allen screw bolt in the tail stock all the way to see if the tail stock will slide on? That bolt is what clamps it down and it may be a little tight still.
You have 34/16 threads on your head stock. the jaw chuck is probably 1- 8 threads. You can buy an adapter of ebay. You could make one on your lathe but its probably easier to buy one.
link
 
check to make sure the threads on the chuck are 1-8 and not 1-10 The "1 is" one inch, the other number is threads per inch..
Then click on the work link in my earlier post and it will take you to an ebay post that is selling one. You can also find them at Amazon
at this Link Those links are both 3/4-16 to 1-8 if you have different threads on the chuck you will need to change the search to those threads.
 
I measured the headstock and it is 3/4" and it only has 3 threads, do they make adapters that size? If not I'll just send my parts back. I tried to take the set screws out of the new tailstock and it still will not fit on my slide so I am definitely sending that back.
 
Yes, your headstock spindle is 3/4 x16 threads per inch. Looking at the adapters I referenced they may have to deep of a seating area in the back that would only allow the first thread to on the spindle to engage. At this point its probably best to return it.
 
I also found this but I'm not sure what they mean by measuring the OD. I can't find any that will fit into a MT0 tailstock. My headstock is MT1 and tailstock is MT0.
 

Attachments

  • Screenshot_20240823_183850_DuckDuckGo.jpg
    Screenshot_20240823_183850_DuckDuckGo.jpg
    88.5 KB · Views: 15
OD is outside diameter. They want you to use digital calipers or better yet a micrometer to accurately measure the diameter of the part.
They state that each one is ground to match the Tailstock its used in. You could take the large locking screw out and see if they will interchange. Its not likely but you can try.
 
This is turning out to be a huge headache, I feel like I never should have bought the Sherline lathe even though I have turned many pens since having it (with problems non the less). Now I know what I have been doing wrong and I will try to make thia all work.
 
The headache is the learning curve, they are great machines but have some limitations that most can be worked through. It helps if you have some machinist experience or background but you will need to learn some new skills and definition of terms. The more advanced you take your pen making the less pat answers are available. You will need accurate measuring tools. You will have to learn work arounds for your lathe and adapt as you go.
There are several of us on the Forum that will help you as best we can although we arent close enough to come over and walk you through it. Keep asking and learning and if it get to be a bit much walk away from it for a day or two and come back and try again.
Your Sherline can thread metal parts, you can make your own center bands and nose cones and caps.
 
I never even knew this was intended as a metal lathe, I was told it was the best wood lathe for pen making and upon speaking with Ed I learned not only is it a metal lathe but the tool I was using was for metal treading. I have been using it for years now and have made many pens and some better than others. My pawpaw taught my dad what he had learned and then my dad showed me, I have always glued the tubes, sprayed with accerlerant and 20 minutes later started turning. I never knew that was the main problem of all my blow outs.

All the advise I have received has been a huge help and I'm going to get this figured out (I hope) as I love being in my shop as it really brings me joy and I feel close to my pawpaw and dad when I'm doing it.
 
New tailstock on the left and original on the right they measure the same but the new one will not go on my slide.
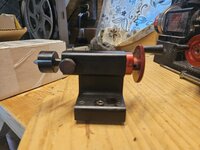
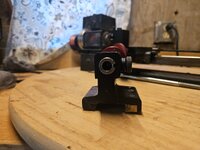
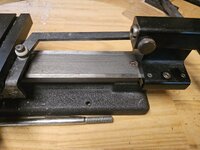
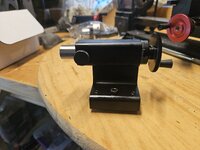
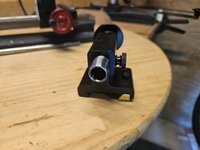
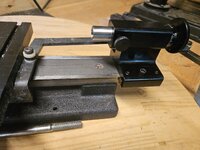
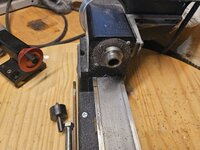
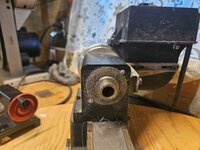
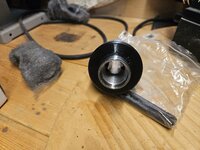
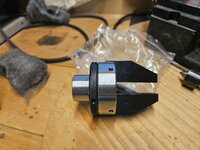
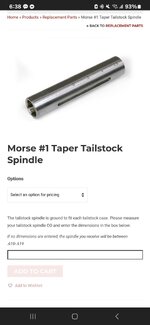
Just thinking out loud here - on your new MT1 tailstock, can you swap the brass "adjuster" piece with the one from your MT0 tailstock that fits? Otherwise, I wonder if there is a burr or something on your new MT1 tailstock that is keeping it from sliding on. - Dave
 
Dave you are a genius, I didn't have to switch the brass plates just had to loosen the screws on the bottom 🤦‍♀️ so now I will have 2 tailstocks.....one for drilling and the other for my TBC. I'm so so very grateful for all of the help and advice I have received. I can't wait to get out there and see what I can do. When it cools down some as my shop is not climate controlled.
 
Has anyone ever used one of these? I just seen it and was wondering if I should purchase one? I bought the square and round negative rake carbide tools from Easy Wood.
 

Attachments

  • Screenshot_20240828_195600_DuckDuckGo.jpg
    Screenshot_20240828_195600_DuckDuckGo.jpg
    96.7 KB · Views: 18
Has anyone ever used one of these? I just seen it and was wondering if I should purchase one? I bought the square and round negative rake carbide tools from Easy Wood.
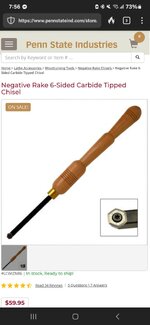
I have not, but I am a big fan of the Easy Wood tools brand. I build all of my new tools using their basic shape and length. I do pack the handles with some lead weights though just to make them a little heavier on the handle though (just a personal preference). - Dave

PS I buy all of my replacement carbide cutters from AZ Carbide. They even started carrying negative rake a year or so ago.
 
Since it was a long weekend I went out in my shop as it has been cooler and tried to do my best at making a pen with my newly purchased Easy Wood tools, I got the first half done and man I was proud (first time ever using hand tools) got down to almost the bushings on the second half and I'm not sure if I nicked the edge or what happened but it shattered and I quit for the day.
 
Signed-In Members Don't See This Ad
Back
Top Bottom