Question about tapping/dies

Signed-In Members Don't See This Ad
Joined
May 8, 2011
Messages
264
Location
Oklahoma City
When you are putting threads into your pens do you turn the lathe on or is it done manually?
I've een reading a toon up on taps/dies but havent gotten any info on that.

And. Why "the longer the better"? I dont understand that.

Thanks!
Michael
 
Signed-In Members Don't See This Ad
Thread with the power off. Otherwise, you'll either wreck the part you're threading, or you'll thread the whole thing.

Not sure what you mean by "the longer the better." Sorry.
 
Thread with the power off. ...

Why, categorically? Unless you're threading up to a shoulder or you don't have the confidence to disengage in time then maybe you ought to do it by hand. Might depend on the lathe. Go at slow speed and you'll get better, consistent threads under power. Try running in reverse with the tool on the back side of your tenon or hole and thread out to the right away from the workpiece. You might have to get opposite "handed" tools for that.

Cheers,
Rich

Maybe I should clarify myself. I thread with the power off. Granted I'm just getting started with component-less pens, but here are a couple of reasons why I thread with the lathe turned off.

  1. My little Rikon 70-100 lathe's slowest speed is 430 rpm. Personally, that's WAY too fast for me to be comfortable threading 9x0.75 or 6.4x0.6 threads.
  2. Acrylic threads pretty easily, and can be done by hand. No need to power through the material.
  3. My lathe doesn't have reverse.
  4. None of this may matter if you're using a metal lathe (on my wish list, but a ways down the road yet).
Maybe this will clear my previous post up. Oh, and if anyone is interested, I'm using one of George's (texatdurango) die holders. It works great!
 
Thread with the power off. ...

Why, categorically? Unless you're threading up to a shoulder or you don't have the confidence to disengage in time then maybe you ought to do it by hand. Might depend on the lathe. Go at slow speed and you'll get better, consistent threads under power. Try running in reverse with the tool on the back side of your tenon or hole and thread out to the right away from the workpiece. You might have to get opposite "handed" tools for that.

Cheers,
Rich

I really don't understand your question of "Why, categorically?" The confidence to disengage and go at a slow speed has nothing to do with it on a pen lathe which 98% of the people here use. Are you thinking that the people here might be using CNC programed machines or metal lathe machine in which the speed is controllable from 0 RPM?
 
Unless you have a tapping head ($$$) you need to advance the tap, then reverse, then advance, then reverse. With the lathe on you'll have done all the threads without clearing the tap which will likely result in poor threads.

AK
 
If your using a metal lathe and you have enough control, use the power feed/threading. If its a short piece like .150 long it may beeasier to do it manually. Its usually easier to cut the inside threads with a tap rather than have to set up your cutter for small jobs. Use a tap guide in your tailstock for alignment. Manual threading on the lathe with taps and dies will not be as accurate as making the threads with with a properly set up cutter using the lathe to cut the threads both inside and out. However if your only making one of each part far a single pen at a time the tap and die set up is all you need. If your doing productin runs manufactureing parts that may be a different story.

For metal lathes they have inside threading tools.
 
Last edited:
Maybe I should clarify myself. I thread with the power off. Granted I'm just getting started with component-less pens, but here are a couple of reasons why I thread with the lathe turned off.

  1. My little Rikon 70-100 lathe's slowest speed is 430 rpm. Personally, that's WAY too fast for me to be comfortable threading 9x0.75 or 6.4x0.6 threads.
  2. Acrylic threads pretty easily, and can be done by hand. No need to power through the material.
  3. My lathe doesn't have reverse.
  4. None of this may matter if you're using a metal lathe (on my wish list, but a ways down the road yet).
Maybe this will clear my previous post up. Oh, and if anyone is interested, I'm using one of George's (texatdurango) die holders. It works great!

That did - thanks. To me the original post was not clear about what kind of threading the question referred to: use of a tap, die, or single point threading.

My comment referred to single point threading. If you're using a tap or die then, yes, manual, unless ... never mind :)

I really don't understand your question of "Why, categorically?" The confidence to disengage and go at a slow speed has nothing to do with it on a pen lathe which 98% of the people here use. Are you thinking that the people here might be using CNC programed machines or metal lathe machine in which the speed is controllable from 0 RPM?

CNC not in this forum. Metal lathe, very possibly as I don't think "Advanced Pen Turning" excludes the use of lathes with lead screws.

Note my retraction with respect to taps and dies and also, now, with respect to pen lathes.

Unless you have a tapping head ($$$) you need to advance the tap, then reverse, then advance, then reverse. With the lathe on you'll have done all the threads without clearing the tap which will likely result in poor threads.

AK

Right, that would be interesting to do.
_____________

Thanks for y'all's comments. That's what discussion's for. It's clear I went down the single point path with mine.

Cheers,
Rich
 
Michael, I do several things on my metal but threading is NOT one of them. I cut all my threads on my pens using my little Jet Mini lathe and taps and dies, why..... because I like to and it works just fine! The lathe doesn't have a reverse, the slowest speed is way to fast to cut small fine threads so I hand feed the taps and dies.

I would guess that 99.9% of the members here use small wood lathes similar to mine or small mini metal lathes with only a handful of members, perhaps half a dozen or less using more expensive metal lathes and/or CNC lathes and mills.

The way I see it, if some of you guys want to cut all your threads on your machines that's fine if that's what you enjoy doing, just don't come on here knocking the manual or old fashioned barbaric ways of doing things just because your way is more efficient and I'm not the least bit impressed that your machine can hold tolerances to .0000000000000005"! The last I looked around, this is a pen making forum not the "Home machine shop guild" and a hand turned $3 tap will cut threads just fine in a plastic pen!
 
Does any one use a tap guide? Or do you simply chuck the tap into a drill chuck?

Well, I have several of them and tried them all but just can't get the feel for them so I just made a little holder that's mounted in the drill chuck to hold various taps then hand feed the taps. I feel that I have much more control over the threading that way.

If you do use your drill chuck in the tailstock, make sure your lathe bed is clean and lubricated well so the tailstock slides back and forth with ease and isn't jerky or requires much force to slide. Nothing will screw up some nice threads quicker than having to push or pull too hard on the tailstock.

I needed a few dozen sections for some pens I made recently so rather than making them one at a time from start to finish, I started doing them assembly line fashion and when it came to the tiny feed threads that I was only cutting about .250" deep, I found that it was actually easier to just mount the tap in a Tee handle holder and tap the threads while holding the small sections in my hand.

I'm a firm believer that there are no hard and fast rules to using particular tools and it quite often comes down to whatever one feels comfortable with using.
 
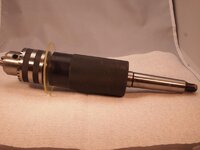
I have a tapping attachment for the lathe, it's basically a sliding sleeve that is knurled that I made a long time ago it is a 2mt on the end with a shaft on the shaft it's a sleeve that is knurled and it spins and slides on special bearings, on the end is a jacobs taper that I mount a chuck.

I don't use it that often, but it is handy you just turn on the lathe grab the knurled sleeve an guide the tap in and when you want to stop tapping just let go, and it spins, turn off the lathe and back out the tap.

I tried to find something like it on line I found this it's close but not exactly the same.

Tailstock Tap Die Holder
 
Last year I made a die holder from delrin and it worked pretty well. After using it for a while I realized that I could do something similar with a tool to hold taps so I made a few of them, each holding my most commonly used taps.

While not as sophisticated or as heavy duty, it is along the same lines as the one Danny showed above in that it rotates on a shaft and can easily be advanced into the part being tapped and withdraw very quickly by just spinning the holde on the shaft.

Tapping ebonite, acrylics and alumilite for pen parts, I do all the tapping by simply turning the handle with my hand. If you are tapping aluminum, drilling a hole crosswise and adding a small Tommie bar would help.

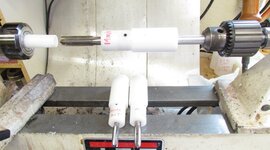
Mine rotates on a 1/2" shaft that chucks into a Jacobs drill chuck mounted in the tailstock.

You can make these tools from delrin if you have it or wood such as hard rock maple or even aluminum.

Because the diameters of the tap shanks vary, I wound up making a holder and drilling the hole for a snug fit of each tap then using a set screw to keep the tap from spinning. A side benefit is that I don't have to change out taps when I need a different one, I just grab the holder ready to go.

Here's a shot of what I did.
 

Attachments

  • tap holder.jpg
    tap holder.jpg
    68.9 KB · Views: 310
George, Thanks for the photo of your tap holder. That helps a lot.
Andrew, I am still a little confused on how to use a tap guide. Is it held by a drill chuck in the tailstock? If so, then what holds the tap?
Sorry for all of the questions but it looks like I have all of the tools needed and some upcoming time to give kitless a shot.
There are a few types of tap guide, the one I bought has a MT2 taper, so it fits directly into the tail stock. There are other types that require the use of a drill chuck.

Have a look at this thread, there is lots of good information in it. http://www.penturners.org/forum/f30/dummies-guide-tapping-lathe-59693/

I can take a picture of my set up if you'd like.

AK
 
Andrew,
Thanks for the link. I missed that thread when I did a search. A photo of your set up would be great!
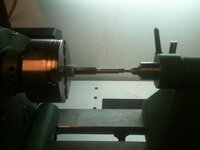
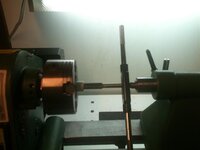
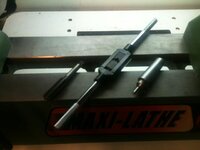
Excuse the cell phone pictures, my wife was using the good camera.

First picture is the tap inplace with the tap guide.
Second picture is the same as above but with the tap handle inplace.
Third picture shows the tap, tap handle and tap guide.

To use the tap guide put the tap in the tap handle and rest the tap at the end of the hole, slide the tail stock with the tap guide so the point is near the tap and then lock the tail stock and advance the quill to depress the point (~1"). The tension on the point is consistant and relatively light, just enough to keep everything in alignment. Then rotate the tap handle to start tapping.

attachment.php


attachment.php


attachment.php


AK
 

Attachments

  • IMG_0994.JPG
    IMG_0994.JPG
    27.5 KB · Views: 442
  • IMG_0995.JPG
    IMG_0995.JPG
    28.3 KB · Views: 445
  • IMG_0996.JPG
    IMG_0996.JPG
    32.5 KB · Views: 441
Andrew, Will that tap handle swing all the way around without hitting the lathe bed?

My similar handle was too long to swing around without hitting the lathe bed rails on my Jet mini and metal lathe so I wound up cutting the handle legs shorter.
 
Andrew,

I have a tap holder that slides on a rod that can be placed in a jacobs chuck thus allowing it to move and rotate similar to a die holder. Is this method less accurate then using your MT2 tap guide? I have the same lathe as you do and I noticed your chuck. What brand is it?
 
Last edited:
Andrew, Will that tap handle swing all the way around without hitting the lathe bed?

My similar handle was too long to swing around without hitting the lathe bed rails on my Jet mini and metal lathe so I wound up cutting the handle legs shorter.
Yes it will, there is probably an 1" clearance or so. My lathe has 12" swing.

I am probably going to make or maybe buy a smaller ligher handle if I can find it (or cut the handles like you've done). I'd like to reduce the weight to minimize the chances of damaging threads when mounting or removing the tap from the part.

AK
 
Andrew,

I have a tap guide that slides on a rod that can be placed in a jacobs chuck thus allowing it to move and rotate similar to a die holder. Is this method less accurate then using your MT2 tap guide? I have the same lathe as you do and I noticed your chuck. What brand is it?
I can't speak for the accuracy, Georges set up sounds like what you have, and he has used tap guides, maybe he'll chime in. I'd guess there is little to no difference in accuracy as the drilled hole will guide the tap for the most part. One bennefit to the MT2 tap guide is it greatly minimizes the distance from the tailstock to headstock (as you don't have the drill chuck or rod assembly), this may help make it more accurate if you have a loose quill.

The chuck is a SuperNova2, it's only being used as my collet chuck set is on back order (STILL!!!!) and I wanted to get started.

AK
 
Unit I made

Here is the tool I made a long time ago, the knurled sleeve has both linear, and radial bearings, so it can slide and rotate, I have a return spring built into the unit so it has a slight return preasure on it, you just put it in the tail stock, and put the tap in the chuck and slide it forward into your part to stop cutting let go, and it spins with the lathe.

Like I said I don't use it that much any more, works great for small production runs. :biggrin:
 

Attachments

  • P7062759.jpg
    P7062759.jpg
    40.6 KB · Views: 190
Here is the tool I made a long time ago, the knurled sleeve has both linear, and radial bearings, so it can slide and rotate, I have a return spring built into the unit so it has a slight return preasure on it, you just put it in the tail stock, and put the tap in the chuck and slide it forward into your part to stop cutting let go, and it spins with the lathe.

Like I said I don't use it that much any more, works great for small production runs. :biggrin:
I would use something like that ten times a day! If you ever want to get rid of it, just drop me a PM!
 
As most taps have a small dimple at the end of the tap (not all have this but mine do) I use a small tap handle and use a safety drive in the tail stock. It has a small centre pin that is spring loaded with a cup ring around it. When I put this up to the end of the tap and lock the tail stock I can apply some pressure with the hand wheel and it puts just the right pressure on the tap and also keeps every thing inline. I can post a picture if someone wants to see it.

Lin.
 
My similar handle was too long to swing around without hitting the lathe bed rails on my Jet mini and metal lathe so I wound up cutting the handle legs shorter.

Why not hold the tap in place and turn the work? I think I read that in the library...
I've never understood this thinking, can you explain exactly how you do it and perhaps post a photo or two to show what you are talking about? How do you advance the tap into the work or do you advance the blank into the tap? Something's not clear to me!

On my Jet mini lathe I leave the Beall collet chuck mounted 100% of the time and just switch out collets to suit the task at hand. When I thread, either with a die or a tap, the pen blank is in the collet and I have the tool holders mounted in a Jacobs chuck in the tailstock.

With the blank firmly in the collet, it's a easier to advance and rotate a tap or die mounted on a shaft in one motion. Are you suggesting mounting the tap in the tailstock and advancing the entire tailstock? If so, let me know how that works for you when you are cutting fine 6mm threads for a nib feed.
 
Why not hold the tap in place and turn the work? I think I read that in the library...
I've never understood this thinking, can you explain exactly how you do it and perhaps post a photo or two to show what you are talking about? How do you advance the tap into the work or do you advance the blank into the tap? Something's not clear to me!

"Hold in place" for rotation... the tap advances into the work. A tap guide (spring-loaded pin) in the tailstock keeps it aligned and applies pressure to advance the tap.

This is based on a "typical" setup where the tap wrench handle is short enough to swing over the bed. The work is chucked to the headstock, a tap guide is in the tail stock, and the tap is caught between the two. With short handles, you would hold the work (keep it from spinning) and turn the tap wrench. If the handle is too long so you can't turn the tap wrench, you can hold the wrench (keep it from spinning) and turn the work instead.

Ah, here's the source. It was a thread, not the library.
http://www.penturners.org/forum/f30/dummies-guide-tapping-lathe-59693/
That includes photos.
 
Last edited:
Back
Top Bottom