NGLJ
Member
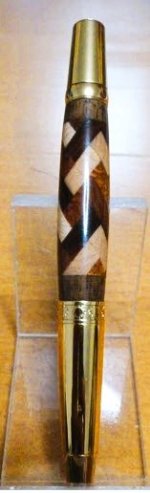
A few weeks ago I was admiring a pen with a 360 Herringbone pattern in a post here. I have thought many times if I should dive into the "Lion's Den" but was unsure about my skill level to tackle something where "perfection" is very difficult to achieve. Undaunted, I decided that I needed a new "challenge", and proceeded to "consume" all that I could in the Resources section. With grateful thanks to those who took the time to explain how it can be done, I made a start. I pretty soon realized why it is very difficult to make a wooden 360 Herringbone pen blank which has no gaps between the segments and has no chip out from turning!!
There are simply so many places that even a very minor mistake in the overall process shows up like a major mistake at the end. Needless to say, my first few attempts ended up on the "cutting room floor". You can soon get through a lot of wood, lots of thin expensive CA, and many hours. However, each iteration produced a better result, after carefully analyzing where I went wrong.
I did notice that one topic didn't appear to be "explicitly" addressed in any of the articles that I read, that is "grain orientation", although it can be ascertained from drawings in some of the articles. There are many possible combinations having regard for glue-up, turning, and final appearance. I cannot claim to have investigated many of the options, and plan to try more. I did eventually find one which has now worked "fairly" well for me. I use the word "fairly" because I don't consider my best result so far as anywhere near perfect or what I hope to eventually achieve. Basically I glue up the 2 mirror image pieces avoiding gluing end grain. However, I did notice end grain was glued in one of the articles.
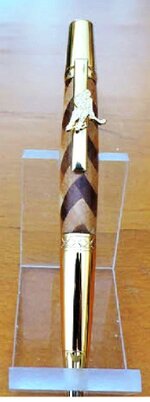
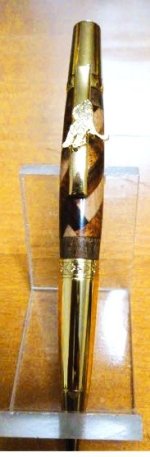
There are other basic options to consider, tile size and thickness. Bigger tiles means more wood used, and more to turn off at the end. Also, the more turning that you do means more opportunity for chip out. It is sole destroying to get so close and.......%&^^&^&^. On the other hand, small tiles can be difficult to handle and glue. Thicker tiles means less levels to achieve the blank size that you are aiming for, but that also affects the final appearance. Thin tiles means more work, and more chance that a glue joint is bad or mis-aligned. Accurate glue-up can be one of the most difficult to get 100% correct when you consider that you will have 70 to 100 joints to make. Let's just say that it is a WIP (work in progress) for me. I am experimenting with jigs, and different clamping approaches. Rubber bands make some of the best clamps. For now, I ended up deciding to "standardize" on ¾" x ¾" x 3/16" tiles, and continue to refine my technique. At some point, I aim to add veneer into the mix, further complicating matters") . Please see attached my best effort so far. Please feel free to offer advice. There are simply so many different ways to achieve a good result in woodworking.
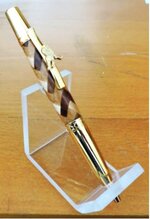
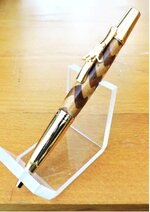
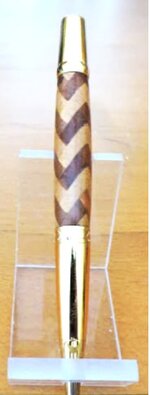
. Please see attached my best effort so far. Please feel free to offer advice. There are simply so many different ways to achieve a good result in woodworking.
There are simply so many places that even a very minor mistake in the overall process shows up like a major mistake at the end. Needless to say, my first few attempts ended up on the "cutting room floor". You can soon get through a lot of wood, lots of thin expensive CA, and many hours. However, each iteration produced a better result, after carefully analyzing where I went wrong.
I did notice that one topic didn't appear to be "explicitly" addressed in any of the articles that I read, that is "grain orientation", although it can be ascertained from drawings in some of the articles. There are many possible combinations having regard for glue-up, turning, and final appearance. I cannot claim to have investigated many of the options, and plan to try more. I did eventually find one which has now worked "fairly" well for me. I use the word "fairly" because I don't consider my best result so far as anywhere near perfect or what I hope to eventually achieve. Basically I glue up the 2 mirror image pieces avoiding gluing end grain. However, I did notice end grain was glued in one of the articles.
There are other basic options to consider, tile size and thickness. Bigger tiles means more wood used, and more to turn off at the end. Also, the more turning that you do means more opportunity for chip out. It is sole destroying to get so close and.......%&^^&^&^. On the other hand, small tiles can be difficult to handle and glue. Thicker tiles means less levels to achieve the blank size that you are aiming for, but that also affects the final appearance. Thin tiles means more work, and more chance that a glue joint is bad or mis-aligned. Accurate glue-up can be one of the most difficult to get 100% correct when you consider that you will have 70 to 100 joints to make. Let's just say that it is a WIP (work in progress) for me. I am experimenting with jigs, and different clamping approaches. Rubber bands make some of the best clamps. For now, I ended up deciding to "standardize" on ¾" x ¾" x 3/16" tiles, and continue to refine my technique. At some point, I aim to add veneer into the mix, further complicating matters
. Please see attached my best effort so far. Please feel free to offer advice. There are simply so many different ways to achieve a good result in woodworking.