Wow she’s ugly

Signed-In Members Don't See This Ad
See more from Todd in PA

Todd in PA

Member
Joined
Feb 16, 2021
Messages
731
Location
Port Matilda, PA
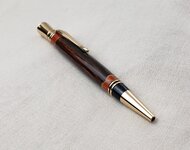
My first pen since buying a bandsaw. Cut me some scallops out of padauk and aluminum and glued em onto a nice piece of maple burl. Scallops are even. Fit and finish are solid. Matched the aluminum with a chrome kit. But I just don't like this ugly pen. it reminds me of a kings court jester. Please tell me why you also hate this pen. 🙂
Is it the kit?
Is it the shape?
Is it too busy?
Is it the color contrast?
How can I make a pretty pen next time?
55C2E0E3-00EE-4675-B82D-6AEF8D0AA7C0.jpeg

F80F85AB-1174-4CBE-A9CA-0EB774D08179.jpeg
 
Signed-In Members Don't See This Ad
It looks good, but I think having contrasting segments on the ends would have improved it. Something dark; African blackwood, katalox, or even just some walnut. Maybe even just a narrower dark band sandwiched in aluminum between the end segments and the scallop section. The finish looks great!
 
My first pen since buying a bandsaw. Cut me some scallops out of padauk and aluminum and glued em onto a nice piece of maple burl. Scallops are even. Fit and finish are solid. Matched the aluminum with a chrome kit. But I just don't like this ugly pen. it reminds me of a kings court jester. Please tell me why you also hate this pen. 🙂
Is it the kit?
Is it the shape?
Is it too busy?
Is it the color contrast?
How can I make a pretty pen next time?
View attachment 314885
View attachment 314886
Nice job segmenting. I don't mind the blank so much. Looks pretty good. I think it's turned a little too thick for that kit, though. Like curly, it's not one of my favorites despite it being the first kit I turned. I did Honduran mahogany on a matte gold executive. I made it super thick at the top and then a straight narrow down to the nose. It was HIDEOUS. Looked like a carrot. My then three-year old kid loved it, though, so it became his.
 
So, first off, how many scallops are there ..... if I am correct, there are 4 ..... 2 top and 2 bottom.

I THINK it would look better if you interspersed the existing scallops with additional scallops in a contrasting wood .... say walnut.
And make the added scallops of a different size from the existing scallops ..... to add interest.
So then there would be 8 scallops ..... 4 top and 4 bottom ..... the added scallops would "overlap" with the existing scallops.
Half of the total scallops would overlap symmetrically with the existing scallops ..... so some result in being "trimmed" a bit when pen is turned

At the top end, the added scallops should be about 2/3 the length of the existing scallops ..... differing from existing to add interest.
At the bottom, the added scallops should be of a length 1.25 the existing scallops ..... just to add interest.
Of course, this is just my opinion !!
And the contrasting color for the added scallops will certainly add interest and appeal.

BTW, I am not recommending that you modify the existing pen ..... make a whole new pen from scratch !

The pen actually looks pretty good the way it is ..... I think your workmanship is excellent !!!

Like Curly, I am not a big fan of the Executive pen kit (which is what you have, or it may have another name), but it is what it is !!
 
I like the executive kit. Though it's not at the top of my list, but they have sold well and are forgiving due to the beads on the hardware. I think it might look also better with the scallops right at the ends instead of having the added segments on there. Here's an example of one that I did a while back.

20191111_134922.jpg
 
@sorcerertd
Todd said :

" I think it might look better with the scallops right at the ends instead of having the added segments on there. "

Very good point .... I agree.
 
I think the blank looks pretty good. I'm not so sure about the kit though...something....about it just doesn't seem right.
 
I really like the precision of the blank, great job there. And the maple burl together with that high gloss finish looks superb.

What probably makes it not so nice, is the flow of the body together with the kit's butt. I don't see it picking up the form. If it would pick up the form, it would probably destroy the great symmetry of the scallops.

And it looks to me, that the proportion or position of the scallops is too much off from the golden ratio.

To improve it, add only scallops at the front, pick up the flow of the kit, especially the back section could go with an inward curve (Todd's example seems to follow that flow as far as I can tell), and maybe go for a bit more contrast in the wood choice.
 
It looks good, but I think having contrasting segments on the ends would have improved it. Something dark; African blackwood, katalox, or even just some walnut. Maybe even just a narrower dark band sandwiched in aluminum between the end segments and the scallop section. The finish looks great!
I had made some sandwiches of dark wood to add behind the scallops, but "ran out of room" to put them in.
6B1D0D5C-8854-4DF7-8E41-DD2610552ECA.jpeg
I chose the Executive kit because of the long barrel. I have a carrot shape problem with that kit which was mentioned. In this case I didn't feel I could taper it without losing symmetry. I ended up leaving it sausage shaped. 🤦🏼‍♂️

It never occurred to me to concave the butt end to flow with the cap. I will try that next time.

I cut the scallops at 68*. They nearly touched on the unturned blank. I see now that in turning they shorten. Obviously! 🤪 So I had a lot more room than I thought.
 
I THINK it would look better if you interspersed the existing scallops with additional scallops in a contrasting wood .... say walnut.
And make the added scallops of a different size from the existing scallops ..... to add interest.
So then there would be 8 scallops ..... 4 top and 4 bottom ..... the added scallops would "overlap" with the existing scallops.
Half of the total scallops would overlap symmetrically with the existing scallops ..... so some result in being "trimmed" a bit when pen is turned
I have a question, because I wanted to do this but decided to keep it simple for my first scallop.
How do you re-square the blank after gluing on the first scallops? I was worried about accidentally setting a new center for the second set and making a wobbly height scallop. How do you take off the exact same amount on each side?
 
This thread is well worth reading. There have been other threads in which the discussion on specific kinds of segments center around how the design changes as it is turned. Mentally being able to "see" these before turning is crucial. However, most people have to experience what you did in order to be able to make adjustments in future pens.

Ugly: Ugly is for me when the outcome was totally not what I was wanting or expecting! That alone does not make it ugly in and of itself, just not what the pen maker was expecting - kind of picking up a glass of unsweet tea and taking a quick drink when you were thinking it was cola.

How do you re-square the blank after gluing on the first scallops? I was worried about accidentally setting a new center for the second set and making a wobbly height scallop. How do you take off the exact same amount on each side?

I have not done scallops but look forward to seeing the answer. I think it is done with an angle iron shaped jig, but not sure.
 
The few times I played with scallops I did as advised for Celtic Knots. Don't cut completely through the blank, I used a table saw with a thin blade by the way. Then when the scallop (same thickness as the kerf) is added back the blank stays the same length and width. Now it is just a matter of cutting/sanding/hand planing off the extra inserted bits as appropriate and you are ready to make the next insert cut.
 
@Todd in PA
Todd, you asked ....
" I have a question, because I wanted to do this but decided to keep it simple for my first scallop.
How do you re-square the blank after gluing on the first scallops? I was worried about accidentally setting a new center for the second set and making a wobbly height scallop. How do you take off the exact same amount on each side? "

I think you were wise to keep it simple for your first attempt . . . you did an EXCELLENT job.

In my reply, please note that I emphasized the word " THINK " and said . . .

" I THINK it would look better if you interspersed the existing scallops with additional scallops . . . "

The fact is that I have never done scallops, so it was a CONCEPTUAL reply.
I am quite sure that I have seen such evenly spaced scallops presented here on IAP, so possibly there is an article in " RESOURCES "

Sorry if I mislead you, Todd. . . I see that @Curly has now offered a suggestion .

Following this thread myself . . . with great interest !
 
@Todd in PA

Here are a couple of links from " Resources " but I have not checked to see how relevant they are.


My first pen since buying a bandsaw. Cut me some scallops out of padauk and aluminum and glued em onto a nice piece of maple burl. Scallops are even. Fit and finish are solid. Matched the aluminum with a chrome kit. But I just don't like this ugly pen. it reminds me of a kings court jester. Please tell me why you also hate this pen. 🙂
Is it the kit?
Is it the shape?
Is it too busy?
Is it the color contrast?
How can I make a pretty pen next time?
View attachment 314885
View attachment 314886
Different doesn't make it ugly. It's definitely different. When I make a scalloped pen , I like them with 4 scallops on each end. Heres a link to a you tube video that does a pretty good job of explaining one method.
 
This is the link I was using as my guide for Ugly Pen. I decided mid-build to take out the 3 sandwiches of contrasting color wood. I see now that there is enough space that I can put them in and that will certainly make the next pen more attractive. I will also try a straight pen kit. I'll post a picture when it's done for you to see.

In the meanwhile, I'm still curious about the best method to cut off the scallop wedges evenly on both sides to get the blank back to square.
 
@Todd in PA

This is the link I was using as my guide for Ugly Pen. I decided mid-build to take out the 3 sandwiches of contrasting color wood. I see now that there is enough space that I can put them in and that will certainly make the next pen more attractive. I will also try a straight pen kit. I'll post a picture when it's done for you to see.

In the meanwhile, I'm still curious about the best method to cut off the scallop wedges evenly on both sides to get the blank back to square.

"I'm still curious about the best method to cut off the scallop wedges evenly on both sides to get the blank back to square."

I understand what you want, but not sure how to do it. . There will be 4 sloping sides coming to form a square at the blank's end. . Right ?

I can think of two pieces of equipment that might help get there: (1) a milling machine, and, (2) a tilting, indexed rotary table to mount on the lathe bed : https://littlemachineshop.com/products/product_view.php?ProductID=5604&category=

Oh, and you might also need (3) a chuck ( suitable lathe chuck might do ) mounted on the rotary table to hold the blank. . There may be an alternative method for holding the pen blank on the rotary table.

Mounting the rot. table on the bed of the milling machine, you should be able to mill the 4 angled flats on the pen blank to form accurately positioned flat tapered cuts which meet to form a square end on the blank. . You can mill all 4 flats without removing the blank off the rotary table. . You carefully set up to cut one flat and then rotate the blank with the calibrated mech. to the other 3 orientations.

But not everybody has a milling machine and the required accessories in their shop. . . Quite sure there is an alternative method, but not thinking particularly clearly or creatively at the moment.

Please bring your skills to bear on this, and let's keep working on it.
 
Last edited:
Heres a link to a you tube video that does a pretty good job of explaining one method.
Thanks, Ken. He does one scallop at a time, which should make the trimming a bit easier. I did all 4 corners in one go like the tutorial Magpens posted (credit: Bob Perez). With a sled, I could line up the edge of the blank with the cut line and probably get real close to keeping the original size intact.

Imagination is sparking-- I'll be back in a week with the results... :)
 
I do mine also 1 at a time but I simply put a stop on the end so each cut stays aligned, no guess work.
Thanks, Ken. He does one scallop at a time, which should make the trimming a bit easier. I did all 4 corners in one go like the tutorial Magpens posted (credit: Bob Perez). With a sled, I could line up the edge of the blank with the cut line and probably get real close to keeping the original size intact.

Imagination is sparking-- I'll be back in a week with the results... :)
 
I think this pen is pretty good. I like the color combo and it's very well executed. Unlike others (my wife hates it too), I love the Executive kit. I think the only problem is the thickness of the blank. I think it would look really sharp if it was straight end-to-end instead of puffed out in the middle. My 2 cents.
 
UPDATE:
I'm working on a new scalloped pen. Here is what I came up with to keep the blank square as I will be cutting off and gluing on new corners 8 times. It's probably a bit crude, but sometimes simple is simply good enough.

Basically I made sled out of half inch plywood and screwed 3 press clamps on it. Then I cut a slot for the bandsaw and glued up 3 sheets of brass which exactly filled the slot. I use this as a fence to position the blank on the slot edge, then an L shaped placeholder behind the blank. I can remove the blank by lifting the center press clamp, and then easily return it to the same position after each glue up to cut the scrap and return the blank to square. For the end trimming, I just used a crosscut sled with a stop.

Anyone can see in the photos that it's not perfect. Which may be as much about me not having the right tension on my belt as anything. I'm still figuring it out. Proof will be in the pudding when I drill it out and turn it down to discover if I'm within tolerances-- I'll post a finished photo this weekend.

2021-08-25 Segmenting Jig 001 (1024x768).jpg
2021-08-25 Segmenting Jig 005 (1024x768).jpg
2021-08-25 Segmenting Jig 011 (768x1024).jpg
 
Good evening.

I completed a follow up pen. In spite of my struggle shaping this kit, I stuck with an Executive. I wanted to improve upon the previous design, apples to apples, and shape was part of the reason the last one was ugly.

the new design includes a dark band behind the scallops to anchor them visually. Several people suggested 8 scallops instead of 4, and I took Magpens suggestion of varying the heights. I replaced the aluminum borders with black to tie into the black on this kit. It is vulcanized fabric (too thick for the scale here?).

I'd love to know what you think and hear any additional suggestions. I plan to continue to try different things.

4E3414A4-4127-4840-A378-878965229A34.jpeg
A83CA27D-FEF0-4CCB-9546-ED5B448E7E06.jpeg
 
I am liking the shape in the new one much better. The somewhat sudden turn in at the top seems a bit too sudden. Given the shape of the cap on this kit, I wonder if you could start to taper in a little earlier, then just about straiten out as it meets the cap? Then the cap, effectively, would do exactly the opposite (given its profile).
 
This is much improved aesthetically. The scallops being "anchored" makes a huge difference. While I do agree with Jon about the abrupt taper at the top, I do still think it looks good that way. That part would be personal preference and I just prefer smoother flowing curves. It doesn't look too out of place here because it follows the shape of the clip. I'm sure people think my cigars are weird as I do them similar to this at the top. I just like the way they look being thicker on the top half, though I might play around with that a little next time.
 
Back
Top Bottom