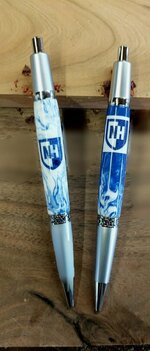
Basically the process is the same for both, applying a ca finish and placing a decal and covering it up with more CA. I like waterslide because they are thinner. I use the clear background, but there's also "white decal" you print on. The drawback to clear is it can be hard to see it depending on the material you place it on. I've always used it onto light colored woods like maple.
What I do is…. Print my text on the waterslide material, let dry for an hour, lightly spray a few time with the bonder (Testors brand - or clear coat spray like Krylon) and let it dry for a day. I usually make the decals a couple days prior to the pen. Then I turn my pen, and apply a CA finish. I finish the blank with micromesh to get it as perfect as I can so the surface is like glass for the water slide decal to adhere to and lay flat. any imperfections in your finish will be sealed under the next layers of CA that cover your decal. I wipe the blank off with some denatured alcohol to make sure it clean before applying the decal. If using clear background material make sure to cut it out as close to your printed text or image to minimize the decal edges from showing. Then I place the decal on top of a small dish of water and allow it to soak up the water so the top film slides off when I push on it. When ready, I apply a small drop of water to the pen surface and slide the decal onto it, trying to keep some water under it. This will allow me to slide it where I want it. Then I press down on the decal lightly with a Q tip or paper towel to remove the excess water. They make a decal softener that you can brush over it to help the edges relax and lay flat. It's not always needed but can help on tapered blanks. Some wait a day to proceed but I place a clamp light over the decal with a heat lightbulb in it to warm the surface and evaporate the moisture. After an hour it's ready to seal. I use medium CA for this. Thin CA allows the paper towel to touch the decal and can smear the print. Medium CA will keep that from happening. I apply 3 coats of CA, then finish it again with micromesh.
I do this process on both wood and acrylics. The first ca finish will help side the decal material. I also us Gluboost Fill and
Finish CA for these. With that much CA layered up, non flexible CA will become brittle and crack over time. I had a blank I made in a demo several years ago with another brand that cracked like a broken windshield just sitting in a box of demo supplies.
I'm in the process of making a YouTube channel for March, so I'll make a video on this process. Feel free to reach out with any questions.