Trouble with casting labels

Signed-In Members Don't See This Ad

KCW

Member
Joined
Dec 18, 2014
Messages
382
Location
Lincoln, NE
I am getting a bit frustrated, with this label casting business. I put the label on the tube, then let it sit for 24 hours, then I spray a sealer on the label and let it sit for 24 hours, then I cast it in a resin saver mold and move all of the bubbles out from the tube, then let it cure for 24 hours. The last two cures have all kinds of small bubbles right next to the label, so I have to scrap the whole thing and start over, and it isn't a short process. I am not set up for pressure, but didn't think it was absolutely necessary, am I wrong? What can I do? Is it off-gassing from the sealer?
 
Signed-In Members Don't See This Ad
Also what type of resin? I use PR resin to cast various items. I read someplace to put the PR resin in a hot water bath (not hot enough to melt your cup of resin,don't ask how I know :biggrin:) I let my resin get warm and it thins out. then I add 4 drops per ounce of hardener and mix and pour. I get great results. I'm sure others have different things to try. I wish I knew where I read about heating the PR. I would give credit to the originator.
 
heres what I do... First I print the decals or labels and let them dry over night. Then I spray them with a satin clear coat to seal the ink, and let it dry over night. Then I put them on the tube and let them sit a couple hours. I think it lets the adhesive dry and stick to the tubes without the risk of them unpeeling in the resin. Next I pour a thin coat of ca over them and let them dry another day. It's probably overkill but the ca will saturate the paper where the air used to be. I'm guessing your air issues are from air in the paper fiber. I always warm my Silmar 41 poly resin up because it's stored in my basement where its colder this time of year. I pour out in a clear Kroger plastic cup the amount needed and place a clip light near it, without touching it or you'll melt your cup, and put a tinfoil lined box over it, trapping the warm air from the 100 watt bulb. Just check it every 10 minutes to see how it's thinning out. Once you get it thinned, let it sit a few minutes to remove some of the heat in the plastic cup, or it will set up quicker on you. Then add the drops of hardner and stir as needed. Pour the resin from the cup onto the blank tube and let it fill in around the tube, to avoid making bubbles. I use a pressure tank but others like Don Ward get good results without one. Get you a small piece of wire and bend it in a half circle at one end to squeegee over your tube to move air bubbles off the label. Hope this helps, and Don't give up, your almost there.
 
Last edited:
What kind of label are you using? All the steps you are using seem to be right. What are you sealing the label with???

I'm using Avery labels the 2x4 inch ones, can't remember the number right now. I used a spray on acrylic sealer from Walmart, but my next try will be Mod Podge that I just picked up.
 
Also what type of resin? I use PR resin to cast various items. I read someplace to put the PR resin in a hot water bath (not hot enough to melt your cup of resin,don't ask how I know :biggrin:) I let my resin get warm and it thins out. then I add 4 drops per ounce of hardener and mix and pour. I get great results. I'm sure others have different things to try. I wish I knew where I read about heating the PR. I would give credit to the originator.

I also use PR resin (Silmar) and warm it up to thin it out.
 
heres what I do... First I print the decals or labels and let them dry over night. Then I spray them with a satin clear coat to seal the ink, and let it dry over night. Then I put them on the tube and let them sit a couple hours. I think it lets the adhesive dry and stick to the tubes without the risk of them unpeeling in the resin. Next I pour a thin coat of ca over them and let them dry another day. It's probably overkill but the ca will saturate the paper where the air used to be. I'm guessing your air issues are from air in the paper fiber. I always warm my Silmar 41 poly resin up because it's stored in my basement where its colder this time of year. I pour out in a clear Kroger plastic cup the amount needed and place a clip light near it, without touching it or you'll melt your cup, and put a tinfoil lined box over it, trapping the warm air from the 100 watt bulb. Just check it every 10 minutes to see how it's thinning out. Once you get it thinned, let it sit a few minutes to remove some of the heat in the plastic cup, or it will set up quicker on you. Then add the drops of hardner and stir as needed. Pour the resin from the cup onto the blank tube and let it fill in around the tube, to avoid making bubbles. I use a pressure tank but others like Don Ward get good results without one. Get you a small piece of wire and bend it in a half circle at one end to squeegee over your tube to move air bubbles off the label. Hope this helps, and Don't give up, your almost there.

I do everything you mention, except I sprayed the sealer on after the label was on the tube, do you think that would make a difference? I use hot water to warm my resin and an automotive pick set to remove the bubbles, but pretty much the same. I'm hoping it is the sealer that I'm using, I might have to try the CA coat also. What CA do you use (Thin, Medium, Thick)?
 
I haven't had any luck with Mod Podge or the spray on sealers. I was told that some of the sprays have additives that will cause problems. I use ca glue and Elmers glue to seal my stuff. The only thing I might add is try letting the ca cure or out gas for 3 days and make sure the resin is not sticking the the mold. I've found that a lot of times it's not air causing the problems it's the resin sticking to the mold and pulling away from the tube.
 
I don't like mod podge either. I pretty much follow what John U described (except for how I heat the resin) and I use thin CA to coat the label. Spraying with a sealer would be easier but I've always used thin CA. I use a silicone plug to hold the tube; drizzle on some thin CA and smooth it out wearing nitrile glove on my smoothing hand.

I pay special attention to make sure the seam (overlap) is well stuck along the edge.

Like John said, keep trying. You are almost there.
Do a good turn daily!
Don
 
Last edited:
Well it sounds like I can throw the Mod Podge away, lol. I will have to try the thin CA, although, I don't know if I have the patients to wait 3 days for it to cure.:) Can you use accelerator on the glue?
 
Last edited:
I spray on modge podge to the decals just after i print them let the set 12 to 24 hr ...cut put on tube.. pat dry let set 12 to 24 hr .....mix pr slow ,add to mold slow let it set a bit then tap sides of mold if i see bubbles next to tube....workes for me
 
I tried lots of methods and had trouble with everything. I started using an inkjet rather than a laser printer and stopped coating the labels - then I had success.

I also use an inkjet, so you don't have to seal them with an inkjet?
 
Last edited:
I use thin CA like Don mentioned. I only use the spray ( 2 light coats) to seal the ink from smudging. The CA, in my opinion is what makes the difference, soaking in and sealing everything for the resin to stick to. I feel modpodge only seals air in and sits ontop like a film. I like that CA soaks in and it all becomes one, so to speak. I would also suggest you warm up your tubes before pouring. ( under a light) this will remove any moisture from the surface and give your resin a good dry surface to cling to. Good luck!
 
I used both Mod Podge and CA glue and a decal sealer.

no matter what you use the tip that doesn't often get discussed is you have to allow the tubes to air out for significant amount of time so that any gas is released by whatever you're using to seal them is gone before you put on the resin. I typically let tubes rest 24 to 48 hours between different applications for example putting on carbon fiber with superglue allow it to rest for 48 hours attaching parts on top of the carbon fiber let it rest for 48 hours before you cast it. I've done decals on top of tubes make sure you let the rest 24 to 48 hours before you actually cast the resin.

Cheers and happy casting
Mike
 
I hate to say it but patients is also a key part. I know it's hard to wait but if you look at it from the other angle how long does it take to start over? The positive is that when you get your method down and turn your pen the satisfaction is well worth the wait. Don't give up because I think it adds a new dimension to the hobby.
 
I've only done a few labels and it looks like i was lucky. I used PR from Michaels mainly because it's nearby and I can get it in relatively small quantities. I always wait for their half price coupons and then the wife and I each get one. I used the avery stick on labels with my ink jet printer. After letting dry overnight I warmed the pr in hot water to thin it out then coated the label with pr with a small artists brush taking care to have no bubbles. the PR with hardener was then poured slowly between the two tubes letting it slowly rise from the bottom up. I had made my own moulds that hold two sierra tubes so poured the pr in between the tubes. I either did something right or was really lucky as I don't have a pressure pot or vacuum chamber.
 
Every time I used a sealer, Mod Podge, CA or even clear acrylic paint - regardless of curing time, I had problems. When I cast the labels without a sealant, I had success.

John and Don, and others have much more experience than I do. Their advice is good. If you do want to try an uncoated one as an experiment, next time you cast, it won't take much time to prepare.:)
 
Changed my mind, I thought it worked, but a few days later, the resin separated from the label.
 
Talking to myself

Tried it again, and success. I think I got a little excited the last time and didn't wait long enough before I turned the blanks. Also, can the water from wet sanding seep in the ends of the blank and cause problems?
 
Last edited:
Thanks John, no one better to take advise from than you, I want to pull my hair out just doing these two blanks, I don't know how you do it.
 
Yes, I would suggest applying some thin ca to the ends of your blank after trimming and before turning. It's a good idea to do this with any clear cast object blank. Better safe than sorry. Glad to hear you found success!

John took the words out of my mouth! this step is also very critical when working with labels otherwise the results will be what looks like a wicking effect on the paper and that is a failure!. so many steps to follow, but once you get yourself into that groove, it will get easier and become second nature for ya! All this talk, i would love to see some pictures of your results!
 
  • Like
Reactions: KCW
Yes, I would suggest applying some thin ca to the ends of your blank after trimming and before turning. It's a good idea to do this with any clear cast object blank. Better safe than sorry. Glad to hear you found success!

John took the words out of my mouth! this step is also very critical when working with labels otherwise the results will be what looks like a wicking effect on the paper and that is a failure!. so many steps to follow, but once you get yourself into that groove, it will get easier and become second nature for ya! All this talk, i would love to see some pictures of your results!

I second the request for a picture of the results.
 
  • Like
Reactions: KCW
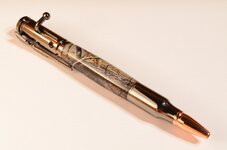
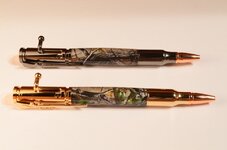
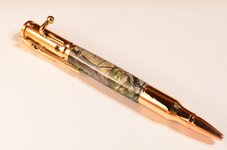
These are what I was working on. They are for my dad.

DSC_0119.jpg

DSC_0120.jpg

DSC_0123.jpg
 
Dan job well done. See that hard work paid off and you learned as you went. Yes whenever a decal comes right to the end of the blank it is important to seal the ends with some thin CA. Thanks for showing and you are now in the clear. I am sure Dad will love them.
 
  • Like
Reactions: KCW
Dan job well done. See that hard work paid off and you learned as you went. Yes whenever a decal comes right to the end of the blank it is important to seal the ends with some thin CA. Thanks for showing and you are now in the clear. I am sure Dad will love them.

He better love them! These things made me want to put my head between centers.
 
Back
Top Bottom