Tips and Tricks Request! How to avoid?

Signed-In Members Don't See This Ad

TLowe2

Member
Joined
Oct 21, 2024
Messages
4
Location
Washington State
Hello all, I recently started using CA for my finishes and am learning what works and what doesn't. One problem I've ran into a few times is when I'm at the assembly stage and I press my blanks together a cloud pocket forms on the end. Does anyone have any tips to prevent this? It has happened 3 times in a row. :(

These pens are:
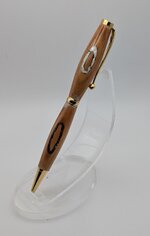
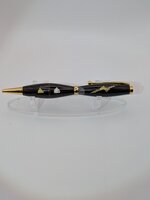
Olivewood with real T-Rex fossil inlay and silver inlay. Ebony with inlayed T-Rex fossil scales of justice weighing gold and silver triangles and a gold lightning bolt with diamond dust.

For what it's worth real T-Rex fossil is ~$15 for a small bag of tiny bits which is enough to do a lot of inlays! The silver and gold I used were both very thing sheets!

I am nowhere near where I want to be before leveling up to more expensive pen kits so I am practicing on slimlines.
 

Attachments

  • PXL_20241113_010043705.jpg
    PXL_20241113_010043705.jpg
    79.1 KB · Views: 68
  • PXL_20241109_072110588.jpg
    PXL_20241109_072110588.jpg
    71.5 KB · Views: 67
Signed-In Members Don't See This Ad
Try hand trimming the excess CA overrun with a sharp barrel trimmer. Do this by hand and don't be too aggressive. Then soak a piece of folded paper towel with thin CA and pressing each end of your blank in it. Don't hold it too long. Just enough to get CA on the ends and seal them. Don't use excessive pressure when assembling.
 
That is the CA lifting off of the wood. Oily wood makes it easy for the CA to do that as mentioned above. If you get CA onto the bushings as you are coating the blanks, breaking the CA'd blank from the bushing will cause that too.

During assembly, with just a tiny bit too much pressure - that will cause the same results as breaking the bushings from the blank.

IF the problem is bushing and blank separation, Turning Between Centers (TBC) will eliminate that - because you finish with CA without using bushings. No bushing, not breaking point and no lifting off.

IF the problem is in assembly, it can be from one of two problems:
1. small amount of cured glue (CA or epoxy) inside the tube. When pressing the fitting in, the glue forces the tube to expand and that causes cracks in wood, OR the CA to loosen on the surface and lift off as in your picts.
2. the best way to smooth the ends after finishing with CA is a "Sanding Mill". A pen mill can "catch" and lift the CA away from the blank in spots. An uneven finish on the ends will do similar as it is pressed. A sanding mill is less invasive so to speak, or easier on the finish. It is a bit slower if you are not used to it but it sneaks up on smoothing the end of the blanks up to the brass tube, and is less likely to lift the CA off the surface of the blank.
 
Welcome to the world of finnicky finishing of pens

What you have is typical what has been discussed here many times. here is how I would handle this. Start first with getting Ca on the bushings and then breaking free when taking off. Stop after so many coats and then just take the blank free of the bushings and sand the ends down on a piece of sand paper 400 grit that is flat on a mirror or steel plate. Better yet use delirn cone shaped bushings when finishing . This is what most people do and you avoid that part of it.

Next is assembly and this is where most problems happen. First if you use CA to glue your tubes in may I suggest stop doing that and switch to an epoxy. Epoxy will dry with some flex in it as CA will dry very hard and no flex. The flex will help with the tube expanding ever so slightly when components are pressed in. This is natural because that is the way they stay in. But before pressing in run a round rat tail file in the tube to clear any residue from CA or adhesive. Then before pressing components in I like to check the tightness of them by hand pressing a little. If I feel it is too tight I take that file and file the inside of the tube to loosen the fit. Do not need much but do need concentric when doing it so no flat spot. Then when pressing make sure parts are in line and straight as you push them in and this all should help with your problem.
 
All above is good info to help fix this issue. I just wanted to add, make sure the inside of the tube is clean from CA or debris, or it will force your tube to expand more than it should when pressing in your parts, adding to the ca finish pulling away from the pen body. I also seal my end grain and body of the blank with ultra thin CA before applying the finish to seal the pours and build the CA base. In cases like this I've been able to use a whip tip on the ultra thin and apply a small amount on the end grain at the white foggy lift area, and it will often flow in there and fill the gap, sealing under the finish and removing that spot. You may have to remove the presses in part with a punch rod first.
 
Better yet use delirn cone shaped bushings when finishing . This is what most people do and you avoid that part of it.
All good ideas above! That is the most important part! The cone bushings don't stick to CA very well. Then sand the end of the blanks and apply thin CA to the end of the bushings. Check and make sure no CA got into the inside of the brass tube.
 
Umm... yeah, what all those guys said. I had the exact same issue for a while. Going to plastic cone shaped bushings, just touching the end of the blank to my squaring jig (disc sander & PSI holder) and trying to only use enough pressure to seat everything the way I want it has helped a great deal.

JohnU's point about making sure there is nothing inside the tube is important too. I check all of my tubes immediately after the glue is set to make sure there is no glue in the tube. I have a small rod that I wrap sandpaper around and clean the glue off that way if needed.
 
I don't know about the black Non-Stick Plastic Bushings that Penn State Industries sells, but the white Nylon Finishing Bushings from Exotic Blanks and the white HDPE Finishing Bushings that Exotic Blanks sells can both be soaked in acetone to dissolve any CA left on them after use. I routinely drop the bushings after each use in a 1/2-pint jar of acetone for about 15 to 30 minutes and fish them out with a toothpick. Even after several years of use they are still in like-new condition.

For removing the buildup on the ends of the blanks after finishing, I re-mount them on my disc sander based squaring jig and lightly (very lightly) touch the ends on the sandpaper to remove built up CA. Then as someone has already mentioned, I make a blotter from a small folded piece of paper towel, apply a few drops of thin CA, and daub the ends of the blanks on the blotter. This seals the ends of the blanks and helps prevent the adhesion issue you are having.

Also as has been mentioned already, I clean my blanks and let them dry before I apply my finish. Acetone has been mentioned, but I clean mine with denatured alcohol (wood alcohol) instead. Although it takes a little longer to evaporate from the blank, in my opinion, it is a little less harsh, has less of an offensive odor, and it works almost as well. (I still keep both in my shop however, because I use acetone to dissolve CA from finishing bushings and clogged up CA caps, etc.

Dave
 
A possibility not mentioned so far is to ensure the parts being pressed into the tubes are in as perfect alignment as you can get. When they are cocked a little the brass distorts which makes the blank and CA move resulting in the lifting or cracking.
 
Back
Top Bottom