Thoughts on sanding segments

Signed-In Members Don't See This Ad

Dragnet

Member
Joined
Mar 8, 2020
Messages
15
Location
Pensacola, Florida
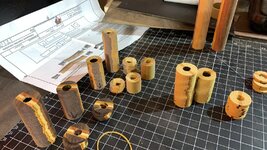
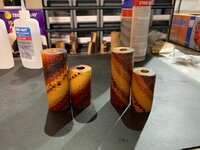
I primarily make spiral segmented pens, and one of the most tedious/time consuming aspects of this is hand-sanding each individual segment prior to glue-up. After slicing my blanks into small segments (usually 3-4mm) using my dewalt table saw and diablo 7 1/4" ultra finishing blade, I typically just lay a couple 9x11 sheets of sandpaper down (usually 150 grit and 240 grit) and sand each segment front and back on each by hand. However with up to 35 segments per pen, this can take quite a bit of time and often results in tired fingers and gloves that develop significant wear, sometimes forming holes. In order to achieve a good fit, especially with spiraling, however, I've found this step to be absolutely necessary.

I was wondering, though, if this process could be carried out using a mini sander or some other device? Part of the problem of course is the size of the segments, which in my case can be barely thick enough to grasp firmly with 2-3 fingers. I've attached photos showing a few of the blanks with segments sanded and placed on the tube, along with one showing 2 pen blanks after the glue-up.

For those who make pens like these, I'm curious as to how you sand and if anyone may have suggestions on other methods I could try to make things easier on myself.

Thanks in advance!
 

Attachments

  • IMG_9103.JPG
    IMG_9103.JPG
    341.1 KB · Views: 321
  • IMG_8541.JPG
    IMG_8541.JPG
    323.3 KB · Views: 320
Signed-In Members Don't See This Ad
Are you talking about each piece that goes into making up a ring or the ring itself?? I would avoid power tools on sanding anything that small. You only need to knock off the fuzzies from the blade. I would set up a piece of 150 grit sandpaper on a piece of glass by either using adhesive backed paper or spraying some adhesive on a piece of sandpaper. Glass is about as flat as you can get. If your blade cuts true no need to sand the mating portions. Now if you are talking about sanding rings that should be easy enough with again flat sandpaper and only one grit paper needed. Maybe more info needed.
 
Talking about the ring itself. I think my blade cuts well, but there is still a need for sanding prior to the glue up.. been doing what you suggested, it's just tedious. I guess I was thinking something like the mini belt sanders used by jewelers , perhaps I could throw some 150 grit paper on one of those and hold the ring flat over for a few seconds. Then again, these are so thin that I'm not sure I could get a good enough grip.
 
I can only relate this with the segmented bowls and vessels I do. With your rings so small and thin, it will be difficult to regulate the amount that is removed using power tools. It may be tedious using glass and sandpaper, but to keep a consistent ring thickness I believe that is the way to go.
 
Preface: I don't do anything like this, so I have no experience, but I do have some ideas for you to consider.

Have you considered power sanding (or even manually sanding) the exposed side of your glue up after each disk is sliced off. That would give you something to hang on to while at least one side is being sanded and would leave you with only one un-sanded side on each disk to finish things up.

Another thought would be to take the parts from above and stick the already sanded sides down to a piece of double stick tape stuck to a flat surface and then hit them all at the same time using a random orbit or palm sander.

Dave
 
Joshua, I use the same method as you, just with one grit (120) and no gloves. Some steps are just unavoidable and this is one. Your blanks look very nice đź‘Ť
 
Yes as mentioned when you start introducing power tools in sanding small thin pieces such as that you run the risk of bevel sanding or sanding too much on one ring and so forth. Sanding the rings should not be that bad. I to have done this many times with small pieces and never use gloves. You could attach to a piece of wood with double sided tape and lightly sand that way. The trick is to sand evenly. I believe what you are sanding off is merely glue from the segments. Try to minimize this as much as possible and the sanding will be less. Now that I looked back to your thread you said you make these in sticks and cut rings off so again then it should not need much sanding or you are using the wrong blade to cut the rings. There is no glue between rings to worry about. I sand rings like this to just knock fuzzies off.

IMGP0006.JPG
IMGP0846.JPG
Copy of IMGP0892.JPG
 
Last edited:
I was in a furniture manufacturing plant a few years back. The maintenance person who was showing me around was proud of a new finish sander they had just installed. It was a drum sander that operated over a feeder belt that was semi rigid with tiny holes that were connected to a vacuum system. The object to be sanded was held down by the vacuum. He offered to sand the ink off one side of a dollar bill, but then decided that would take too long to set up so we settled for sanding the ink off one side of a business card. It went in printed and came out smooth and clean. I think if I wanted to sand small pieces of wood very smooth and precise, I might build a vacuum table.
 
I was in a furniture manufacturing plant a few years back. The maintenance person who was showing me around was proud of a new finish sander they had just installed. It was a drum sander that operated over a feeder belt that was semi rigid with tiny holes that were connected to a vacuum system. The object to be sanded was held down by the vacuum. He offered to sand the ink off one side of a dollar bill, but then decided that would take too long to set up so we settled for sanding the ink off one side of a business card. It went in printed and came out smooth and clean. I think if I wanted to sand small pieces of wood very smooth and precise, I might build a vacuum table.
You still would need a machine that is precision to sand evenly. Tough to do with a drum sander or even a hand held sander unless you maybe use some sacrificial pieces to surround the good pieces. Snipe is possible and tilting is possible and will sand uneven.
 
I have used my drum sander to make very fine veneers. I lay double sided tape on a flat board and lay the little bits on this. make sure that they are pressed well down onto the tape and the several passes at a very fine cut usually suffices. I have more success than failure, but failure still occurs.
 
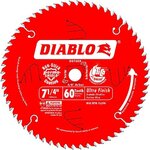
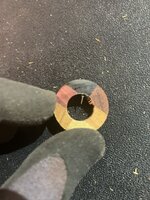
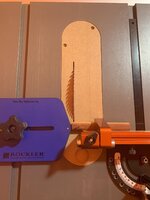
Thanks guys for all the responses. John, that is a masterful pen ! Just to follow up on my process as there seemed to be some questions -- all my sanding is done PRIOR to the glue up. I am simply sanding the rings to clean up the surface after the table saw cut. I've attached an image showing my table saw setup for slicing blanks, the blade I'm currently using (chosen primarily for its thin kerf) and I also tried to capture one of the rings showing a defect or inconsistent area where the blade left me with a little extra sanding to do.

Of note, if I were simply gluing the rings back together just as they were prior to slicing (or very close) , then much less sanding would be needed. There is no fun in that though.. I enjoy experimenting with the glue-up, sometimes turning rings 180 degrees relative to its neighbor in order to fit a design.. because of that, I've found that I need to sand each ring a fair amount to ensure good matches without any gaps.

I do not have a drum sander, so it sounds like my current strategy, while tedious, may well be the right one. I wonder though if anyone may have any tips or suggestions with regard to my table saw set-up for slicing and/or my saw blade? If I were to try another blade, it would need to produce a kerf no larger than the one I'm using, which is 1/16".
 

Attachments

  • 51A8cPLgQmL._AC_.jpg
    51A8cPLgQmL._AC_.jpg
    44.8 KB · Views: 197
  • IMG_9453.JPG
    IMG_9453.JPG
    422.1 KB · Views: 208
  • IMG_9457.JPG
    IMG_9457.JPG
    249.1 KB · Views: 187
As I said all you have is fuzzies and that is all you should have if the blade and saw have no runout. That should be a slice that is true and clean. You need to have that miter guage tuned in as well. It needs to be dead 90 to the blade and no wobble in the slot. Miter guages tend to do that. I have shown my set up many times here and use it all the time. I am currently using it on 7 different pens right now. It is dead accurate because I took the time to set it up when I built it. It is nothing fancy like some people make but it works. You seen it in that pen I shown. I use a ton of doublesided tape in my pen making. Use it for many things. I use it on this sled too and many times I just mark a point on the fence and sometimes I use a stop block. But if I find that the pieces being so small kick back I will use double sided tape on the stop block too. Had to do this on one pen I am working on and sometimes I need to dial in a cut but do not want to move the stop block so I add layers of tape to zero me in. Had to do that on another pen I am working on currently.

To sum this up you should not have to sand much at all. If you are getting cut marks on the slices that are making grooves than the blade or the saws arbor has runout. Again I sand on a piece of glass with sandpaper adhered to it. Couple passes I am good.
IMGP0005.JPG
IMGP0006.JPG
IMGP0825.JPG
 
Last edited:
I had another idea to run past you. How about a handle, with a small tenon that fits inside of the drilled hole to capture the ring and let you put downward pressure and figure 8 motion on the rings while you sand them via a handle - and if the OD of the rings are consistent in addition to the tenon for the center, a lip to surround the OD as well to reduce the force that would be put on the ID of the ring? Of course the tenon would have to be shorter than the thickness of your rings - Maybe something kind of like this:

Handle.JPG


Dave

PS It's definitely the engineering background coming through. We love to come up with creative solutions to problems.
 
I had another idea to run past you. How about a handle, with a small tenon that fits inside of the drilled hole to capture the ring and let you put downward pressure and figure 8 motion on the rings while you sand them via a handle - and if the OD of the rings are consistent in addition to the tenon for the center, a lip to surround the OD as well to reduce the force that would be put on the ID of the ring? Of course the tenon would have to be shorter than the thickness of your rings - Maybe something kind of like this:

View attachment 244962

Dave

PS It's definitely the engineering background coming through. We love to come up with creative solutions to problems.

Dave, I think you may be on to something with this! I may be able to figure out some kind of workaround, similar to this so that I can use my disc sander just as I do to square the blank following glue-up.

Thank you everyone again, appreciate all the advice and tips.

For those needing a thin kerf, curious as to what blade(s) you guys are using for these sort of "micro" cuts?
 
Here is my latest finished product.
IMG_9499.jpg

IMG_9497.jpg


Working right now on something similar with a spectrum of colors from yellow to red. I'm using Yellowheart, Osage Orange (US & Argentina), Chakte Viga, Pernambuco and Redheart. Trying to find another vibrant red, however, that isn't Padauk (don't care much for the porous qualities). Any suggestions?
 
I use the same method as you, just with 120 grit and some of my rings are 1.80 mm thick.
to clean the central hole, a piece of paper rolled in the shape of a cone makes it possible to remove the burrs. And the piece of 120 is glued with repositionable glue on a piece of synthetic parquet to clean the faces. Long and tedious work but essential to have a quality result. Yours is remarkable.

Thanks for the compliment :). I also use the cone trick.. for sanding the face, however, I just place a 9x11 sheet down and do by hand, typically 4-5 seconds for each face. I guess with segments 1.8mm thick, it would be difficult to get any kind of grip, even if you have fingers as small as mine.
 
Joshua true blood wood is as red as you will get without dying it. Have to say this pen has some layers that are off balance looking at that center band. Now that has to be from cutting. I do not believe you can sand that far off balanced. Again I say this with all sincerity lose the sanding of the discs. Not needed. If you are getting fuzzies then hit just a few passes with sandpaper. Cone shaped dowel with sandpaper attached will get fuzzies around hole if they are a problem. As far as blade goes I use a 1/16" 7-1/4" blade on tablesaw if thin slices are needed. I make thin layers all the time and never have to sand the rings. I use both woods and acrylics. You are talking thin delicate rings here so anything you do has to be with care. Good luck.

I do not remember if you are turning these blanks round before you are slicing and if that be the case than that is where your problem can be. That rod needs to be exact same diameter all the way down the rod with your design being centered. If you are getting blade teeth marks than either the blade is out of round, there is runout in your arbor on table saw or the blade is not 90 degree to table. A sled comes in handy here because you want those rings to have support when it passes the blade. If you are having problem of them kicking back at you when passed the blade then set up a vac on the side the pieces fall too. Put a screen of some sort in front of the nozzle to keep from getting sucked into vac. These are all suggestions to help time wise. But you are sanding rings that never should need sanding unless they have small fuzzies and then quick one two passes and takes less that 10 seconds. Been there done that so I am speaking from experience.
 
Last edited:
Awesome work and you must have the patience of a saint , or a very large swear box for the money 🤫
 
I use this machine - a bit expensive but I can't live without it now. Adjustable to about .002" with a twist dial and perfectly flat/parallel.
 
Joshua

I think you need to build and use a sled similar to John's.
The sled must be perfectly square to the tablesaw's blade.
Your miter guage is likely allowing some very minor movement. The least movement can further impact the blade.
A square, true sled eliminates this.

Furthermore, if the sled is only used for this pen setup, you'll have a perfect zero throat kerf and almost zero sanding. Even fuzzies may become a thing of the past.
 
Back
Top Bottom