Temporary tubes for gluing segments

Signed-In Members Don't See This Ad

Terry Kester

Member
Joined
Feb 17, 2017
Messages
7
Location
Michigan
So I am going to try and do some segmenting work. Seems the best advice is to bore the hole in the blank FIRST, cut the segments, dry fit and then do glue-up. (At least for the design I'm looking at)

Here's the thing. I would prefer to use wood glue (Titebond 3) to glue up my segments and not use CA as I see some do, where they fastening the blank to the tube as you go. (Hopefully won't start a war on which glue is best for gluing tubes)

I would like to use a tube (or bolt or ?) just to keep things in line as I assemble and glue using Titebond, then REMOVE that tube or bolt or whatever and then insert the permanent tube later using 2 part epoxy.

Anyone else do anything like this? Any dangers to avoid with getting the tube or bolt stuck by the wood glue? Would I be making a huge mistake for the epoxy adhesion later to Wax the tube or bolt first to keep the wood glue from sticking to it? Am I crazy and being stupid?

Thank you
Terry
 
Signed-In Members Don't See This Ad
Terry welcome to the site if I did not get a chance to welcome you. Glad you found us and hope you stick around and have some fun. Glad to read of another segmenter wanting to jump in.

Many ways to make a segmented pen. Alot depends on the design being used. What you are asking is not unreasonable. I always use Titebond II or III on my wood glue ups of any kind. i have built pens on tubes before but I like to use epoxy and build them right on the tube as I go. The blank is made and glued with the tube inside and no worries about breakage. That is me. If you choose to use your method, make sure the holes are the size of your tube being used for the kit. You may have to run a drill bit through once everything is glued because of squeeze out. Wood glue will not stick well to a tube. But if you choose to use a bolt it will get in all the threads and become very difficult to remove. No on the wax. Do not sand the tube either if using for just a guide. Sand it later when installing. If you choose my method the key factor is to be able to center the tube within the design being used so correct measurements are necessary. Good luck and hope this helps. others will have more ideas for you. look forward to seeing what you can do.
 
John is right, there are many ways to do it. Here is a pict of segments that I do in most cases, but not all.:

http://www.penturners.org/photos/images/940/1_Blank_construction.jpg

There are 3 blanks in the picture on the upper right is a glued up one that has not been turned.
ON the bottom is one with the segments not yet put on the tube. Above that one is a semi-turned segmented blank. Hey, I can attach it to this post:


View in Gallery
 
Last edited:
Just an idea here, not sure if its feasible or not. Drill the hole in the center, but instead of actual diameter, drill it smaller, the diameter of a plastic drinking straw (easy to get at any fast food joint, and in various diameters. Use the plastic straw as your glue-up tube, and go ahead and use whatever glue you want. Then, once you've got it all glued up and dry, chase through that hole with your actual size drillbit, and procede as you normally would with any other blank.
Does that sound like it would work?This is something I have thought about doing , but have yet to try it, but it seems to me like it would work just fine. If you do try it, let me know how it works.


The problem with that is you run the risk of a blow out that is unnecessary. If you drill all parts to correct size you do not have to stress the glue joints. Maybe have to run the bit through again because of some residue but no stress to the blank. You can never say something will not work because it may do just fine but i would eliminate the risk if i could. :)
 
Terry

Have not done pen blanks but for other larger work have used hardwood dowel turned between centers as the mandrel.

Having the centers on both ends already established and having the "working length" established as concentric made it work with titebond. After glueup cleaned up between centers, smoothed up the headstock side for insertion in a collet chuck, drilled on the lathe and turned.

Can be done.
 
Thank you all for your input. I ended up using a 1/4" bolt long enuf so it was at the flat with no threads. I did my main glue up plus a second with the leftover scraps. In the first case, I removed the bolt in about 30 min or so and worked out well. I did indeed need to run my drill bit back through to do minor touch-ups on the hole but it was ok. The second one with the scrap pieces I made the mistake of leaving over night. The Titebond 3 adhered things very nicely to the bolt. :) I did manage to get it out by turning it with a wrench to break it free, then was able to tap it out.

So, lessons learned. Worked ok as long as the bolt came out in a short time. I will experiment with your suggestions for future stuff.

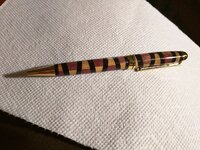
For what it's worth, here is the finished pen. Not thrilled with it but could be worse for my early segmenting work. The pieces didn't line up well, most likely because the hole was not perfectly centered and because the bolt was not 7mm. Also, I learned that Ebony is not my friend. Ended up with black dust embedded in all my light pieces of the pen. Sigh.

As a wise person had posted here on the site before...Another pen for my wife. :)

Thanks again for the great replies.

Terry
 

Attachments

  • fma.jpg
    fma.jpg
    207.5 KB · Views: 475
Terry welcome to the world of segmenting. very nice pen idea and it is a start. You have learned some valuable lessons. Sometimes it just better to try on your won and learn as you go. You can now visualize what can go wrong. The next one you make will be better. A pattern like that really does better if you can build on the tube because you can line things up better and not have to worry about spinning out of alignment. I like to use epoxy when gluing pen blanks of any kind. I also like to use my skew to turn them. I skip the sanding part if I am using woods that can contaminate one another. I go right from tools to finish. When you get proficient with the skew you will find it to be the best tool in the arsenal.

As said good job and keep at it.
 
Ah yes, the dreaded skew. I have managed to not "stick" it too much but in my attempts so far, still needs sanding. However, sound advice and I'll give it more practice.

I have owned my lathe for 25 years but until about 10 pens ago, only used it once. Practice, practice, practice.
 
Ah yes, the dreaded skew. I have managed to not "stick" it too much but in my attempts so far, still needs sanding. However, sound advice and I'll give it more practice.

I have owned my lathe for 25 years but until about 10 pens ago, only used it once. Practice, practice, practice.

John T:
I skip the sanding part if I am using woods that can contaminate one another. I go right from tools to finish. When you get proficient with the skew you will find it to be the best tool in the arsenal.

Like John, I skip the sanding part. Don't think of it as "if I don't sand it I will have to settle for less smooth". IN wood working, there are some high end, and I mean "HIGH end/priced" works of wood art that do not sand but use scrapers only. Sanding removes and moves the dust. Scraping removes and does not contaminate. Skipping the sanding is more mental than difficult. It is a matter of using a different technique.

Unlike John, I don't use a skew, but rather the scraper. I use my own made scraper that I can sharpen - sharper than the carbide inserts. People argue about this but I have several carbide inserts and I can get a finer cut with my scraper that I sharpen than I can with the carbide. The carbide lasts longer for rough cutting than mine. I do sharpen mine 3 or 4 times per blank. I have a piece of hardened plate glass with 4 strips of pressure sensitive sandpaper - 400- 800- 1200 - 2000 and take a swipe or two every minute or so when turning. Keeps it SHARP.

Skews, in general will do better on soft wood and scrapers in general will do better on stabilized and hard woods. Skill level comes into play also.

Here is a picture of a turned blank/pen that did NOT have any sanding done on the blank:

View in Gallery

ON the upper end, those dots are silver solder and they smear on the wood like pencil lead. NO sanding will work on that. The only way is use the scraper, or if proficient, the skew. These two tools will make the wood smooth.
 
Last edited:
Gorgeous pen. I'll work at learning how to ditch the Sandpaper. I've already doubled my knowledge with the help of everything I read from everyone here.
 
Temporary Tubes

Terry

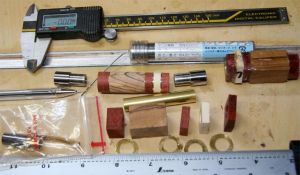
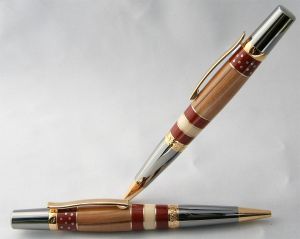
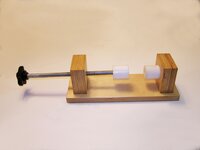
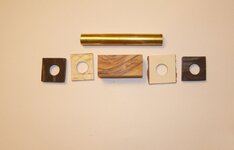
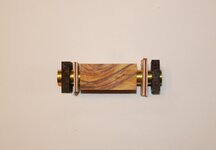
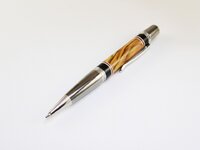
This is the way I make a simple segmented pen. 1st pic shows a vise that I made especially for segmenting, 2nd pic shows parts to be segmented, 3rd pic shows parts dry run assembled, 4th pic shows parts with epoxy applied and clamped up in vise, and 5 pic shows completed pen. Try this, play with it a little and I'm sure you will turn out some nice pens. Keep us posted on your progress.

Ben
 

Attachments

  • segmented A.jpg
    segmented A.jpg
    142.7 KB · Views: 342
  • segmented B.jpg
    segmented B.jpg
    116.3 KB · Views: 318
  • segmented C.jpg
    segmented C.jpg
    122.4 KB · Views: 309
  • Segmented D.jpg
    Segmented D.jpg
    167 KB · Views: 294
  • segmented E.jpg
    segmented E.jpg
    81.4 KB · Views: 283
Terry

This is the way I make a simple segmented pen. 1st pic shows a vise that I made especially for segmenting, 2nd pic shows parts to be segmented, 3rd pic shows parts dry run assembled, 4th pic shows parts with epoxy applied and clamped up in vise, and 5 pic shows completed pen. Try this, play with it a little and I'm sure you will turn out some nice pens. Keep us posted on your progress.

Ben

Ben, that is plum good. That is what I need to make. I have done quite a bit of threading wood; that will be simple enough. Thanks for the post.
 
Terry

This is the way I make a simple segmented pen. 1st pic shows a vise that I made especially for segmenting, 2nd pic shows parts to be segmented, 3rd pic shows parts dry run assembled, 4th pic shows parts with epoxy applied and clamped up in vise, and 5 pic shows completed pen. Try this, play with it a little and I'm sure you will turn out some nice pens. Keep us posted on your progress.

Ben

Ah, yes....I'm liking this, a LOT. Methinks that I shall have to make one for myself :). Thanks for sharing.
 
The plastic straw, IMHO, might melt with the heat from the bit and make a bigger mess. I built custom fishing rod grips from cork and other materials. Cork rings had a 1/4" hole. I drilled other materials 1/4" too. I put the rings in order on a piece of all-thread wrapped with teflon (plumber's) tape so the glue wouldn't stick. Pull the rod by turning a bit and then place the rough grip on the turning mandrel. Yes, I used TBIII for the grips and never had a problem. Lots of good information to get there by different routes.
 
Pulled this up for the information given here. I got ten pen kits for Turning For The Troops and would like to do a couple with segmented blanks. I have tons of wood! Kits are the Woodcraft Slimline which can allow some "creativity" on the contours like most pens. I'll try to take some photos to share.
 
Addendum: Our AAW chapter had a demo last night about turning a small platter with scrapers. Very interesting and informative with the different scrapers and grinds that can produce very smooth pieces.
 
Terry,
Follow Lee's advise, I've done several segmented pens using similar process and had excellent success. Won't get into best glue to use, but I use epoxy. It gives me more time to position segments. Your pen looks good keep up the good work
 
I drill the blanks with a 1/4" hole, so I can stack the parts on a 1/4" wood dowel. After it has dried, I turn between centers to 3/4" diameter. It fits my 3/4 collet chuck, then I drill out the dowel and glue in my tube. To prevent blow outs I either drill from both ends, or I make them extra long and cut off the excess.
 
I do a lot of segmenting, too. I usually have at least one segmented pen is some stage of production. I don't do a lot of wood though. For simplicity I usually cut a tube to a somewhat longer length and make each end piece like wise a little longer, glue it up with epoxy then trim it to size on a disc sander. This way I can "sneak up" on the exact length. It may take me a little longer but I achieve good accuracy.

Ben, that jig is awesome, thanks for posting it!!!
 
I'm probably a little late to the party but what I've found works best for me is drilling the blank, cutting it, then taking a 1/4" metal rod if your using a 7mm kit and putting in the holes of the multiple blanks while it dries. It's worked pretty well for me. As long as the metal rod is shorter then the blank itself it works.


Sent from my iPhone using Penturners.org mobile app
 
If the skew puts you off or theres other reason you have to sand try some wipe on sanding sealer before sanding and between each grit. I found it to work quite well on my segmented bowls with bloodwood and padauk between white oak segments.
 
Back
Top Bottom