Still Practicing Pen Photography

Signed-In Members Don't See This Ad

W.Y.

Member
Joined
Aug 10, 2008
Messages
1,656
Location
BC, Canada
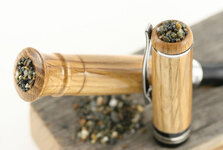
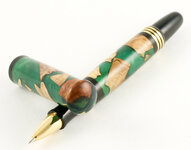
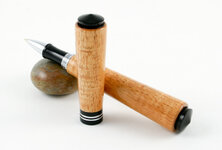
Still playing with photography practice. Gradually getting there ..
Have not figured out how to get rid of the second light reflection line yet. This time I used a florescent fixture with the plastic diffuser covering the tubes and thought that might have helped because previous ones have been without the diffuser.

Photopractice2.jpg


Photopractice1.jpg


Photopractice3.jpg
.

Have never been able to get the background snow white yet with the white balance settings even though I am using white printer paper under the white cloth. I can get the background very white if I increase the brightness but then it is too light for natural pen color.

I might try the same pens with a Grey background and see if it makes any difference to the reflections.
 
Signed-In Members Don't See This Ad
William; If your camera has a white custom setting, use the white paper by itself to set the white balance. It looks like the balance is set a little too much to the blue side.

What camera do you have?

Look at the manufacturers web site and search for the manual in PDF form. It is a lot better than the postage stamp size manual they print now-a-days. You can blow up the manual to readable size.

Randy .
It is a Sony DSC-H10 . I do have the full pdf manual for it but they can be daunting the way they jump you around from one page to another sometimes from close to the front to somewhere near the last page or anywhere in between.
It does not have a cusom white setting per say but it has quite a few settings for different types of light sources . I can get it to look snow white in the viewing screen with one setting but as soon as I process it , I get the tint shown in the picture. Those pictures were taken under daylight florescent tubes but I have tried cool white as well as natural light both indoors and outdoors in the past.
Of course I use macro setting and I am working Manual function rather than Auto as per instructions from a member of my own Woodworking Friends site who shows the best pen photography I have ever seen from anyone , anywhere , bar none . . . He has also been helping me because he has a Sony camera. Not the same model as mine but basically the same guts in it. Mine is a newer model (last year) with just a few extra bells and whistles than his. .

Thanks for you reply . I like to get all or any suggestions of things that I have not tried yet. .

I am endeavoring to get my photos as natural as possible without using any photo editing software at all , although I do have a few good ones on my computer . Any photos in this thread will be with zero use of photo editing software .
 
The background not white is a good indication of shutter speed (under exposed), I hope you are *NOT* shooting on automagic mode but in manual mode.

To balance out the light on the pens put lights on both sides of the pen, remove any / all diffusers and flood the subject with light. You can not have to much light.

Reflections is a question of angle of the camera to the direction of the light sources. If you have to see reflection then force it to be used for your benefit.

Also rem the sensor on the camera will see the world in zone V, middle grey. You will have to force it to be over exposed to get proper white colors.

Thanks ED.

As mentioned above I am shooting in Manual mode and not Automatic.

Perhaps you would like to post a few pictures of yours ? to show how your suggestions are working for you ?
 
Last edited:
Bill, If that is macro function then you must be standing 20 feet away. :)Does it have a super macro function???.. I am serious you should try getting the pen closer. I always think way too much is made about that shine line. All that is to me is a reflection of the lights above the pen when standing under a light source. I am no photographer and there are people here that take better photos than I but that is my 2¢
 
Bill, If that is macro function then you must be standing 20 feet away. Does it have a super macro function???..

12 inches away as suggested by a Sony camera user with the same guts as mine and who produces absoloutly FANTASIC pictures as mentioned before. .
No super macro setting . Only macro on his and mine.
 
Last edited:
12 inches away as suggested by a Sony camera user with the same guts as mine and who produces absoloutly FANTASIC pictures as mentioned before. .
No super macro setting . Only macro on his and mine.


Does the camera have a optical zoom feature??? Or a digital zoom feature??? If so use it. The only reason I am asking this is the pens look lost in the frame of the photo at least on my monitor. I have seen some of your pens where you shown them to fill the frame better. Maybe those were edited and that is what I am remembering. Good luck. Photography is a whole other hobby. :)

PS--- Maybe you would like to take a photo of the pen using the macro and one not using it and compare. Keeping the pen and camera at the same distance and this way you can see if that function really works on your camera. Ed is using a lens to create his macro photos but a camera such as yours which I am guessing is a good quality camera would have a better ratio going from standard to macro. You should be able to see this. As said Good Luck.
 
Last edited:
Thanks Ed for the link to your last post plus the closeup pictures you posted in this thread. Wish I had more time to participate in the various sites but my own site has got busier than I ever expected it to become and along with a few other sites I check out there just isn't enough time to be active in them and still have enough shop time. I do scan through a few sites daily and this IAP site is one of them

I noticed in your last post before this one you mentioned using a light tent . I have tried a few bought ones (which I took back) as well a a few home made ones over the years and never had any success with them. But then I know more about photography now than I did then and it was with a different camera. .

I notice there is not much shine on your pens. Are you using a satin finish or are you setting your camera purposly to eliminate the shine and more to focus on the wood than on the finish ?
 
I try to remove any reflections that I can, it may be impossible to remove all of it but if I can reduce it greatly I am happy. The shredded money is just like the snakeskin, it is indeed a high shine on it, the amboyna burl euro black titanium (first image) has a CA finish on it, the next two (apple and afzelia burl) that has been stabilized and very reflective as well.

Example of light angle.

IMG_4811.JPG
Here we can see some MAJOR reflection and it is very distracting from the image.

IMG_4784.JPG
Here I changed the direction of my monolight and changed the view angle of the camera. The reflection is still there but greatly reduced.

IMG_4690.JPG
Here again we see reflection but my goal was pure documentation and the reflection is not that bad but it is not a front page image by no means.

And finally
IMG_4689.JPG
the same set in a better layout with very little reflection.

The quick and easy method to wash out reflection is to pump up the light volume and bounce it around inside a light tent and metal that reflects is a pure pain in the butt to remove.


Quality of light can be expressed in direction and volume (among other things) If you change either your artwork takes on a whole new meaning.
 
Thanks ED .
Those are fantastic pictures and great work.
Are you using a white background for those pictures or a slightly grey one . Or maybe it is my monitor. Is it really possible to get a pure white background in the $250.00 price range of camera like I have ?


Well I have exhausted my ideas of getting a completely white background. I think I have tried about every possible setting in my camera and still get a slight tint of color unless I put the brightness so high that it washes out the picture . Time to move on rather than waste a lot of time trying to do the impossible.

I have however tried Grey carpet as well as blue paper shop towels as a background using the same three pens as a reference. .
My wife and I seem to prefer the Grey carpet best . I know some will disagree with that and say it is too busy and distracts from the article being shown but to us it appears to show the coloring of the bright copper plating better on the coffee bean pen.. I suppose that is one of those all in they eyes of the beholder things.

Carpet2.jpg


Carpet1.jpg


Carpet3.jpg


Blueshoptowel3.jpg


Blueshoptowel2.jpg


Blueshoptowel1.jpg
 
Tray a grey background. The carpet is too distracting and the blue makes the colors look wrong.

I have a Sony DSC H5 and a Sony DSC H20. I love both of them but prefer the H5 for pen pictures since it allows the most manual operations including custom white balance. You are right, you model does not have a custom white balance setting. I assume you have tried shooting the same picture with all of the different white balance pre-sets that are available on your camera? Also, have you tried shooting with a higher ISO setting?

I shoot all my pens in aperture priority mode with a custom white balance and a f stop of about 5.3. I use a photo tent with 3 5,000k compact fluorescent bulbs in 9" aluminum clamp on shop lights, one one each side and one on top. I shoot with macro and zoom in to fill the screen. I also use a tripod with the timer function so that I am not touching the camera when it goes off. Frequently I shoot in bracket mode and choose the best of the 3 that the camera takes.

All of the photos I show here and on my website are un-retouched with the exception of cropping, re-sizing, and occasionally removing some dust specs. No color correction, sharpening, or anything like that.

I am by no means a photographer. It is not a hobby I want to pursue! Too many expensive hobbies as it is! I just played around with my camera until I got the right settings and went from there.
 
I use a variety of things. My most common background is believe it or not bright white printer paper. The cheapest things is often the best things when it comes to photography. The light tent has 2 types of felt one is an off white felt and the other is a black felt.

I also use this parchment paper that I bought years ago.
IMG_7965.JPG


A good rule of thumb is snow white is 2 stops above middle on your camera. So if you were to put the camera in center spot focus and take a reading on the light it should be 2 full stops above middle. If you do not have enough light to read that far then you either a) need to change the f/stop or increase the volume of light. If you change the f/stop your Depth of field will change, small objects it will suffer greatly. I use all manual mode and my settings are f/11 and 1/250, I adjust my light accordingly.


Try this, rotate the pens about 90 degrees clockwise so the tips are bottom right corner and see how that turns out, then change them another 90 degrees so the tips are facing bottom left corner. Keep in mind to that pens are not flat and wedge shape which makes a great deal when it comes to reflections.
 
One last thing, pick the background that will cause contrast with the subject, dark vs light or sharp vs dull will cause significant viewing differences and could easily distract or degrade from the subject. I find that anything middle gray, zone V, is blah and needs to be avoided if possible. Anything that would add contrast to the subject will really make it pop. So I would suggest taking that blue sierra add it to white printer paper and do the rotation thing with it, double the light present and post that :) You will be amazed at the results.
 
I agree ED, about metal being very tough to photograph and here is a couple that I tried many things and with my limited expertice and equipment I was only able to get these. Not only was the metal from the kits gleaming but also the blanks which are a high shine metal braiding and add the gloss of the resin, was not easy. I am sure you would have nailed these.

Not quite sure why using a photo program seems to be a no-no amongst camera buffs. Not all photos look the same on all monitors so what is the big deal. I also agree that a grey background shows about the truest colors. I have used blue though and I guess it is in the eye of the beholder as was mentioned.

By the way nice photograghy ED.


IMGP0616.jpg


IMGP0619.jpg
 
Last edited:
Thanks Ed for all your help.
You would not believe how many times I tried those photos with them end for and and everywhere in between.
I don't mind a single glare line on a pen photo. I actually prefer it . It shows me the amount of or type of finsih like dull, satin, semi gloss or high gloss. .
What I don't like is the multiple glare lines like mine are showing. . I tried different areas all around the house and shop and of course hade to change settings accordingly.
I might just have to go back to automatic mode with a lesser quality of photo to get rid of the multiple glare lines.
I have spent many days of long hours trying to improve my pen photography and seem to be getting worse as I go along. Probably time to quit taking pictures of them and get back into some more intersting areas of turning again where pictures of bigger things turn out better taken from a distance with the zoom and just on Auto mode.
I really don't think my camera is capable of the settings you are suggesting so I will have to console myself of the fact that I am a lousy photographer :wink:. My f setting can be 3.5 or 8.0 . Nothing above or below or in between. On the other hand, I might spend some more time in photo editing programs for pen photos to see if I can improve things but I hate to do that because most changes in those programs take away from their natural qualities rather than adding to it and are more or less a cover up .
My main ambition in recent days of photographing pens was to do it without any alteration or using a photo editing program to make it look other than it really is. I believe photo editing programs are a crutch for ones that cannot get their cameras to take better pictures on Manual mode and there sure are a lot out there doing it like that . The editing programs however are nice for adding script or stiching several photos together . I have often used them for that.
I can almost always spot where people have manipulated their picture in a editor especially when they use the sharpness feature which generally does more harm than good.
Thanks again.
Your photography is great Ed .
 
You can not get a white white background. Unless you raise the pens off the paper enough to flood paper with light that is not getting on pens.Ad agencies drop out the background when they want it white white. Do that in photoshop. Or airbrushing. One other way for white is a CSI light table which they use for everything.
 
I don't know that you need to improve a whole lot with your photos. The color of the pen looks natural. Fluorescent lights of any kind always give off color. You have to buy a white light at a specific temperature to get that perfect. Without having a white balance setting and lights at a specific temperature it's going to be really difficult to get a white background and accurate color. Your photos look great. To get rid of the lines, you have to diffuse your light more. But a shiny surface and light pretty much equals reflection lines unless you diffuse light.

Even if you don't spend the money on photographic lights, Alzo Digital has great info on lighting, diffusion and setup. Search Alzo on the thread and you'll see a reference to it in an earlier post.

Great photos. What program are you using to edit with? There is a way around this with editing, but I would need to know the program you are using to be of any help. It's fairly easy too.

Martin
 

Attachments

  • WineOakSand-7513.jpg
    WineOakSand-7513.jpg
    90.5 KB · Views: 112
  • Chrchill_Custom-7446.jpg
    Chrchill_Custom-7446.jpg
    94.7 KB · Views: 120
  • Custom_7613.jpg
    Custom_7613.jpg
    93.4 KB · Views: 116
I am familiar with editing programs and have a few of them. What I was trying to do was create better photos right off the camera because I always felt that editing was like cheating

I thought I had posted my latest results here but I gues it was just in my own Woodworking Friends site and another one so I will repeat it here (below) . The only critisism I got was that the dark Grey is too harsh and I totally agree so I am giong to find a lighter Grey and settle on Automatic mode until I get more time to fool around with camera settings . Would much rather be turning than photographing .


I was in the city today buying band saw blades and some other woodworking supplies and decided to look for Grey bristol board which so many have suggested for best background for pen photography . There was not a sheet of light Grey to be found anywhere but I did get a sheet of darker charcoal Grey.
I also found Staples house brand of the BlueStick/FunTack that has been suggested for preventing pens from rolling on a hard surface..
I decided to try a few pictures on just straight Automatic mode instead of all the manual settings I had been trying for countless hours .
Below are a few photos taken that way on the bristol board. By using the automatic mode I was able to get away from the multiple gloss lines . I actually prefer a gloss line to show but not multiple ones. I am well aware that these photos are not of the quality that I have seen from some others but I am tired of trying to get them any better so for better or for worse this will probably be the best I can do with future pen photos.
Thanks for all the help from all concerned . I am now going to concentrate on my woodworking again instead of my photography .
The way my photography is now seems to be good enough for the girls I go with so that's good enough for me :-*

CameraTest3.jpg


CameraTest2.jpg


CameraTest1.jpg


CameraTest4.jpg
 
Shooting in a tent might help with the reflection issue. I am a photographer and take shots for stores, etc.

Check the Kelvin setting on your camera--if there is one? Play with the Kelvin setting, it should be under White Balance. It depends on what temperature the lights are that you are shooting at.

No Kelvin settings at all on my Sony camera.It is not a professional model at all .

Since posting above in automatic mode I switched to a lighter grey in a cloth material and the photos are coming out great so I think I will stay with the automatic mode rather than wasting any more time fiddling with all the settings in manual mode. I am not a photographer and never profess to be. I prefer to hone my woodworking skills more than my photography skills and just don't have time for both. I guess if anyone doesn't like the quality of my photos shot in automatic mode , they don't need to look at them . :biggrin:
Thanks to all who contributed to this thread.
Back to the shop to cut segments and glue up more rings. . . . . . . .
 
Back
Top Bottom