Southwestern Stained Glass Theme - "The Dud"

Signed-In Members Don't See This Ad

mark james

IAP Collection, Curator
Joined
Sep 6, 2012
Messages
13,077
Location
Medina, Ohio
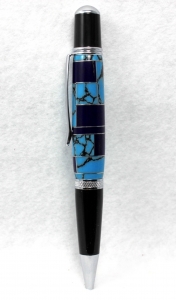
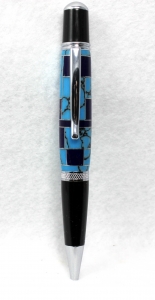
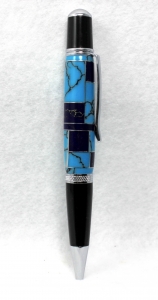
Introducing, "The Dud." I fully expected this to explode at numerous times during turning. But thankfully, the bomb squad outfit was not necessary (as typical, I did wear a full face shield).

Two different Trustone blanks, aluminum sheeting, 2 part epoxy, cutting fluid for the drill, HSS roughing gouge/spindle gouge, Magic Skew Round Bit, wet sanded with Abranet then Micromesh, McGuires polish, Renaissance Wax, my lucky rabbit's foot.

As explained in a different thread, after constructing the blank, I was very concerned about drilling through the aluminum sheeting parallel with the drill bit. The technique for encasing and drilling the blank is detailed here: Roy Quast's Technique.

Not well aligned, and one end is undercut, but for a first attempt, I'm OK with it. 95% of my experience turning/segmenting is with wood, so this had the potential for a few surprises.

View in Gallery

View in Gallery

View in Gallery
 

Attachments

  • IMG_0774.jpg
    IMG_0774.jpg
    153.7 KB · Views: 257
  • IMG_0776.jpg
    IMG_0776.jpg
    153.3 KB · Views: 238
  • IMG_0780.jpg
    IMG_0780.jpg
    178.6 KB · Views: 237
  • IMG_0781.jpg
    IMG_0781.jpg
    169.6 KB · Views: 240
  • IMG_0782.jpg
    IMG_0782.jpg
    156.6 KB · Views: 217
  • IMG_0783.jpg
    IMG_0783.jpg
    157.4 KB · Views: 246
  • IMG_0784.jpg
    IMG_0784.jpg
    161.8 KB · Views: 237
  • IMG_0785.jpg
    IMG_0785.jpg
    187.3 KB · Views: 271
Signed-In Members Don't See This Ad
Nice start! The lapis is so much harder than the turquoise, must have been frustrating to turn. Isn't it amazing that what looks just right when square, looks so different round?
 
Mark,
I think that has been a very useful exercise, and thanks a lot for all the detailed pics.
For the small piece sizing, did you increment in multiples of 1/4", for example, in order to get the different sized pieces to all fit together ? . They don't look like random sizes.
 
Last edited:
Nice start! The lapis is so much harder than the turquoise, must have been frustrating to turn. Isn't it amazing that what looks just right when square, looks so different round?

I have turned several Trustone, and have about 7 blanks. I knew previously of their different "densities", but in all honesty I had forgotten :redface:. Until the wood was turned away, I was using my bowl gouge, then with the trustone and aluminum inserts I alternated between a small Sorby gouge (red mini handle) and the Magic Skew. I used very light cuts as I was more afraid of a blowout, and I believe that is why I didn't notice any difference in the Trustones.

Just looking at the glue-up blank I knew things were not aligned, but it ended up better than I anticipated.

Mark,
I think that has been a very useful exercise, and thanks a lot for all the detailed pics.
For the small piece sizing, did you increment in multiples of 1/4", for example, in order to get the different sized pieces to all fit together ? . They don't look like random sizes.

Yes, this was not intended to be a "refined" product. My objectives were 1) Assemble a segmented trustone blank with small aluminum inserts, 2) Try out Roy's block technique to drill the hole, and 3) See if I could turn it without picking aluminum and trustone out of my faceshield. I am still drawn to Frank Lloyd Wright stained glass designs, as well as the Southwestern Indian Blanket designs. So that is the main area of inspiration (but I'll also give a shout-out to Steve Johnson and Dale Parrott - beginning to feed off of each other and that is fun. No competition, no egos involved, just loving each others efforts - I admire both of their precision, certainly a notch above mine).

Piece sizing; yes, I cut a few thin slices for full squares - 1", some 1/4" x 1/2" in each color, some 1/4" x 1/4" squares, etc. I actually did cut and glue small aluminum 1/4" x 1/4" squares for some of the insides. No joint between the trustone did not have an aluminum spacer :eek:. Each piece of aluminum was sanded, flattened to eliminate burrs, and epoxied on the corresponding piece.

I had been contemplating this type of segmenting for over a year. With some family responsibilities going from 24/7 for weeks, now to crisis-Ok-crisis-OK, I am able to have more shop time. And, quite honestly I don't worry about the results, I just want to have fun and get some "shop therapy."

Note: Yes, a random pattern would also have been fun, but it would have resulted in a jagged blank that would have needed to be sanded to a uniform block to be able to build the supporting "Quast Coffin." (apologies to Roy)

So all-in-all, yes, a useful exercise. I do like the 2 trustones and aluminum together.
 
I just reread my comments - I hope they don't read as criticism. I think you did a great job, and I'm impressed with the three material combination.:)

You know me better that that Chris :):)! Comment away - and, WE learn more from critique/suggestions than compliments/appraisals. And I for one, welcome suggestions - for me this is not an ego issue, I truly believe in sharing and making positive comments/suggestions.

Recently there has been a resuggerance of negativity - criticism of the initial posts, then criticism of nice comments and suggestions. And we wonder why IAP has had drops in folks visiting... Sheesh, if you are only knocking folks down, don't post, especially you have not given any positive comments to the issue posted. I just dislike when there are typical questions, nothing rocket science, just asking for info or an opinion, and some of the posts are just so negative... Simply not needed.

Sorry for the rant Chris - none of this pertained to you, but I'm the OP and it has been bugging me :redface:. Back to your regular station!

Yes, Chris - I appreciate your comments and they are taken in the spirit given, be well!
 
Mark:
The Dud, like the name!!!!
Now that some work to get it together, I for one think it's great we at all time think out side the box, surly you have got it started.

Good work.

Charlie
 
Eek, the thread was exhumed! :embarrassed:

I did enjoy assembling this Charlie. After the pen was done, I did not think I would revisit it; now I am reconsidering. The few flaws I suspect I can work out, so we'll see.

I have contemplated doing a pen and pendant pair for my wife for her birthday. I have never done any kind of jewelry, but I have a spool of flat aluminum jewelry "Thingy Stuff" - Looks like Fettucini (Hobby Lobby), which I suspect will work fine with my extra pieces from the pen blank. Just need to explore how to meld the ends.

Actually, in the AM I am traveling to Phoenix to get trained by Sharon Wertz on how to work with visually challenged penturners. One of my (hopefully) sidetrips will be to get to the Frank Lloyd Wright Taliesin West Museum. And I hope to take in the Heard Museum (SW Indian artistry). Hoping for some inspiration for future pen inlays.

I hope others will take whatever inspiration and sawdust I can offer and run with it. I also hope to get some new designs for us to play with!

Cheers, Mark
 
Back
Top Bottom