Slices for celtic knot

Signed-In Members Don't See This Ad

thrustmonkey

Member
Joined
Jan 21, 2010
Messages
113
Location
Illinois
I've been trying to make wood slices for celtic knots that are consistent in their thickness with no luck. I've tried using stop blocks, I even spent quite a bit of time making a jig for my miter saw and just can't seem to get any kind of repeatability in my cuts.

I've tried using my table saw but it throws the slices all over the shop.

I was wondering how much "play" or variance other members allow in their slices before it starts showing up in their knots. I'm trying for .065 and I'm getting .062 - .068. Any help would be greatly appreciated.

Ross
 
Signed-In Members Don't See This Ad
Cutting veneer to a consistent thickness with a saw is a challenge. Your precision of +/- .003 is pretty darn good for straight sawing.

Better precision is achieves with use of a drum sander and a carrier (usually plywood) and the strips of veneer (1/16th is thick veneer) are attached with double stick tape and sanded to uniform thickness.

Have done some with the plywood - double stick tape and a scraper plane - that was a bit time consuming but got the job done.
 
If you are getting .003 difference on the small side that is just fine. Too tight is not good. Need room for glue.

To me there is no better cutting tool than a fine tuned table saw to make strips with. Use a good quality blade and no sanding is needed. Now if you have runout on the arbor or the blade than the results may be not as good. A table saw can do so much and using jigs and fences it can be a very accurate tool. A tool for easy repeatable cuts.

Here is a simple jig that I made to make simple strip cuts. there are many commercial jigs that do the same thing. But the one thing about woodworking in general, it at times is more fun making your own jigs.


After I cut them I ran mine through my thickness planer. The issue is I don't think I can get lower than .10" without some sort of sled.
 
Last edited:
I've been trying to make wood slices for celtic knots that are consistent in their thickness with no luck. I've tried using stop blocks, I even spent quite a bit of time making a jig for my miter saw and just can't seem to get any kind of repeatability in my cuts.

I've tried using my table saw but it throws the slices all over the shop.

I was wondering how much "play" or variance other members allow in their slices before it starts showing up in their knots. I'm trying for .065 and I'm getting .062 - .068. Any help would be greatly appreciated.

Ross

Go back to the table saw .... This time round, make the cut an extremely deep rabbet cut that nearly goes through your stock and break it off by hand. You won't be using the top portion anyways, you'll be cutting that away with a chisel, right? If not, then you can simply use another method. Rather than trying to cut all the way through the stock, which would release that piece you cut and make it fly off, DON'T complete the cut. You start cutting the strip as usual, and stop the saw when you've nearly reached the other end of the board. Snap off the strip you want and re-set the saw for the next strip .... keep a drawer full of strips and you're ahead of the game. :)


After I cut them I ran mine through my thickness planer. The issue is I don't think I can get lower than .10" without some sort of sled.

After you cut the thinner pieces, you can get some 80 - 120 grit paper and glue it to a piece of glass or other flat surface and use that to get nice finished edges that are prepped for glue-up.
 
Last edited:
I've been trying to make wood slices for celtic knots that are consistent in their thickness with no luck. I've tried using stop blocks, I even spent quite a bit of time making a jig for my miter saw and just can't seem to get any kind of repeatability in my cuts.

I've tried using my table saw but it throws the slices all over the shop.


I was wondering how much "play" or variance other members allow in their slices before it starts showing up in their knots. I'm trying for .065 and I'm getting .062 - .068. Any help would be greatly appreciated.

Ross
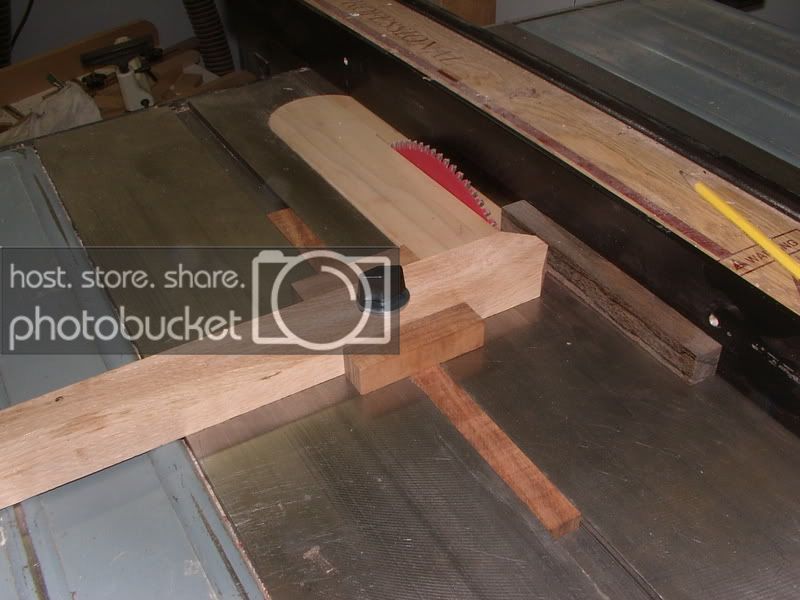

Ross

There are always basic rules when using a tablesaw and they are also a matter of safety. The two keys in cutting thin strips on a tablesaw is to use a zero clearance plate and a splitter at the back end to keep the kerf open on the backend of the cut. What happens is the blade can pull the piece down in between the throat plate if not a zero clearance plate. or the back end can close and pinch against the blade and with the forward motion of the blade it will launch the cut piece. Both are preventable and very easy to fix. i will again say this that there is no better way or tool on the market to cut thin strips accurately safely, and with repeatability than with a tablesaw in my opinion. I have cut many many strips and wood projects on my table saw. It is the most used tool in my shop and the center of the shop. All tools help support the workings of a tablesaw.

When people talk about what tool to buy for the shop I always tell them a good tablesaw and not one of these minature toys that model makers use. It can outperform any bandsaw any time. Do not get me wrong bandsaws do have their place in pen making too as well as woodworking in general. Match the proper blade and you are set. Good luck and lets get some segmenting done.

Here is a link showing this set up.


http://www.woodsmithshop.com/media/pdf/209/tablesawrippingjig.pdf
 
Last edited:
John, you need to hang around these parts more often. You started the Segmenting forum and it needs you to help it flourish.
I love your setup and your advice is always spot on.:wink:
 
John, you need to hang around these parts more often. You started the Segmenting forum and it needs you to help it flourish.
I love your setup and your advice is always spot on.:wink:

Hello Skip

I stopped by once again because I got a PM I needed to answer and thought i would look around. Saw this question and decided to jump in. I did get the segmenting forum going a while back and had hopes it would flourish more but seems to not have. I guess people are not that crazy about adding decorative looks of segmenting into their pens these days. So be it. But I do stay away for whenever I seem to post it draws the trolls out and things go south. If anyone has any questions for me they can email or PM me and I will try to get back.

Hopefully with the wide turnover in membership and the new members joining there will be some fresh ideas cultivated and shared. Such a small item as a pen can have many dramatic looks to it. We just need to open our minds and look beyond the norm when creating. The sky is the limit. You are a prime example of this Steven. Your work speaks for itself. Keep those lathes turning.
 
To Join the Thread; This is a vacuum rip fence to "grab" the cut-off pieces so the saw doesn't fling them to the ends of the earth.
Vacuum Rip Fence

I have also seen an easier version to uses a short piece of PVC pipe with a shop-vac.
 
To Join the Thread; This is a vacuum rip fence to "grab" the cut-off pieces so the saw doesn't fling them to the ends of the earth.
Vacuum Rip Fence

I have also seen an easier version to uses a short piece of PVC pipe with a shop-vac.

How bout a magnet (to secure it where you want it on top your table saw), some shop-vac hose and an attachment that goes to the table saw's dust collector ....? :)
 
Quote:
Originally Posted by randyrls
To Join the Thread; This is a vacuum rip fence to "grab" the cut-off pieces so the saw doesn't fling them to the ends of the earth.
Vacuum Rip Fence

I have also seen an easier version to uses a short piece of PVC pipe with a shop-vac.
How bout a magnet (to secure it where you want it on top your table saw), some shop-vac hose and an attachment that goes to the table saw's dust collector ....? :)
____

a good reference: http://content.penturners.org/library/tools_and_jigs/jig_sucks_thin_strips.pdf


Put a mesh screen/strainer cut out/etc.. over the hole to allow chips to pass, and catch the piece.
 
Last edited:
Thanks for all the responses and ideas. A few things I have to try out and see if they'll work for me.

John, I do most of my "thin" or "small" cutting on my table saw with a sled. I have a bottom of the line, P.O.S. Skil table saw, and I can't put a zero clearance insert in it. It come with a stamped metal insert that gets screwed into 2 "ears", and that's all that holds it in place. I've been wanting to get a new table saw for quite a while, I'm just having a hard time deciding on which one to get and how much to spend.

Thanks
Ross
btw I am getting interested in segmenting.
 
Take insert out ....

Set it on a piece of 1/4 inch thick hardwood big enough to draw around your insert ...

Mark holes for your "ears" and drill ...

Cut around your drawing of the insert and then sand flush up to the line with a drum sander or disc sander ...

Lower saw blade all the way down and install wooden insert ... Make sure your blade is set at exactly 90% first, of course.

Place shims (washers) on the ears to bring your insert up to table level or a bit above, and then sand it flush.

Turn on saw and SLOWLY raise blade till it clears your new zero-clearance insert.

Congratulations ... make a new insert now any time you want.
 
Thanks for all the responses and ideas. A few things I have to try out and see if they'll work for me.

John, I do most of my "thin" or "small" cutting on my table saw with a sled. I have a bottom of the line, P.O.S. Skil table saw, and I can't put a zero clearance insert in it. It come with a stamped metal insert that gets screwed into 2 "ears", and that's all that holds it in place. I've been wanting to get a new table saw for quite a while, I'm just having a hard time deciding on which one to get and how much to spend.

Thanks
Ross
btw I am getting interested in segmenting.


Oh for every obstacle there is a workaround I am sure. If you can not duplicate the insert as was suggested, try filling in the open space with a piece of wood. attach with epoxy from underside. All else fails just lay some duct tape over the hole. Keep as flat as possible to keep from snagging. Or run it all the way to the end of the table.

As far as table saws go there are many factors to consider and space is a huge one. Good luck.
 
Back
Top Bottom