Casting Skydiving themed pen? (Creativity block, need help)

Signed-In Members Don't See This Ad

JP1337

Member
Joined
Aug 24, 2016
Messages
34
Location
VIC
The long version:

I skydive for a hobby, most weekends when the weather is good, and one thing that is required for all skydivers, is for us to record every jump in a logbook and have it signed.

Up to this point I have just been using my EDC pen, which happens to be the very first pen I ever turned, but I was thinking I would turn a pen that I can keep with my skydiving gear at all times, and then I thought it would be great to make a pen that is themed around the sport!

I have only ever turned wood, never touched acrylic (yet), and my skills are very beginner. Most likely would base it around a slimline since I like that size, but I just don't know what to do for the blank. I don't have casting equipment nor experience in that area, and I don't want to spend a fortune. I need ideas!!!!!!

Short version:

I want to make a pen themed around skydiving but don't know where to start.

The thoughts I've had so far:

- Wrap the tube in Vectran lines (the 'strings that hold the parachute to the harness) and clear cast it somehow? (No easy access to casting materials/equipment)

- Use CA in place of casting? So wrap the tube, soak lines in thin CA, then build up layers of medium til oversize? Not sure how CA turns, but I'm guessing not fantastic for a beginner?

- Use some other skydiving related material?


Please add any thoughts, tips, ideas, concerns, constructive criticisms, elaborate witticisms, topical musings you might have to help me with this as all assistance is vastly appreciated
 
Signed-In Members Don't See This Ad
The long version:

I skydive for a hobby, most weekends when the weather is good, and one thing that is required for all skydivers, is for us to record every jump in a logbook and have it signed.

Up to this point I have just been using my EDC pen, which happens to be the very first pen I ever turned, but I was thinking I would turn a pen that I can keep with my skydiving gear at all times, and then I thought it would be great to make a pen that is themed around the sport!

I have only ever turned wood, never touched acrylic (yet), and my skills are very beginner. Most likely would base it around a slimline since I like that size, but I just don't know what to do for the blank. I don't have casting equipment nor experience in that area, and I don't want to spend a fortune. I need ideas!!!!!!

Short version:

I want to make a pen themed around skydiving but don't know where to start.

The thoughts I've had so far:

- Wrap the tube in Vectran lines (the 'strings that hold the parachute to the harness) and clear cast it somehow? (No easy access to casting materials/equipment)

- Use CA in place of casting? So wrap the tube, soak lines in thin CA, then build up layers of medium til oversize? Not sure how CA turns, but I'm guessing not fantastic for a beginner?

- Use some other skydiving related material?


Please add any thoughts, tips, ideas, concerns, constructive criticisms, elaborate witticisms, topical musings you might have to help me with this as all assistance is vastly appreciated

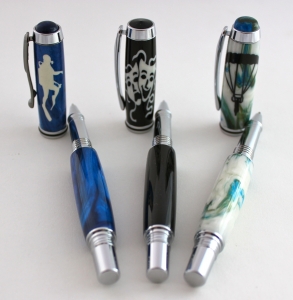
If you are not opposed to purchasing a blank, I made this for my son - Skydives out of Chicago. Skydive Midwest (Chris Haslam).

Blanks from Exotic Blanks.


View in Gallery


View in Gallery
 
Unless you do a custom slimline or a real fat one it is not allowing much room for things to be cast to it. May need a larger pen for casting.
 
I don't know if parachutes ever wear out but it might be cool if you could get some extra parachute material and wrap a blank with that and cast it? Would definitely have to move up to a Sierra or Cigar to get a good cast though.
 
If you are not opposed to purchasing a blank, I made this for my son - Skydives out of Chicago. Skydive Midwest (Chris Haslam).

Blanks from Exotic Blanks.


That Skydiver blank looks cool, but I couldn't find it on the website. Do you remember what the blank was called?


Unless you do a custom slimline or a real fat one it is not allowing much room for things to be cast to it. May need a larger pen for casting.

Good point, hadn't considered that, point noted.

I don't know if parachutes ever wear out but it might be cool if you could get some extra parachute material and wrap a blank with that and cast it? Would definitely have to move up to a Sierra or Cigar to get a good cast though.

Parachute nylon is fairly easy to get your hands on, but not the most interesting material to look at.

Every skydiver I know has a picture of them on a jump. Easiest pen would be a light turned wood such as maple with a water slide decal of the picture.

That's an interesting idea, I'm not sure what is involved in making waterslide decals, so I'll have to read up on it to see if it's something I could do at home easily. Cheers
 
...

That's an interesting idea, I'm not sure what is involved in making waterslide decals, so I'll have to read up on it to see if it's something I could do at home easily. Cheers

There are several types of decal programs and materials out there ... one of the more common are the type that have a white background paper and the other most common one is the one with a clear background "paper" ...

You can use either, if your blank is lightly colored, but if there is a lot of grain or "noise" behind where you are putting the decal, using the white background would make better sense, so that you can see the decal design.

My decal paper is designed to be used with an inkjet printer ... make certain you have a printing solution prepared for the paper type you have and choose to use. If you don't, taking the image file down to a local print shop should work just fine ... take the decal paper of your choice down there too, in case they don't keep it in stock or it's expensive. They should be able to print it on your paper. If they refuse, take your business elsewhere...

Once you have it printed, seal it in the appropriate type of sealer. If you are going to cast this inside a clear coat, you'll want to make certain the inks won't bleed through this seal. Even if you are applying this on top of a barrel, you'll still want to seal it before applying the finish (CA), as the inks will bleed into it and ruin the appearance.


OK ... so you have your decal, and it's ready to go ... did you make it the right size to fit your pen barrel? good idea to double check or make extra decals in a variety of sizes in case you wish to make one with a larger pen barrel or smaller pen barrel later down the road.


Appropriate decals to use ....

Try a full body wrap? (take a photo of the person or persons skydiving against whichever background you like, cut it to fit round the pen barrel end to end ... use white background paper and try to make it appear seamless if you can.

Try a collage? Take multiple pictures and make decals of them, apply them at odd angles, even overlapping some corners ... works great for a group or a couple. In this instance, include long distance shots of the group skydiving, and with chutes deployed, even in the plane together before the jump.

Try a single shot? Take the best photo you've got and make a slightly larger decal to put on the pen barrel. This one's the best type for including written info, such as name, date of jump, location, ect ... just make a decal of the written part to include under the photo.

Many other techniques you can try ... I'm sure you'll find something you and the recipient will enjoy immensely!


Now .... my preferred method of application is to apply over a semi-finished pen barrel. Other people prefer to apply to the tube and clear cast resin over it. That method is better for longevity for sure, as something would have to happen to the basic fabric of the pen to damage the image inside, but it's not so good for a beginner .... bubbles, proper curing time, proper sealing, not easy to fix or re-do if you mess up .... thus, my preferred method is the beginner's method.

You take your pre-finished barrel ... sand it up to at least 1000 grit for a nice smooth surface, and pre-finish with CA. The barrel can be any wood or acrylic material of your choice, of course. Once the CA is cured, I polish it with some Plast-X to give it a bit of shine and clean it in preparation for the decal application.

Soak your decal for the appropriate amount of time to let the bond between it and the backing paper dissolve (ie - follow the directions). While it's soaking, wipe the application area with boiled linseed oil (I just apply some using an applicator pad with the lathe running and then turn the lathe back off) and get your CA ready. Once the decal is free, carefully lay it on some paper towel to soak up the surface water. VERY gently lay it on the oiled surface .... this helps you see bubbles behind the decal that need to be smoothed out, and helps you move the decal around without tearing it in order to smooth out surface wrinkles and straighten edges to line up with your desired application layout.

Once it's in proper position, gently apply a thin layer of BLO or other oil of your choice over the top to help smooth the surface, and with the lathe turned OFF, gently apply some CA to the surface, wiping it over the entire decal. Make certain you get the edges! BLO reacts with CA to give a smoother application. It CAN cloud up a good bit, so make it a VERY THIN layer. It should be unnoticeable if there's any clouding at all.

Once the first layer of CA is cured ... turn the lathe on and apply more layers of CA till you have a good protective coat to finish sand, micromesh, and polish. I typically use 9 - 12 coats of the thin CA stuff that Harbor Freight sells in their little 10-pack tubes.
 
Back
Top Bottom