segmenting a geometric logo

Signed-In Members Don't See This Ad
Joined
Feb 23, 2016
Messages
26
Location
Grand Rapids, MI
Hi y'all,

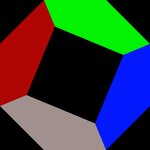
I'm still a newbie, having made about 15 pens, and only a few with simple segmenting like Celtic knots. I was wondering if anyone might have a suggestion for how to make a pen with segmenting that will suggest the attached logo. It doesn't have to look exactly like it, but something that resembles it enough to make you think of it. This is for co-workers at my organization.

Any help from people who can think in 3-D much better than I can??

--Rob
 

Attachments

  • mark-whitebkgd.jpg
    mark-whitebkgd.jpg
    593.7 KB · Views: 687
Signed-In Members Don't See This Ad
Hi Rob:

First, keep in mind the the final diameter will be round, not the angles that are in the pictures.

If you eliminate the inner square, and simply glue/epoxy together four different types of wood, it will result in a four sided segmented blank. this is pretty easy, but I'm not sure if this is what you are looking for.

Keep asking questions if this is incorrect.
 
You could save yourself a lot of work by making a decal of the logo and applying it to the pens.

Now if you still want to segment it then look at the logo as an octagon made of 4 boat hulls around a square. What I would do is to make those boat hulls from wood a couple feet long by sawing and hand planing with the hull in grooves to get the shape or on a sled through a planer.

To glue together around the square, wrap with surgical tubing or inner tube cut into strips.

Now take the two foot octagon and cut it in half. And glue it together along one of the sides of the octagon. Glue a triangle piece to fit above and below the glue joint.

Now you have a one foot long piece two logos wide. Cut it in half and glue it as before to get a four logo wide piece that is six inches long. If long enough for a pen crosscut it to make the blanks. If not cut and glue again to make it eight logos wide, three inches long. Cross cut to make your blanks.

You will be drilling and turning across the logos so be careful.

Simple eh!
 
Thanks for responding and helping me think about this. This forum is an amazing place.

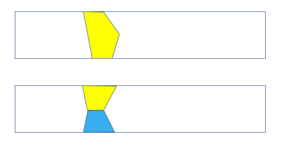
Mark -- One thought I had was something like the drawing I threw together below, showing two views with a 45 degree rotation between them. Something like this (with all four colors going around the pen, but maintaining a geometric flair to it) might connect to the logo. Don't know what this looks like when it gets rounded by turning.

Curly -- I'm afraid I'm going to have to think pretty hard to visualize what you're describing (the fault lies with my lack of visual imagination, not your description!). But I get the boat hulls starting point.

--Rob
 

Attachments

  • Screen Shot 2017-07-05 at 2.02.10 PM.png
    Screen Shot 2017-07-05 at 2.02.10 PM.png
    12.9 KB · Views: 246
Thanks for responding and helping me think about this. This forum is an amazing place.

Mark -- One thought I had was something like the drawing I threw together below, showing two views with a 45 degree rotation between them. Something like this (with all four colors going around the pen, but maintaining a geometric flair to it) might connect to the logo. Don't know what this looks like when it gets rounded by turning.

Curly -- I'm afraid I'm going to have to think pretty hard to visualize what you're describing (the fault lies with my lack of visual imagination, not your description!). But I get the boat hulls starting point.

--Rob

G'Day Rob:

First, I do agree with Curly that you should consider a decal.

However, in the spirit of taking the more challenging route (not that decals are easy - they present their own chores...), I will simply suggest you JUST START! Make your best guess of what you think will work, and make it! You will learn SO much about what will work and what will not, and get some indicators of where to start tweaking your process.

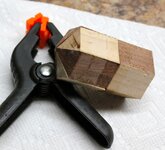
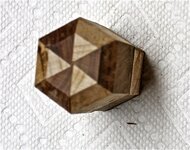
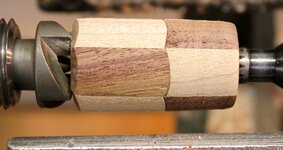
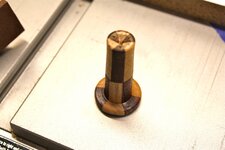
These pictures are of an idea that I mumbled over, tried, and found to be totally lacking. My point is that the process of "beginning" will hasten you effort to achieve your "endpoint" (but be prepared for several forks in the road! Your final successful product may be nothing like what you preconceived!) Have FUN!
 

Attachments

  • IMG_2292.jpg
    IMG_2292.jpg
    208.9 KB · Views: 267
  • IMG_2293.jpg
    IMG_2293.jpg
    286.1 KB · Views: 263
  • IMG_2295.jpg
    IMG_2295.jpg
    173.4 KB · Views: 238
  • IMG_2297.jpg
    IMG_2297.jpg
    149.7 KB · Views: 292
I am having a hard time visualizing from your pickies where you are going (My wife says I have this too a fault - LOL).

I will suggest you take some scrap stock, glue up some sample blanks and "Have at it." I suspect your glued-up sample blank will yield some interesting results (some good, some less so) after being turned round!

Again, Have FUN!
 
Thanks for the encouragement, Mark. I have a habit of asking people to do the hard work that belongs to me. It indeed shortcuts the fun and discovery of the adventure. I'll see what I can come up with, but I (to crib Hitchhiker's Guide), expect it will "be almost, but not completely, unlike what I was hoping for"! :glasses-nerdy:

--Rob

"You know," said Arthur, "it's at times like this, when I'm trapped in a Vogon airlock with a man from Betelgeuse, and about to die of asphyxiation in deep space that I really wish I'd listened to what my mother told me when I was young."
"Why, what did she tell you?"
"I don't know, I didn't listen."
― Douglas Adams, The Hitchhiker's Guide to the Galaxy

Partners in crime! Enjoy the journey.

Cheers, Mark
 
This suggestion is a little out of the box, but what if you cut the shapes exactly how you have shown from different colors of veneer. Soak them in water so they are pliable and use CA to glue them to a tube. I have done something like this very similar so I know it works. Than take smaller strips of another veneer to fill in the spaces. Build up to diameter with CA or cast in clear resin.

Alternatively, you could contact one of the several folks who make laser cut blanks. Would be quite simple for them to make this, especially if you want more than one.
 
Here is my thought.
Imagine if you quarter 4 blanks into 4 smaller strips. Then used one of each mini-blank and glued together.

You would have a basic 4 color segmented design... after drilling thru, and turning you would have 4 different colors vertically.

Yellowheart, purpleheart, any dark wood will do 3 of your 4 colors. The cyan is the tricky one and you would want to buy a cyan colored resin blank, quarter it to provide that portion.

Now you turn the piece but not all the way down. just most of the way. Heres where it gets tricky.
You will want to make a jig such that you can use a belt sander or similar to sand down one edge of the pen on 1 of the colors, halfway.
Then you turn it 22.5 degrees and sand down the other side of that same color.

Repeat and you wind up with an octagon shaped pen which will look similar to the logo.


In fact, if you took a crosscut of that pen blank you'd have your exact logo, except with a circle inside instead of a square. A small chisel and you'd have the logo. You could fill with a white wood square inside and use as a cap piece for the pen. It would create the illusion that the logo runs all the way down the pen.
 
I have been interested in this challenge since it was first posed.

One thing I don't get about the idea ....

.... does the octagonal pattern shown represent a cross-section through the pen blank ? . (ie. do the colored portions run lengthwise down the full length of the pen ?)

or ....

.... does the octagonal pattern wrap circumferentially around the cylindrical shape of the pen blank ?
 
Last edited:
My description was for the octagons to be side by side with wedges to fill between. When turned looking directly at the octagon you see the logo. If you look at it rotated ninety degrees you wouldn't see the octagons. If drilled lengthwise through the square all you would see would be stripes of wood with no pattern.
 
Last edited:
Yeah ... I think I understand your suggestion, Pete ...

... but have a read of this ... "all four colors going around the pen" ... ?????

... and this ... "Something like this might connect to the logo." ... ?????

Mark -- One thought I had was something like the drawing I threw together below, showing two views with a 45 degree rotation between them. Something like this (with all four colors going around the pen, but maintaining a geometric flair to it) might connect to the logo. Don't know what this looks like when it gets rounded by turning.

Curly -- I'm afraid I'm going to have to think pretty hard to visualize what you're describing (the fault lies with my lack of visual imagination, not your description!). But I get the boat hulls starting point.
Pete, with your technique as I understand it, you are going to end up with multiple logos adjacent along the length of the pen, and the color pattern will rotate from one to the next.

Initially, there will be Seven two-foot long strips of wood with different colors and different cross-sectional shapes: One square, Two triangular, and 4 Pentagonal. . Getting these all sized properly and glued together accurately is going to be really tricky. . Plus you have to worry about the cross-sectional dimensions of each strip in relation to the final turned pen diameter, and that diameter will have to be uniform along the length of the pen (not tapered towards the ends).

It is not clear that Rob wants this sort of pattern, or just a single octagon on one side (or perhaps two sides, running through), or even something different (which might require some very skillful marquetry ).

Visualization is getting a bit too complex for me and I think I will drop out now ....

But it would be interesting to hear from Rob again on exactly what he has in mind.
 
Last edited:
I'll have to slowly review all the suggestions... My head hurts :wink:

But, I like the input to work out a challenge! This is fun!
 
Well I did state at the beginning that a decal would be easier.

I'm bad with names but the relatively new guy making all those neat laser cut blanks would have the easiest time making something for this.

Mal the process is similar to making patterned edge banding for furniture. It can all be done be done on a good tablesaw.
 
Well I did state at the beginning that a decal would be easier. I do agree.

I'm bad with names but the relatively new guy (Ken Wines) making all those neat laser cut blanks would have the easiest time making something for this.

Mal the process is similar to making patterned edge banding for furniture. It can all be done be done on a good tablesaw.

Hopefully the comments got included. I am putting a finish on a blank from Ken Wines (Blank) - (I'll be gone for two weeks in the AM.) He does wonderful work - I like segmenting, and I could care less how he makes them - they are beautiful. This blank will have special meaning to me as it was the last one with "My Shop buddy" supervising..., and it has a very appropriate design - Maple, for me; Walnut for "my buddy."
 
Last edited:
That is going to be a lovely pen, Mark !!!!

Yes it will! I use wipe on Poly, so it take 4-5 days. I have the blanks turned, with 2 coats on, but will be gone for 2 weeks. It is a special pen to me as "My buddy" was there to watch. (I had to put her down the next AM due to cancer... Sigh...). So this is a nice pen for me and the design of the blank from Ken is perfect!

I'll post the finished pen in about 3 weeks. Hey guys/gals - hug your pets!!! They simply love you.
 
Hopefully the comments got included. I am putting a finish on a blank from Ken Wines (Blank) - (I'll be gone for two weeks in the AM.) He does wonderful work - I like segmenting, and I could care less how he makes them - they are beautiful. This blank will have special meaning to me as it was the last one with "My Shop buddy" supervising..., and it has a very appropriate design - Maple, for me; Walnut for "my buddy."
Mark, I'm so sorry to hear about your "Shop Buddy". I've personally been through that more times than I care to remember. I try to stay focused on the "good times" memories with my friends. The intertwining of the weave in that blank is very symbolic, of how you and your buddie's lives affected each other. I wish you the best, my friend, and my heart goes out to you during times like this. Ken Wines
 
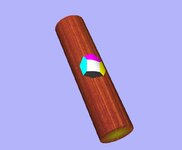
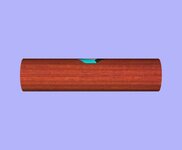
If it is just a simple logo you are after that is projected onto 90 degrees of the circumference of the the pen body, then this is what it would look like. I've included an isometric view as well as a side view.
 

Attachments

  • Geometric Shape ISO View.jpg
    Geometric Shape ISO View.jpg
    77.6 KB · Views: 201
  • Geometric Shape Side View.jpg
    Geometric Shape Side View.jpg
    68.6 KB · Views: 204
Back
Top Bottom