Scratches on a finished pen

Signed-In Members Don't See This Ad

Amihai

Member
Joined
Oct 8, 2021
Messages
117
Location
Israel
Hello again,
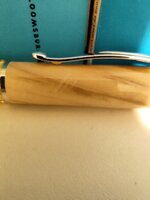
I have a repeating problem in several of my pens: There are small scratches on them. Hope you can see it in the picture attached.

Also, the CA finish seems to be of different thicknesses on the same pen. Some parts are "glassy" and shiny, while other still feel "woody", with rougher surface and duller look.

maybe my sanding isn't sufficient enough? Or maybe I don't apply enough CA? Any suggestions on the causes and possible solutions are welcome. Thanks!
 

Attachments

  • IMG_20220126_104706.jpg
    IMG_20220126_104706.jpg
    157.8 KB · Views: 203
Signed-In Members Don't See This Ad
Hello again,
I have a repeating problem in several of my pens: There are small scratches on them. Hope you can see it in the picture attached.

Also, the CA finish seems to be of different thicknesses on the same pen. Some parts are "glassy" and shiny, while other still feel "woody", with rougher surface and duller look.

maybe my sanding isn't sufficient enough? Or maybe I don't apply enough CA? Any suggestions on the causes and possible solutions are welcome. Thanks!
I would say the cure is to dismantle the pen and sand back again and refinish.
Looks like the ca wasn't applied evenly,was the lathe running at low speed when applied,applied wet on wet or allowed to dry between coats.
Don't know what might cause the scratches.
What wood is it?
 
I would say the cure is to dismantle the pen and sand back again and refinish.
Looks like the ca wasn't applied evenly,was the lathe running at low speed when applied,applied wet on wet or allowed to dry between coats.
Don't know what might cause the scratches.
What wood is it?
I run the lathe at about 400 RPM when applying CA finish. the wood is Olivewood.
 
It may be a problem if not enough CA. You may have sanded through the finish leaving you with bare wood in places. Though i will say that when I've done it, it didn't result in parallel lines.

There are many good articles here, both discussion and in resources, about getting a good CA finish. It's a real skill and one that I'm still learning.
 
Just an observation, but the lines are at a weird angle for it to be a sanding issue, unless the lathe is running extremely slow while you're sanding.
 
Handsome pen. I would say the woody areas are you sanding-through or close-to-sanding through the CA (done that many times when I first started).
OW and the like can be oily (not that you will feel any oil), you may want to use a paper towel and wipe down with DNA (a few times and let dry for 5 minutes) after sanding but before apply the CA.

I would disassemble and start over by removing the CA finish. Many ways to approach this and very good advice available to you in the above posts. Good luck and have fun!
 
Sand through at different spots can be a result of several issues.
1. if using a mandrel, too much sanding pressure causes the mandrel to flex and one side or spot will sand off more than than another spot. Don't force sand, use light pressure and let the sandpaper do its work, not your hand. It takes an extra minute but it is worth it.
2. Too much pressure and too low of sandpaper number such as 320 - 240. Pens do NOT need the same low number sandpaper that flat wood or large bowls need. Small fine pieces of wood such as pens should only use detailing sandpaper at best.
3. If the head stock and tail stock are out of alignment, it can shift the focus to one side, but yours doesn't exhibit that.
4. If the improper tail stock live center is used with the mandrel, it can cause a tiny wobble that will result in more sanding to one side. The tail stock live center should be a 60° live center; many wood lathes come with a live center that is sharper angle than 60°.
5. Not enough build up of CA/finish. Use calipers to measure the build up as compared to when it is bare. Calipers are a good friend to pen makers. Use it often on each pen.
6. it is rare, but occasionally bushings can be out of round/off center by a minuscule amount, throwing the sanding force to be more on one side.
7. TBC or turning between centers instead of using mandrels does eliminate some of the above.
 
Last edited:
To me it looks like the wood inclusions. See how the dark grain pattern disappears as the so called scratches cross over. Nature's beauty. As far as shiny and matte, could be you sanded through CA and or did not use enough coats. There is a fine line when it comes to CA application and many have a problem but you will figure it out and it will become easy. Good luck.
 
After sanding with the lathe spinning at whatever speed works for you, stop the lathe and using the same grit sanding medium, sand manually along the grain to remove any circular scratches left by the sanding with the lathe running. Do this for grits up through 400. This process may help remove some of the scratches shown in the photo. YMMV. Add your CA in whichever method works for you (I do two coats of thin followed by three coats of medium) and then lightly sand with the highhest grit used in the previous sanding ooperation to remove any high spots left by the CA application. After that, micromesh will polish and help remove any residual scratches.

This process works for me. It may or may not work for you.
 
@walshjp17's advice in the post above about stopping the lathe and sanding along the grain is a good one. I would like to add:
-> After each sanding step, stop the lathe and wipe off the dust and grit with a clean rag. You don't want the leftover bits of heavier grit to leave scratches on the pen blank as you sand with the next finest grit. In case it matters, I use small cut-up pieces from old T-shirts.
 
Back
Top Bottom