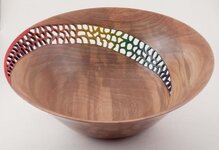
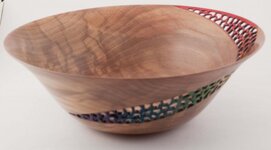
Elm bowl, pierced and airbrushed. Around 8" (20 cm) in diameter. Finish is PolyWhey Clear Gloss Furniture Finish, a Whey protein based finish made from a byproduct of cheese making. This was my first attempt to use this new for me waterborne finish.
You are using an out of date browser. It may not display this or other websites correctly.
You should upgrade or use an alternative browser.
You should upgrade or use an alternative browser.
Rainbow Bowl
- Thread starter holmqer
- Start date
Signed-In Members Don't See This Ad
See more from holmqer
I was lucky to get a free pint from Vermont Natural Coatings. I am the secretary of the Central New England Woodturners, and they sent me an e-mail offering a free sample via my secretary email. Just make sure you don't let the stuff freeze, I got mine in January when it was insane cold and had to have it shipped to the Fedex Office store in the center of town to ensure that it did not freeze outside my house while was at work when it was close to 0F outside.
There was actually a day when they could not even ship product as it was -24F at their plant in Vermont and it would freeze in the truck.
The main reason I let it cure inside was temperature. VNC recommends application and curing 65F+ so I keep the can and the piece inside and just bring it all into my garage to apply the finish then bring it all back inside. The piece and the can have enough thermal mass that they stay warm even though my shop is cool.
I am working on a review / instruction guide on the product as I appear to be the first turner to try the stuff as far as they know. Before me, no turner had asked them questions about applying it on curved surfaces like bowls and spindles.
Signed-In Members Don't See This Ad
Pioneerpens
Member
Stunning!! I love it! Very unique!
Pen_Turner_297
Member
Great Job all around
Edward Cypher
Member
Very nice I love the piercing airbrushed.
seamus7227
Member
wow, that is a very different approach at piercing a bowl! Nice job
greggas
Member
Eric ...nice work....I like the swoop. Have not heard of that finish before but I am intrigued ....how did you like it?
Jim15
Member
Beautiful work.
David Keller
Member
Nicely done, Eric. The coloring looks good as does the overall design.
Thanks everyone, it was a lot of fun to make
A slight amendment, I have used this finish before, this is the first time I've tried it on a pierced and airbrushed piece.
Greg - I like the finish results, but I am struggling to master the art of applying it right. Applying waterborne finishes is much different than oil based finishes as they have a very short open time, it tacks up almost as fast as medium CA. Trying to form a unform, streak free coat in that short of a time requires very good brush technique. On the plus side it is ready for recoat real fast, and the finish seems to heat flow so it responds better to buffing than oil based Polyurethanes like Minwax Wipe-On-Poly which has been my standard finish for airbrushed work. A finish for airbrushed work should cure clear, so your image does not change color, and like Minwax, this cures clear. Another plus is that this is an odorless "green" product. I let the work cure in my living room and could not smell it curing, even on the same table as I ate my dinner while watching TV.
I have not decided if I will switch to PolyWhey for this sort of work, I have half of my first pint left from a few projects and will continue to experiment with it until I use it up. If I can master the application technique, I might switch.
PolyWhey is made by Vermont Natural Coatings and is available from Rockler. You can order it from Amazon, but Rockler is their provider.
hewunch
Member
Whey Cool :biggrin: sorry, I figured someone else would do it first. Great looking bowl!
greggas
Member
thanks for the info eric...I just ordered some...I like the idea of no fumes and curing inside the house during our cold northeast winters (that never seem to end like this one)
thanks for the info eric...I just ordered some...I like the idea of no fumes and curing inside the house during our cold northeast winters (that never seem to end like this one)
I was lucky to get a free pint from Vermont Natural Coatings. I am the secretary of the Central New England Woodturners, and they sent me an e-mail offering a free sample via my secretary email. Just make sure you don't let the stuff freeze, I got mine in January when it was insane cold and had to have it shipped to the Fedex Office store in the center of town to ensure that it did not freeze outside my house while was at work when it was close to 0F outside.
There was actually a day when they could not even ship product as it was -24F at their plant in Vermont and it would freeze in the truck.
The main reason I let it cure inside was temperature. VNC recommends application and curing 65F+ so I keep the can and the piece inside and just bring it all into my garage to apply the finish then bring it all back inside. The piece and the can have enough thermal mass that they stay warm even though my shop is cool.
I am working on a review / instruction guide on the product as I appear to be the first turner to try the stuff as far as they know. Before me, no turner had asked them questions about applying it on curved surfaces like bowls and spindles.
broitblat
Member
Another beautiful masterpiece.
-Barry
-Barry
Very nice Eric.
nava1uni
Member
Beyond words, but exquisite will have to do.
76winger
Member
Having had past experience with custom auto painting, I can appreciate the airbrushing you did. It looks gread on the wood surface. I'm more curious though, concerning how do make all those little holes in it? And how much time does that take?
Thanks again everyone!
Dave, the piercing took maybe an hour or two to do, but I probably spent an equal amout of time drawing and erasing various swoop profiles until I got one I liked. Performing the piercing requires two things, a thin wall (in this case the bowl has a fairly consistant thickness between 1/16" and 1/8" until it approaches the foot and thickens up to around 3/16"), and the right tool. Piercing is generally performed with a very high speed (320,000+ RPM) rotary air tool. I use a dental grade handpiece (NSK Presto) with a 699L carbide dental burr. This burr is essentially a 1/16" shank tapered router bit that goes to a 0.022" (1/45" or 0.6mm) tip. You can plunge the burr into the wood then cut sideways just like full size router bits.
Dave, the piercing took maybe an hour or two to do, but I probably spent an equal amout of time drawing and erasing various swoop profiles until I got one I liked. Performing the piercing requires two things, a thin wall (in this case the bowl has a fairly consistant thickness between 1/16" and 1/8" until it approaches the foot and thickens up to around 3/16"), and the right tool. Piercing is generally performed with a very high speed (320,000+ RPM) rotary air tool. I use a dental grade handpiece (NSK Presto) with a 699L carbide dental burr. This burr is essentially a 1/16" shank tapered router bit that goes to a 0.022" (1/45" or 0.6mm) tip. You can plunge the burr into the wood then cut sideways just like full size router bits.
Rangertrek
Member
I like it! Nice shape, piercing, airbrush work. Great job on everything.
crabcreekind
Member
very nice piece


