Question on Alumilite

Signed-In Members Don't See This Ad

Patio

Member
Joined
Apr 21, 2014
Messages
36
Location
Fort Worth, TX
I am new to casting and after researching and reading on the different resins and experiences everyone has had on here plus watching the videos that Curtis has made, I decided to use Alumilite.

I created my molds and made up a casting last night using alumilite water clear with some blue dye and pearl mixed in. I liked the color a lot and poured into my mold and put in pressure pot at 70lbs for about an hour.

After I releaseed the pressure on the pot and took out my mold, I noticed the resin was still soft.

I had a little bit of resin left over in my cup and I had stirred it a while looking at how the pearl coloring appeared in the light. That resin hardened to a rock and it wasn't ever in the pressure pot.

My question is what are the things that could cause that resin not to harden properly? Did I not stir it up well enough? I stirred it until it was all clear with no swirls and then stirred for about another minute, then added the dye and pearl and mixed that in as well (actually pearl was last and swirled it). In all I would say that I had a little over 3 minutes of stirring time.

Is it possible that I'm introducing moisture from my air compressor? What is the shelf life of the resin? I've had this resin for about 6 months.

Anyway, I left the resin overnight in the mold and took it out this morning. Its hardened but not as hard as I think it should be. I was able to cut it into blanks and it seems to be just fine and seem to have hardened a bit more since cutting into blank sizes.

Thanks everyone!

Pat
 
Signed-In Members Don't See This Ad
Sounds like the Alumilite wasn't stirred enough. AL has to be stirred completely, scraping the sides and bottom of the cup, too. On another note, make sure you don't exceed the maximum working pressure of your pot. It's not a pretty sight pulling shards of aluminum or stainless steel out of your gut after an explosion.
 
I don't think it's moisture. There's typically a white crust that forms on the top of the resin when it contacts water.

It sounds like you mixed it properly.

One thing you didn't mention is how you measured the resin. Did you do it by weight or by volume?

What type of dye did you use? If it was alumilite dye...how much did you add? If it wasn't alumilite dye...what was it? Some dyes are water based and that could keep it from setting up.

Even if your working psi is 80 on your pressure pot you really only need 40psi to crush the air bubbles in the resin if you're just doing color casting. If you were to do worthless wood or embedded objects...yeah the higher the psi the better. Just don't go above what your pot is rated for.
 
Thanks for the replies! I should have mentioned a little more about my setup.

My pot is a Binks and rated at 70psi. I had read a lot about those harbor freight ones exploding and all, and read great things about the binks, but still was a concern for me. I should maybe keep it lower than 70, around the 60lb range?

I thought I had stirred it enough, but I question that since after stirring the remaining in my cup it hardened pretty well. Granted it was about 1/4" in the bottom of the cup. I also used a clear cup and thought I had it well enough, so I will stir longer next time.

I used the alumilite blue dye and pearl powder.

I also measured it out by weight using a digital scale which I zeroed after the cup was placed on the scale and filled with the Part A resin. Then zeroed again and filled with the same amount in weight of Part B resin. Both were 6 ounces. I used a total of 10 drops of the blue dye and used part of a tip of a tongue depressor of the pearl powder. I really didn't have a clue of how much to use, but remember in one of the video's that Curtis had made that he uses about a drop per ounce, or at least I thought that is what he had stated.

I will try another one today/tonight an stir it longer and see how we do!

Thanks again!

Pat
 
Thanks for the added info Pat!

It sounds like you didn't do anything out of the ordinary. I think as long as you don't go over 5% concentration of dye to resin you're fine. 10 drops wouldn't do that. There isn't a real rule of thumb on how much pearl powder to add. I tend to add more than most. The best way I can give advice on it is if you want your blank totally opaque (solid and not translucent at all) mix in all your dyes/powders/etc. and mix. Dip your stir stick back into the resin and pull it out. If you can still see the wood through the resin you need more pigment. If you can't you're opaque enough to where you shouldn't need to reverse paint your blank or the brass tube.

Don't be gentle with the stirring. Since you're using pressure stir the hell out of it! You are stirring way more than I ever do.

Is the part B side of the resin gelled at all? Like Jello consistency? If it is you'll have to heat it up or else it won't mix properly and cause the issue you're getting.

Before going with a large pour maybe instead just mix .5oz of each side in a cup with your pigment of choice and put it under pressure. Keep it there a bit longer, say 90min to 2hrs. and see if that sets up normally. That way you're not wasting large amounts of resin to troubleshoot.
 
Thanks Brooks803 for the tip on the dyes and pigments. I know its somewhat a learning experience as well and have already made a single blank mold so I can practice! :)

I will definitely try and leave in the pot longer and mix a bit better. In answer to your question, both resins (A & B) were the same consistency and not gel'd and flowed pretty well.

I will keep you all posted as to how the next batch comes out!

Thanks again for all the help, I really do appreciate it all. :)

Pat
 
It sounds like you did everything correct. I would put your mold in the oven at 150° or so for 20-30 minutes before pouring. This time of the year, it can use a little extra "punch".

As for your pot, if it is a relative new Binks, it should be rated to 80 psi, not 70. If it is an ASME certified pot with the certification stamped on the side, then it is certainly good to the rated pressure. There rated pressure is not a do not exceed pressure, it is a working pressure. In other words, the pot is designed to be used up to the working pressure all day long, day in and day out. Their working pressure already has a safety factor build in.
 
Thanks Curtis I appreciate the tip of the oven and especially all the info you've so graciously provided here in the forum and on your site!

It was a used Binks pot and it has the stamp on side stating the maximum working pressure is 80PSI, guess it helps if I put my glasses on! haha!

At what temp would you suggest to have the oven at? I'm guess nothing over 200?

Thanks everyone for all the great input! This is exciting for me to learn a new hobby and another way of being creative!

Pat
 
Hi Curtis, please disregard my question on the temp of the oven, I see you put it in your post! :)

Thanks again everyone!

Pat
 
Well, I tried a few things different tonight and had great success! Here's what I did:

1.) I put both parts A & B resin (Alumilite) in a bath of hot water from the tap

2.) I put my mold in the oven at 150 degrees per Curtis' suggestion

3.) I stirred the mix for a while longer, about 3 1/2 minutes

I put everything in the pressure pot at 70 lbs. I cut up a banksia pod and included it in my mold.

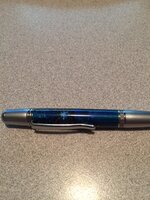
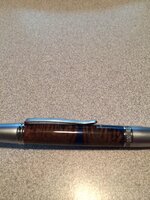
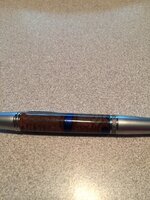
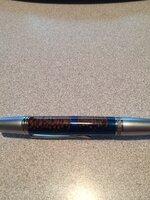
After 1 hour, the resin was perfect and I turned a blank for my wife's pen I think it turned out great. She's happy and chose the position where she wanted the cap and such.

Thank you everyone for all the suggestions, I am very pleased with the end result and am thankful for all the advice!

Let me know what you all think! I prefer to make the Junior Gent II style pens but these Wall Street II pens are fun as well.

Thanks,

Pat

IMG_1244.JPG

IMG_1245.JPG

IMG_1246.JPG

IMG_1247.JPG
 
Looking good. One word of caution, though. Be careful with putting your Alumilite in hot water and getting it warm. You may, on occasion, need to warm one side if it thickens but even then you should let it cool back to room temp before use. This time of the year you can get away with heating part A and B but in the summer, you are likely to lose the mix before you can get it poured. Heating it up speeds it up significantly. Heating the mold does as well but the heat is not applied until you pour it in. Honestly, you should just ditch heating the resin itself as it is not needed if you are heating the mold.
 
Your initial post says you used "Water Clear"...is that correct? Alumilite's web site says "Water Clear" has a 2-3 hour demoed time. It also has an open time of 15 minutes...so taking it out of the pressure pot only 45 minutes after the open time ended vs. the 2-3 hours Alumilite calls for seems premature...
 
Thanks for the advice on the Alumilite, it makes good sense! Even though my garage is "heated", its just a single vent in the garage and the temp is around 65 in the winter and 75 in the summer.

@Tim, I'm not sure which formulation I have, but last night, after an hour in the pot it was solid and not "gummy" like the last one was. I'm almost out of the resin and will be purchasing some more, so I will read over the info that comes with it. I don't know what I did with the info that came with this batch.... :)


Thank you everyone for all the help! I really do appreciate it a lot!

Pat
 
I should clarify that its the Water Clear but not sure if its the prior formulation that has the quicker demold time or if its the newer formulation with longer demold time. I have a feeling its the older formulation as it was totally cured after an hour and I was able to make the individual blanks.

Thanks!
 
Glad I read this!

I was about to buy Water Clear and decided to read more on the forums for more ideas. I had read the Alumilite site and they mentioned the polishing and hardness of Clear vs. Water Clear. In Curtis's instructions he mentioned using Water Clear. Is the opt for clear based on changes in the formula or further learning?

Is clear the better option?
 
Last edited:
Make a mold for a bottle stopper blank. Turn a bottle stopper with an indentation in the top. Use the mold to hold the bottle stopper upright and imbed a picture or object. Dome the water clear on top and stick in pressure pot. After it is set, finish bottle stopper.
 
Back
Top Bottom