Putting together a resin casting setup

Signed-In Members Don't See This Ad

Harpazo

Member
Joined
May 8, 2014
Messages
137
Location
Central Ohio
As I've admitted, I'm new to casting and stabilizing but am making my attempt at it. I took the documented advice from Curtis and probably not much else other than a few youtube videos on the subject.

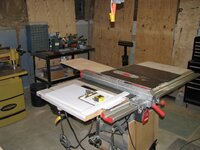
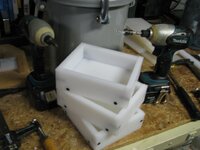
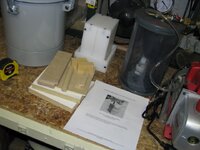
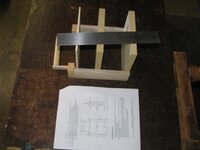
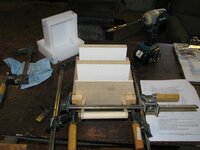
I used the cut sheet Curtis put up and I think my table saw was off a smidge as I had to re-cut the bottoms to fit with the side pieces. One of them I will probably dis-assemble and remake into smaller molds for other single cast blanks.

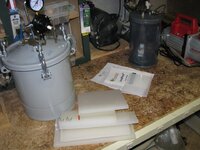
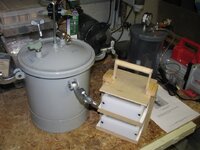
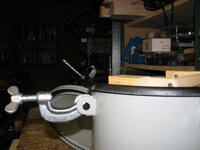
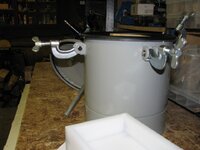
The pressure pot is nothing special. Harbor Freight 2-1/2 gallon with a discount coupon for a cost of $79.99 plus tax. I have a small nailer compressor to power that when it's ready to use.

I'm not sure which resin I will use first but I'm pretty sold on the Alumilite products based on all I've been discovering. I'll probably try PR resins as well. Mainly because I can get a small amount to play with for comparison at least once.

Here are some photos of today's activity.
 

Attachments

  • IMG_0129.jpg
    IMG_0129.jpg
    225.5 KB · Views: 416
  • IMG_0131.jpg
    IMG_0131.jpg
    225.2 KB · Views: 347
  • IMG_0136.jpg
    IMG_0136.jpg
    175.8 KB · Views: 462
  • IMG_0137.jpg
    IMG_0137.jpg
    168.2 KB · Views: 490
  • IMG_0140.jpg
    IMG_0140.jpg
    228.2 KB · Views: 359
Last edited:
Signed-In Members Don't See This Ad
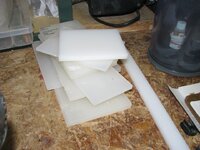
With the successes there are also the fails. I tried to go the "easy" route and buy plastic for the resin molds online. The material I received was so unusable I had my wife pick up a cutting board from Sam's Club. Yes, this is what Curtis recommends but limitations on getting out the mail order route looked like a good operation. Plus, the supplier is one listed here on IAP.

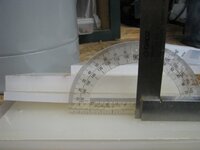
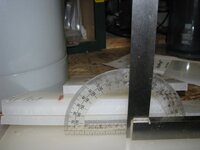
The plastic was every imaginable thickness as well as the expected random width and length. Some over an 1" thick. It's also not the same material as what cutting boards are (HDPE). It cut more like acrylic sheet (melts as it cuts and ends up binding the saw blade... very bad for motors BTW).

And to be fair... I've yet to contact the vendor to complain. As I see it, if the material is not suitable for a particular purpose then it probably is best not to risk bad customer experiences by just not offering it to them. So, if they are concerned, they can comment here as I *would* like an explanation.

The photo illustrates just how bad some of the pieces were. I just received this material and I don't think this would have warped after shipment. I would think that poor storage with a huge amount of weight + time would have caused such a thick sheet to warp like this is.

What it looks like to me (my opinion) is that they cut off useless scrap and resell it rather than truly scrap (recycle if you will) and it is not much worth trying to re-purpose it. See what you think. I don't mind honest feedback but please don't shoot the messenger. :biggrin:
 

Attachments

  • IMG_0132.jpg
    IMG_0132.jpg
    146 KB · Views: 304
  • IMG_0133.jpg
    IMG_0133.jpg
    159.6 KB · Views: 302
Last edited:
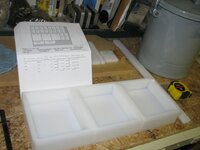
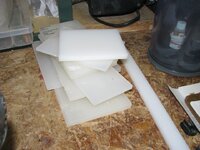
This photo shows one small piece leftover from the cut-up cutting board from Sam's. The top piece is cutting board and everything else on the stack is from the guy in Ohio (probably within an hour's drive or so from here).

You can see the difference in whiteness. The cutting board is much whiter and it was a dream to cut on the table saw. I used my Freud Premier Fusion regular kerf blade. It was either that or the WWII blade and I've had so much good service from the Freud I just used it. The other plastic would probably have destroyed my good blade if I'd have used it.
 

Attachments

  • IMG_0140.jpg
    IMG_0140.jpg
    228.2 KB · Views: 281
Last edited:
Casting molds need a carrier box if you're gonna do it the C.O.S way...

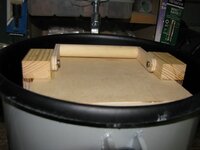
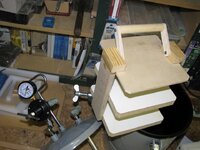
I spent the day making this from material I had in the shop. A lot of time was spent just hunting for the right stuff and dusting all the cobwebs off. I was very pleased with the plan Curtis has on his website and I was able to build it nearly identical to his.

Rounding the corners was needed as the photo shows my first attempt to drop it into the pressure pot which has a rounded bottom preventing the carrier to lower enough to get the lid of the pot back on.

I think the only part I had to re-cut was the dowel rod handle which, if I'm not mistaken, was the length which was a bit too long. It seems it was about an inch off in the cut list.
 

Attachments

  • IMG_0150.jpg
    IMG_0150.jpg
    202.1 KB · Views: 303
  • IMG_0151.jpg
    IMG_0151.jpg
    177 KB · Views: 268
  • IMG_0152.jpg
    IMG_0152.jpg
    195 KB · Views: 253
  • IMG_0153.jpg
    IMG_0153.jpg
    216.1 KB · Views: 323
  • IMG_0156.jpg
    IMG_0156.jpg
    165.9 KB · Views: 264
Last edited:
Here's a few more photos of the process as I finished up. Now it's basically there but the system is not functional quite yet. I still need to remove the drop tube from the lid of the pot.

I am not sure how I will remove the pipe so if anyone has a method I would appreciate suggestions.

This turned out to be an all day project but I took a bit of time getting photos taken and documenting my efforts.
 

Attachments

  • IMG_0157.jpg
    IMG_0157.jpg
    180.6 KB · Views: 232
  • IMG_0159.jpg
    IMG_0159.jpg
    143.7 KB · Views: 279
  • IMG_0161.jpg
    IMG_0161.jpg
    216.8 KB · Views: 281
It depends on how the pipe is installed. Can you take a picture of the top and the bottom? I know some just cut it and installed a 90 degree fitting to keep the air from being directed completely onto the top of the forms

I have a Binks pot and was able to unscrew it from the top side. I then was able to screw a 90 degree fitting on inside the lid
 
Last edited:
Mitch, If I only had a set of small pipe cutters I'd try them. As for the 90 degree fitting, it probably isn't needed with this setup if using the mold carrier. The top shelf on the mold carrier is not a shelf but intended to prevent compressed air from rushing in on top of the uncured casting resin.
 
Last edited:
The paint tube unscrews from the lid. It might be really easy or it might need convincing with a blow torch and a large wrench. I've encountered both.

I replace the tube with a 90 degree elbow so air doesn't blast down on the resin.
 
Last edited:
The paint tube unscrews from the lid. It might be really easy or it might need convincing with a blow torch and a large wrench. I've encountered both.

I replace the tube with a 90 degree elbow so air doesn't blast down on the resin.

Thanks for the tip Robert. The tube appears to be aluminum. As for the heat, I don't want to melt the paint on the tank if I can avoid it. Plus, I don't have a blowtorch (I assume you meant acetylene), just a butane screw on head for small gas bottle.

Maybe I'll get lucky the tube will just screw off. I will give that a try next. I will be using the shopmade carrier which has deflector to prevent the removed tube from blasting uncured resin all over the insides of the tank.
 
Last edited:
It pays to take the time to set yourself properly and the best way you can and you are just doing that, following Curtis instructions, something that I also used to start my casting ventures, years ago...!

The only thing that I see that may give you some problems in the beginning, is the possibility that the molds will leak badly, particularly after pressurized and make a big mess.

There are 2 ways to deal with that issue, and you may or may not need to add some extra screws to minimize the gaps. I use a demolding liquid that I brush to the molds inside surfaces and let dry before I pour the resin however, you may need to give many coats around the joints to seal them properly.

The quickest and safest way to seal those joints from the very beginning is to use thick CA to make a small run at the joints and use accelerator immediately to stop it from going through, that creates a seal similar to what you see done on windows and other areas, where silicone/silastic is used.

Mark with a marker, the panel that you will remove every time you need to demold, this helps to maintain all the other 3 joints sealed intact for consecutive castings, the panel that is removed will be the only one you need to concentrated to seal for the next time, most times, if the gaps aren't big, a good coat of the demolding liquid at that joint, making sure the mold is tilted so that the demolding solution stays where its needed, after dried, it will be ready to use...!

Re-sealing the removable panel joints with the thick CA again, will be a faster and more effective way, when removing that panel, the glue will separate easily, you only need to clean the old glue before putting the panel back in the mold...!

Hope this makes sense...!:)

Good look.

Cheers
George
 
Scott, I just use a butane torch to heat the fitting on the inside of the lid enough to break the seal. No need to get it hot enough to do any damage. Hopefully, it's not too tight.

I simplified my fittings with the following...
Tee on its side, male down into the 1/4" hole. Female on top for pressure gauge. Female also on side for emergency relief valve at 60psi. 3/8M to 1/4F into the 3/8" hole. 1/4" ball valve with a quick connect on top of it for air hose.

Again, used lots of Teflon tape. She'll hold 50psi for multiple days.
 
George & Robert, Thank you very much for the advice. Guys like you who are wiling to take the time to share experiences and tips are the absolute best and I'm grateful.

I was planning on using plain 'ol masking tape to temporarily seal up the small spaces. By the time the resin is poured in it should be much more viscous (in my unlearned imagination). If the tape sticks to the resin when it's hard the molds will take a ride on the belt sander for a touch-up to remove it.

Robert - When I looked at the tube at the inside of the lid I just figured I'd have to cut it off. I think I'd seen something elsewhere that suggested this method. Doing it your way is a far more elegant solution.

I still have to buy the Alumilite. Or maybe not... In my current state of economic affairs it would be a huge blessing to trade some of their product for a well documented photo-journalistic thread on casting their product and seeing the some of the end results. Why? Cuz' were all here to help one another! With this cold weather I need my reserves to stay to warm and the cash helps to buy the firewood I desperately need (to make pen blanks? ;-))
 
Back
Top Bottom