PSI Groove problem

Signed-In Members Don't See This Ad

Holzchief

Member
Joined
Mar 10, 2020
Messages
40
Location
Duette, FL
I bought the Groove starter kit because I was looking for a slim click pen.
The first one I put together looked nice, I love how smooth and quiet it is.
Next one, not so much. It woulldn't extend or retract reliably. Made 3rd one as a replacement and it worked fine.
It keeps going that way. I've made 6 so far, with a 50% fail rate on the mechanism.
I see comments here that say pushing on the mechanism at all will damage it yet, the instructions say to press the cap on by pushing against a hard surface, such as a table top. I have been using the back side of the tip to press the plunger assembly in, per the instructions.
At this point I'm feeling like I should just find a different kit. We make most of our own blanks to order.
Only thing I've been able to come up wirh is the issue of pressing the cap on, which I just do with my fingers, no press.
Any suggestions as to solving the problem are appreciated.
 
Signed-In Members Don't See This Ad
Well, I have not made a "Groove", but I have made pens using the mechanism which is the Schmidt SKM-192.
The mechanism has always worked flawlessly for me.
But, to guarantee that, you must never mistreat the mechanism during assembly.
The mechanism includes a machined "rod" that goes right through it.
When you are putting the plunger on, be sure you use only hand pressure and support the opposite end of the "rod" as the instructions say.
OK, so I assume you have done all of that, as per the instructions which are quite explicit and fairly good.
I have read the instructions quite a few times when I have contemplated buying the Groove kit, and read them again just now.

When you are pressing the cap into the top end of the upper barrel, I DO NOT like the idea of using the reversed nib to do so.
The instructions suggest an alternative method which is much better, in my opinion. .
Get a 3/4" scrap of a blank and drill a 3/16" hole through it. . I think it is better if that scrap piece is round, but it should not matter.
Use that drilled scrap to press on the cap into the top end of the upper barrel .... use a GOOD pen press to do this, because if things slip you could damage the click mechanism by means of some unintended lateral pressure.

This is a very critical step in the assembly process and, in my opinion, the most likely point at which an error can occur.

At this point in the assembly, YOU MUST NOT PRESS ON THE PLUNGER, just press on the top of the pen surrounding the plunger.
The part that you press on is called "the cap" in the instructions.

BTW, I don't see how you can do this pressing with just your fingers as you say you do. . I think it requires a press of some sort.
Unless, of course, you have loosened the fit between the cap piece and the upper brass tube. . In that case, you will need to use glue to hold the cap into the brass tube. . That is, actually, another approach to the assembly process which could alleviate the problem you are having.
However, it is a "different technique" which would involve some fiddling to get it to work satisfactorily.

OK, so I have already said that I have never made a Groove pen and you might be justified in assuming I don't know what I'm talking about.
LOL !! . I can take it, so you can think that if you wish. . But bear in mind that I have used the mechanism and its brother (the Schmidt SKM-88) which I have damaged by applying lateral pressure. . I have used both mechanisms many times with great success. . I like them.

I have a friend on IAP, @Dieseldoc, and I am addressing this to him to please offer any suggestions. . I know that he has made Grooves.

I wish you luck and better success in the future. . Feel free to ask me anything you wish. . Also start a conversation with @Dieseldoc if you wish. . I am quite sure that he won't mind. . You can tell him that I recommended his input to help you solve this problem.
 
Last edited:
Well, I have not made a "Groove", but I have made pens using the mechanism which is the Schmidt SKM-192.
The mechanism has always worked flawlessly for me.
But, to guarantee that, you must never mistreat the mechanism during assembly.
The mechanism includes a machined "rod" that goes right through it.
When you are putting the plunger on, be sure you use only hand pressure and support the opposite end of the "rod" as the instructions say.
OK, so I assume you have done all of that, as per the instructions which are quite explicit and fairly good.
I have read the instructions quite a few times when I have contemplated buying the Groove kit, and read them again just now.

When you are pressing the cap into the top end of the upper barrel, I DO NOT like the idea of using the reversed nib to do so.
The instructions suggest an alternative method which is much better, in my opinion. .
Get a 3/4" scrap of a blank and drill a 3/16" hole through it. . I think it is better if that scrap piece is round, but it should not matter.
Use that drilled scrap to press on the cap into the top end of the upper barrel .... use a GOOD pen press to do this, because if things slip you could damage the click mechanism by means of some unintended lateral pressure.

This is a very critical step in the assembly process and, in my opinion, the most likely point at which an error can occur.

At this point in the assembly, YOU MUST NOT PRESS ON THE PLUNGER, just press on the top of the pen surrounding the plunger.
The part that you press on is called "the cap" in the instructions.

BTW, I don't see how you can do this pressing with just your fingers as you say you do. . I think it requires a press of some sort.
Unless, of course, you have loosened the fit between the cap piece and the upper brass tube. . In that case, you will need to use glue to hold the cap into the brass tube. . That is, actually, another approach to the assembly process which could alleviate the problem you are having.
However, it is a "different technique" which would involve some fiddling to get it to work satisfactorily.

OK, so I have already said that I have never made a Groove pen and you might be justified in assuming I don't know what I'm talking about.
LOL !! . I can take it, so you can think that if you wish. . But bear in mind that I have used the mechanism and its brother (the Schmidt SKM-88) which I have damaged by applying lateral pressure. . I have used both mechanisms many times with great success. . I like them.

I have a friend on IAP, @Dieseldoc, and I am addressing this to him to please offer any suggestions. . I know that he has made Grooves.

I wish you luck and better success in the future. . Feel free to ask me anything you wish. . Also start a conversation with @Dieseldoc if you wish. . I am quite sure that he won't mind. . You can tell him that I recommended his input to help you solve this problem.
Thank you for the lengthy reply. I'll follow up on the suggestions.
Just to clarify, I have been pushing the little cap onto the mechanism by hand, with the bottom end resting on the table top. Is it possible I'm pressing too hard and damaging the mechanism? Then I was using an assembly press to push the cap/plunger/mechanism assembly into the top of the pen.
I do have a piece wood with a hole in it that I've used for other pens, so maybe I'll try that going forward.
Thank you again, I appreciate you taking the time for responding.
 
You say ....
" Just to clarify, I have been pushing the little cap onto the mechanism by hand, with the bottom end resting on the table top. Is it possible I'm pressing too hard and damaging the mechanism? "

The cap-to-mechanism joint is threaded and so should not require much "pushing" at all. . For sure, put this together by hand.

BUT ... if you are "pushing" very hard at all "with the bottom end resting on the table top" there is potential for damage.

The "bottom end" of the central rod in the mechanism has a very tiny "circlip" .... I assume that's the end we are talking about.
That "circlip" prevents the central rod from coming out the top end.

That rod has some very intricate machining on it. . There is a very tiny ball that rides up and down in the machined groove pattern.
There is also a machined groove internal to the outer sleeve of the mechanism. . Those grooves and the ball are very easy to damage.
Excessive pressure, whether longitudinal or lateral, can unduly force the ball against the grooves and ruin the operation. . The ball may be steel ... I don't know ... but the grooved rod and sleeve are only brass and so are quite soft and susceptible to damage.

When you are joining the mechanism to the cap .... by hand .... no "pushing" should be required - just the gentle twisting/threading action.
And when the threads are fully engaged, a gentle "snugging up".

To be honest with you, I do not like the design of the "Groove" because ..... after you have done this, and then pressed the cap into the top end of the upper barrel, you no longer have access to the mechanism. . If the mechanism should become loose, there is no way you can retighten it .... unless it is possible to make a custom tool to fit down the barrel and grip the mechanism's outer sleeve only (not the rod). . Strikes me as a very, very tricky business !!

I am very interested in this problem and I hope you find a workable and long-term solution. . Please keep me/us informed.
 
After reading story about the fail rate on he Groove with SkM192 Schmidt mech I can say it's not the SKM192 as I have made lot of Grooves about 30 or so and yet have a customer concern. Also I have used the SM192 in custom pens. Note to add to what. Mal has suggested I will add some very important items that should be noted.
1. Makes you square up all four ends of the tubes and have no burs on the inside of the tube.
2. When installing the barrel nut insure it not miss aligned and after the center band coupler is screwed up tight there is no gaps or misalignment.
Same goes for the Nib and clip-cap assembly.
3. I going to assume that the tubes, center band are clean of any glue or burrs. As there could be a problem with the refill hanging up in the tubes.
Make sure the spring is installed correctly and binding up in the nib.
4. Now the clip-cap assembly. Do not use any loc-tight or CA on threads of the. SMK192 when installing into the Cap assembly, just finger tight,
no lube like. WD40 is need on the. SKM192. The plunger can be installed on the cap without much effort, align plunger with SKM192 and it
takes very little effort to push it on. Most important items with the cap-clip assembly as what shown in instructions item four. Need to push
the cap and not the plunger when installing the cap-clip assembly on the tube. Instruction show using the nib, all I use is a cut off of a blank
that will clear the plunger and still let me push Clip-cap assembly into the finished blank.

Sure hope this helps and Like I said it's not the SKM192 assembly.

Cheers


Charlie
Thank you for the follow up advice.
Looking at everything, I'd have to say it looks like pushing the plunger cap on too hard might be the problem.
I've been really pushing hard on it. Guess with the little barbs you don't need that much force.
Near as I can tell, the other items you both mentioned are pretty well in order. I have a couple more kits left so I'll see how they go. Probably just make them up for stock instead of to order, until I figure it out for sure.
I really do like the feel and quietness of the ones I have built that worked right.
Thamk you both so much.
Jim
 
You are right about the quietness and smoothness .... that is the main point about the Schmidt mechanisms.

Makes them very worthwhile using.

I don't know if it is possible to replace damaged mechanisms in some of your pens, you can buy the SKM-192 mechanisms on their own.

Two places sell them, that I know of :

1) Richard L. Greenwald ....... https://richardlgreenwald.com/shop/push-mechanisms/

2) Milan's ........ https://www.milanspens.com/product-page/1-skm-192

You might even be able to get them from pennstateind.com ...... if you phone them and tell them you have some non-functional pens.
 
Last edited:
You are right about the quietness and smoothness .... that is the main point about the Schmidt mechanisms.

Makes them very worthwhile using.

I don't know if it is possible to replace damaged mechanisms in some of your pens, you can buy the SKM-192 mechanisms on their own.

Two places sell them, that I know of :

1) Richard L. Greenwald ....... https://richardlgreenwald.com/shop/push-mechanisms/

2) Milan's ........ https://www.milanspens.com/product-page/1-skm-192

You might even be able to get them from pennstateind.com ...... if you phone them and tell them you have some non-functional pens.
I'll try taking them apart and see if I can get some mechs. Not much to lose and I'd really like to make them work. At this pont I guess it's not goint hurt to punch the cap out by pushing on the mechanism.
You are right about the quietness and smoothness .... that is the main point about the Schmidt mechanisms.

Makes them very worthwhile using.

I don't know if it is possible to replace damaged mechanisms in some of your pens, you can buy the SKM-192 mechanisms on their own.

Two places sell them, that I know of :

1) Richard L. Greenwald ....... https://richardlgreenwald.com/shop/push-mechanisms/

2) Milan's ........ https://www.milanspens.com/product-page/1-skm-192

You might even be able to get them from pennstateind.com ...... if you phone them and tell them you have some non-functional pens.
I'll try taking them apart. Nothing to lose and I'd really like to make them work. At this point I don't guess it'll hurt to try punching the cap out agaunst t
You are right about the quietness and smoothness .... that is the main point about the Schmidt mechanisms.

Makes them very worthwhile using.

I don't know if it is possible to replace damaged mechanisms in some of your pens, you can buy the SKM-192 mechanisms on their own.

Two places sell them, that I know of :

1) Richard L. Greenwald ....... https://richardlgreenwald.com/shop/push-mechanisms/

2) Milan's ........ https://www.milanspens.com/product-page/1-skm-192

You might even be able to get them from pennstateind.com ...... if you phone them and tell them you have some non-functional pens.
I'll try taking them apart. At this point there's nothing to lose by pushing against the mechanism. I really would like to make them work.
I'll try calling PSI. I have emailed them twice with no response. I'll look up the links you provided too.
Thank so much,
Jim
 
I'll try taking them apart and see if I can get some mechs. Not much to lose and I'd really like to make them work. At this pont I guess it's not goint hurt to punch the cap out by pushing on the mechanism.

I'll try taking them apart. Nothing to lose and I'd really like to make them work. At this point I don't guess it'll hurt to try punching the cap out agaunst t

I'll try taking them apart. At this point there's nothing to lose by pushing against the mechanism. I really would like to make them work.
I'll try calling PSI. I have emailed them twice with no response. I'll look up the links you provided too.
Thank so much,
Jim
And I'll let you know how it turns out.
 
And I'll let you know how it turns out.

Yes, please ... let us know ... I am very interested in the outcome.

The more I think about it, the more convinced I am that the damage probably occurred in pushing the plunger onto the mechanism barbs.

And this could be avoided if PSI would do a "pre-assembly" step for the "mechanism-cap-plunger" before packaging the kits.
I don't see any reason why they could not do that. . Then all you have to do is press the pre-assembled trio of parts into the upper barrel.
That would minimize the chance of damaging the mechanism, it seems to me.
I also recommend, as stated before, that a piece of blank cut-off be used to do that pressing, but PSI mentions that method too.

One other thing that I just noticed in the PSI instructions is their suggestion of using a thread-lock compound when you thread the mechanism into the cap. . This should eliminate the possibility of the mechanism ever working loose. . Red Loctite could be used because you will never be undoing the assembly, but Blue Loctite should also work. . Loctite is a brand name, and there are other similar products available.
I don't know how "messy" that process would be ... you might have to be very careful in applying the Loctite sparingly and cleaning off excess.
Red is intended to be "more permanent" than Blue.

Good luck, Jim. . And thanks for your active participation in the discussion.
 
A bit of an update. PSI finally got back to me.
They had me describe the problem which I did. The suggestion was that maybe the mechs might have unthreaded a bit. They indicated that they are working on a tool to reach in and tighten them up.
Trying a couple of their suggestions and we'll see, said they might send a prototype of the tool.
 
Update,
I followed the PSI suggestions with mixed results. After thinking about how hard it can be to diagnose something like this remotely, I offered to send the pens to PSI so they can take a look, and hopefully repair, or send me the parts and instructions, the pens.
They generated a repair order so the pens are on the way.
Actually did order a few more kits in anticipation of getting this solved.
 
The pens made it to PSI and the tech looked at them.
The determination was on two of them the mechanism was unthreaded a bit. He was able to repair those and says they function normally. The third pen was more of a problem. The tubes were both too short. He said they were the length of a Groove twist instead of the click. Said normally with tubes like that he would suspect overtrimming but, since they were within .002 of each other, feels that's not the issue here. I've never purchased any Groove twists so I know I didn't mix them up.
Anyway, he's going to rebuild it as a twist and send it back.
I asked and he did say Loctite might be a solution, letting it cure and testing it before pressing the parts into the tubes.
Also that they were looking into some assembly changes in the future.
 
As a result of several requests, we now have the Schmidt mechanism available for sale, here

Honestly, I don't think this will break, so I don't think this will be the source of problems, but I can get it from Schmidt, so why not make it available?

Ed
 
Just a follow up.
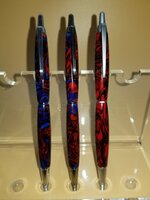
I made 3 more Grooves, 2 of which were used in the gift basket we put together.
I took the advice I got here, plus the comments from PSI, all 3 went together perfectly.
First thing I did was verify the tube lengths, as that appeared to be the problem on one of the failures. Also took some pains to make sure the mechanism was threaded and fully seated before pressing the assembly into the tube.
All three operate just fine, nice and smooth, no hangups.
Really makes me happy because I just like the way these look and feel.
Thank you all again for your help.
Jim 20200821_095649.jpg
 
I got the 3 pens back from PSI. They all work fine. One did have to be reworked as a twist due to the tube length.
Feel better about these now. As I said before, I put together 3 more with no problems after getting feedback here, and from PSI. I did verify the tube lengths , and the seating of the mechanism into the cap before assembling.
Also ordered some more from PSI because I do like the way they come out
 
Back
Top Bottom