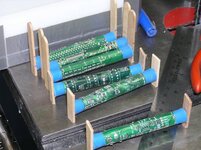
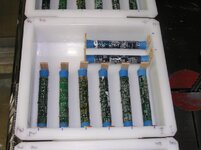
positioning the blank in the mold

Signed-In Members Don't See This Ad

wb7whi

Member
Joined
Aug 29, 2008
Messages
304
Location
Spokane WA
I have not done any casting yet but getting ready. One think I am having trouble visualizing is the placemernt of worthless wood in the mold. Do you not need the blank to be suspended as opposed to floating or laying on the bottom of the mold?

Thanks
 
Signed-In Members Don't See This Ad
I absolutely agree with Don's post - Curtis is the godfather of this technique.

The only subtle difference I take is that when I cast more than one blank at a time - I use a thin strip of wood at either end of the mold and put a drop of medium CA on the blanks to be cast end-points and glue them to the strips. This kinda makes it look like a hand railing:

xxxxxx <- strip
x x x
x x x <- blank
x x x
xxxxxx <- strip

I use the strips on both ends in case there is a complete void between the top and bottom of the blank. This keeps them exactly where I want them in the mold and there are no "floaters".

When done casting I simply cut away the unwanted material.
 
I actually glue mine down into the mold (I use a cutting board mold). I just put a small dab of med ca on a flat spot on the blank, spray accelarator in the mold (it won't set well without it) and position the blank where I want it. It sticks just enough to keep it on place for casting, but comes off of the cutting boards very easily with the rest of the cast and it turns away when you make a pen.
 
I am going to make a cutting board mold to make Alluminte casts. My question is: how do you suspend the TUBE so that there are equal distances on each side?
 
I am going to make a cutting board mold to make Alluminte casts. My question is: how do you suspend the TUBE so that there are equal distances on each side?

yes, I have the same question. Also how do you plug the tube so it does not fill with PR or aluminite? I've heard of using dental wax but my crazy mind says once you apply 60 PSI in the pressure pot the wax will give away and your tube will fill with resin. maybe one needs to fill the tube with a dowel??:confused:

Take a look at Don's snakeskin blank casting tutorial here.
 
That answered MANY questions that I had. What a wonderful and simple (makes my mind a very simple one) solution to floating tubes. Thank you. I'd send you a pen but i bet you have a bunch already.
 
If you have a four inch wide casting mold, cut two 1/8" thick by one inch high by four inch long strips. Then drill 7mm, 8mm or whatever size tube holes you need. Make the first hole at 1/2" and repeat every inch four times. Then chuck a brass tube in your drill press. Take a cork or rubber cork wine stopper and cut it 1/2" thick. Drill plugs of cork from this blank using your drill press. Then put one half of the cork plug in the tube and the rest in the wood strip. Fill the tube with lead shot and seal the other end. A little medium super glue seals the entire assembly. This centers the tubes, seals the tubes and make a easy to center and hold assembly for your mold when you cast.

Trick is to use scrap wood to make the assembly so nothing moves when casting. I tried making separate ends for every single blank and had a few move in the casting. Now nothing moves and it take no time to make a jig. I drill holes in a cheap blank. Then rip on the band saw and glue up tubes as fast as you can pick them up. I have a box of rubber cork plugs that I drilled out one day. One cork made about 20 plugs. Simple assembly for production work. Then when cast I cut the apart on the band saw. Cut the scrap wood ends off and try to just cut the cork plug about 1/16" above the end of the tube. Trims up nice with a pen mill trimmer. Save the lead shot for reuse. So far this has worked for over 200 cast tubes with no failures.
 
If you want to do snake skins it is much easier to buy the long tubes and cast them as long as you can. Much easier to cut a 6 or 7" long snake skin casting into 2 or 2 1/4" long blanks after they are cast. Less waste and much easier to glue them up. I trim the skin to what is the exact width and center the tube over the skin. Glue form the center out both directions at the same time. The seam where the skin meets is almost impossible to find most of the time. I use the long tubes, with the "end strips", to cast all my snake skins.
 
jfoh: I am ready to try your method and have a really stupid question. I understand the 1/8' X 1" X 4" strip, holes, etc, but do you do the same on both ends?
Clueless in Conroe,
John
 
Here is how i do it the tubes are filled with steel BBs you can get at wall mart. The sticks are Popsicle sticks. The rubber corks I got off eBay form a tattoo supply.

pcb02.jpg pcb04.jpg


Bruce
 
jfoh: I am ready to try your method and have a really stupid question. I understand the 1/8' X 1" X 4" strip, holes, etc, but do you do the same on both ends?
Clueless in Conroe,
John

Yes do both ends the same way. My large mold is 4 X 6 X 1 1/2". I use two end setups because they hold the tubes centered if I only fill to the top of the 1" wood strips. My next set of molds will have rounded wells to reduce the amount of resin used. I think that bulk casting for many blanks is the real way to go. One good cast and make four or more pens. Trick is to make it simple and avoid having tubes move when pouring the resin. These strip jigs work well for me.
 
jfoh I made the mold out of kitchen cutting white stuff. I cut the little pieces of board, put 7mm holes in them, applied the cork through the hole, medium glued the labeled tubes to the cork which was estruding out the other side, filled the tubes with bb's and then did the same to the other end. Placed the tubes into the mold and poured the Alluminite, put it immediatly into the pressure pot. After 30 minutes I uncovered the pot and saw that the Alluminite had leaked out the seams in the white cutting board stuff. This was expected. I just poured another 1/2 on top of the alrerady poured mold. I left this one overnight, turning off the compressor and unplugging it. I am in hoped to have a completed mold tomorrow. I am also in hopes that the mold pops out (OH yeah in a perfect world) and the seams stay sealed. If Not I wili unscrew the mold, take the tubes out and use wax paper next time to stop the leaking. Can't wait to see what happened tomorrow. If I weren't in my PJ's, watching TV, eating ice cream and chatting on this site, I'd run out there and look at it.
 
Jgrden, Just wrap the seams with duct (duck) tape or masking tape. That will end the drips and save you a lot of wasted resin. Good luck with your cast.
 
I just tape the cut cut pieces together in a box then put a piece of tape on the ends to hold the box together. Using duct tape. The key is not the tape holding the box/mold tighter it Goop I get it at Home Depot. Get some household Goop put a bead around the inside seams run your finger across it it smooth it out and push it in. It drys in about 1 hour ready to use and won't leak. It will clean rite off your finger like rolling up a big bugger (sorry) or acetone. when the mold is set just cut the ends open the mold leaving the tape on the sides. Clean it up a bit close it back up put new tape on the corners and recalk with Goop and your good to go again. I must have well over 200 cast on my molds doing it this way.
 
jfoh:

I can only laugh at myself. After completing the mold I put the first batch into the pressure pot. After 60 lbs. for 1/2 hour I pulled it out and found 1/2 half left. The rest of the misture had leaked out the sides, as I expected. I mixed an new batch, quickly, and in hopes that there would not be a visible seam between layers. I then set it in the pressure pot about five p.m. and left it there all night thinking the additional time wouldn't hurt. Froth with excitement I ran out the next moring and opened the pressure pot and the last batch was fluid like water. It had not set at all. In a confused state of mind I thought well why not bake it, what the heck. While transporting the mold over to the oven I noticed 1/2 of the mixture still sitting in the measuring cup. In my haste, I had not added part B. Well the part B had formed a 1/8 inch film, that I removed. I poured what was in the mold back in to the cup along with what was left of the part A thinking they'd probably be the same amount. The mold went back into the pot and sat under pressure for about an hour. I took it out and placed in the oven (it did not look good) and raised the temp. to 200 degrees and baked it for 1/2 hour. When removing it it was bubbeling like boiling water.
That is probably a tutorial on WHAT NOT TO DO. I think the pour is a waste and it will need to be thrown away. I will use your suggestion on the tape to secure the leaks.
Sheeesh........
 
Last edited:
Part A & B sounds like you are using Alumilte or an epoxy. heat will not cure it.

Now on the other hand if you had used a Polyester resin such as Silmar 41 or castin clear from Michaels and forgot the catalyst you could put in in the oven at about 200 for an hour or so and it will cure just fine. PR is a heat cure resin the catalyst is just a chemical to create heat.
Hmmmmm,,,, very interesting. So those little drops are to create HEAT. The more drops, the higher the heat. Might have been the issie I experienced in the winter.
 
Back
Top Bottom