Plunge filler fountain pen

Signed-In Members Don't See This Ad
See more from Penultimate

Penultimate

Member
Joined
Aug 22, 2010
Messages
1,126
Location
Bartlett, IL 60103
Greetings,
It's been a long time since I've been able to make a pen. We moved to a new (old) house over a year ago and you know how pen making can take a low priority. I now have a proper work shop so that took awhile to set up.

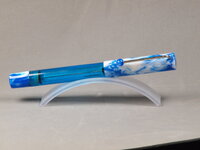
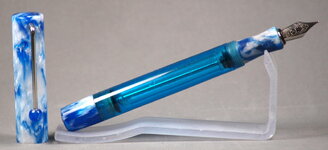
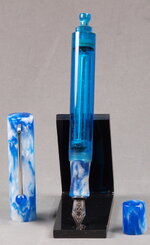
Here is a plunge filler made from Alumilite (I think) and translucent acrylic.
Plunge fillers are really neat. To fill it, pull up on the plunger to evacuate the reservoir. Air behind the seal is forced out thru the nib. As you press the plunger down toward the nib it draws a vacuum behind the seal. When the seal reaches a relief volume close to the nib ink flows up into the reservoir.

I made most of the parts from raw material except for the Schmidt #5 fine nib and a some M2 hex nuts.

Overall length: 5.36 inches
Length uncapped: 4.84 inches
Pen body diameter; 0.499 inches
Cap diameter; 0.557 inches

Thanks for looking, comments appreciated.
Mike
 

Attachments

  • Pic 1.jpg
    Pic 1.jpg
    134.8 KB · Views: 70
  • Pic 2.jpg
    Pic 2.jpg
    195.7 KB · Views: 65
  • Pic 3.JPG
    Pic 3.JPG
    154.1 KB · Views: 62
  • Pic 5.jpg
    Pic 5.jpg
    141.3 KB · Views: 56
  • Pic 4.jpg
    Pic 4.jpg
    189.4 KB · Views: 70
Signed-In Members Don't See This Ad
Very Nice! I cannot imagine making this type of pen from scratch! Impressive!

So this is what I have heard called a Vacuum fill pen. Question for you, when you have the plunger all the way in and the barrel finial tightened, does the plunger seal off the ink chamber from the section/nib housing? I ask because many Vacuum fill pens do this to make them "safe" to fly with since the major volume of ink is isolated from the feed/nib. Because of this feature, if writing more than the ink already in the feed will provide, you have top loosen the finial to open the ink chamber to the feed/nib. An example of a commercial pen that operates this way is the TWSBI VAC700R.
 
Excellent Mike!

A while back, Richard Greenwald made and sold the plunger mechanisms - including a threaded brass part that the shaft passes through, I believe with a seal to help eliminate air leaks into the space behind the plunger.

I made a prototype, the biggest lesson I learned from it is the interior of the barrel needs to be smoothed well - even little scratches prevent a decent vacuum because air leaks around the plunger washer. I couldn't get it to fill more than half the available chamber. One of these days I'll get back to it!
 
Very Nice! I cannot imagine making this type of pen from scratch! Impressive!

So this is what I have heard called a Vacuum fill pen. Question for you, when you have the plunger all the way in and the barrel finial tightened, does the plunger seal off the ink chamber from the section/nib housing? I ask because many Vacuum fill pens do this to make them "safe" to fly with since the major volume of ink is isolated from the feed/nib. Because of this feature, if writing more than the ink already in the feed will provide, you have top loosen the finial to open the ink chamber to the feed/nib. An example of a commercial pen that operates this way is the TWSBI VAC700R.
Hi Thanks. No I haven't made one that shuts off the flow to the nib. That's on my list to do in the future.
 
Thanks for the nice comments I appreciate it.
I made the ball at the end of the from the blank on the metal lathe. I drilled and tapped the mounting hole first M2x0.4. Then made straight stepped cuts approximating the size of the ball. After parting off I mounted it on a short piece of threaded rod and finished it with file and sandpaper.
 
Hi Duncan. The inside walls have to be smooth and a consistent diameter. A reamer helps clean drill marks. I saw an IG reel from Tapp Plastics that used glue to smooth a drilled hole. I going to try that on the next one.
Instead of using a brass part I mare a plastic plug from the body material. It is bored out and has an o-ring, felt packing and a flat piece of rubber to seal it. The patent I referenced used packing. It is just as important to have the reservoir sealed off to draw that vacuum.
You may not be far from a good fill. Don't forget that the relief volume and the nib will hold some of the ink. It is possible to make a small fill to add more ink.
Good luck.
 
A reamer helps clean drill marks. I saw an IG reel from Tapp Plastics that used glue to smooth a drilled hole. I going to try that on the next one.
Instead of using a brass part I mare a plastic plug from the body material. It is bored out and has an o-ring, felt packing and a flat piece of rubber to seal it. The patent I referenced used packing. It is just as important to have the reservoir sealed off to draw that vacuum.
Thanks for this additional information Mike. A friend who is a retired machinist gifted me one of his collection of hand reamers, so when I get around to trying again I'll have that to help get a smooth surface. Of course I'll need a fresh washer, the one I've used is most likely torn up around the edge from the uneven surface in my prototype. (Lucky I bought two sets from Richard - I always expect to ruin things on the first try!)

Did you glue the flat rubber (that seals the chamber holding the felt packing and o-ring) in place? My luck would be the friction of the rod through the rubber would pull it out the first time a customer tried to ink the pen if that isn't locked down some how.
 
Back
Top Bottom