John Eldeen
Member
For my offering to day we have two cigar pins one in a very dark piece of Milo and one in a nice piece of Koa. Both have been adorned with 3/32" aluminum tig rod pins in a spiral pattern.


First up is an ultra cigar wrapped in Milo and adorned with four spirals.


Next is a cigar wrapped in Koa and adorned with three spirals.
I also wanted to share the process I came up with. This is one where all of the difficulty is in the jig after that it is a piece of cake.


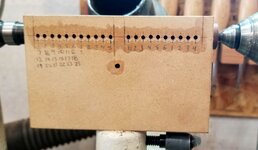
So this is the jig I came up with. It is made using two layers of 1/2 MDF to give it enough thickness to keep the dill bit straight. I also made it out of MDF because i was concerned even using the drill press to make all of the holes the if I used hardwood as small as the drill dit is it would drift. Once the holes where drilled I stabilize them with thin CA and redrilled them. Also as you can see in the first picture I drilled a 5/8" hole in the bottom of the jig to accept a piece of 5/8" round bar to mount in the tool rest. The holes for the pins where drilled at centerline of the headstock to the top of the tool post holder. Letting me locate the jig of the top of the tool post holder.
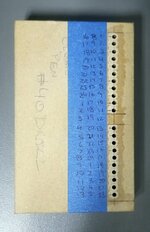
Now the fun part figuring out the spacing for the holes on a single tube pen this should be fairly simple where I had a problem was the cigar is a two tube pen. So coming up with a spacing that worked on both lengths of blank and across the center band proved difficult. I ended up with 3/16" with some slight variations across the center band and actually shortening the upper tube a little. Giving me 21 pins down the length of the pen plus 1 placement in the middle of the center band in effect giving you 22 positions. This is important because the center band wood needs to be removed to keep the grain and spirals in alignment. Next is figure out your degree of rotation per pin this was easy for me my lathe has a 24 position index giving me 15 degrees rotation per pin. If you look at the jigs the picture with the blue tape the tape has been labeled with what holes need to be drilled and what position in the index to drill them. The is also 3 rows of numbers for 3 spirals.

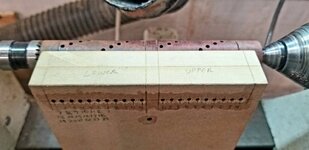
Next between centers turn down your blank to a consistent diameter for me that was 3/4". Then install your jig pushing it tight against your blank. This way you can use your jig as a depth stop for your drill. I drilled 1/4" into the blank that put the pin into the area that would be drilled out but not deep enough to drill into any other holes. Also the jig is marked where the placement of the tube are and this should be transferred to the blank as well. Then drill what seems to be a thousand holes.

Next glue in all of the pins I used medium CA for this because it was the thickest I could get to go down inside of the holes. Before I started gluing in the pins with the tip of my skew I cut the lines in where the tubes stop and start so they would not get removed during the glue up or clean up. I also precut and sanded all of the pins.

After giving all of CA time to dry naturally I came back and cut all the pins with diagonal wire cutters as short as possible. Then with a file finish removing the excess pin and CA down to the blank.
Then cut to little past your marks for the tube location line to give room for squaring. I would recommend drilling on the lathe as keeping everything centered is very important. As for turning I found the aluminum tig rod fairly soft and easy to cut.
Enjoy and as always comments and questions are always welcome.


First up is an ultra cigar wrapped in Milo and adorned with four spirals.
Next is a cigar wrapped in Koa and adorned with three spirals.
I also wanted to share the process I came up with. This is one where all of the difficulty is in the jig after that it is a piece of cake.
So this is the jig I came up with. It is made using two layers of 1/2 MDF to give it enough thickness to keep the dill bit straight. I also made it out of MDF because i was concerned even using the drill press to make all of the holes the if I used hardwood as small as the drill dit is it would drift. Once the holes where drilled I stabilize them with thin CA and redrilled them. Also as you can see in the first picture I drilled a 5/8" hole in the bottom of the jig to accept a piece of 5/8" round bar to mount in the tool rest. The holes for the pins where drilled at centerline of the headstock to the top of the tool post holder. Letting me locate the jig of the top of the tool post holder.
Now the fun part figuring out the spacing for the holes on a single tube pen this should be fairly simple where I had a problem was the cigar is a two tube pen. So coming up with a spacing that worked on both lengths of blank and across the center band proved difficult. I ended up with 3/16" with some slight variations across the center band and actually shortening the upper tube a little. Giving me 21 pins down the length of the pen plus 1 placement in the middle of the center band in effect giving you 22 positions. This is important because the center band wood needs to be removed to keep the grain and spirals in alignment. Next is figure out your degree of rotation per pin this was easy for me my lathe has a 24 position index giving me 15 degrees rotation per pin. If you look at the jigs the picture with the blue tape the tape has been labeled with what holes need to be drilled and what position in the index to drill them. The is also 3 rows of numbers for 3 spirals.
Next between centers turn down your blank to a consistent diameter for me that was 3/4". Then install your jig pushing it tight against your blank. This way you can use your jig as a depth stop for your drill. I drilled 1/4" into the blank that put the pin into the area that would be drilled out but not deep enough to drill into any other holes. Also the jig is marked where the placement of the tube are and this should be transferred to the blank as well. Then drill what seems to be a thousand holes.
Next glue in all of the pins I used medium CA for this because it was the thickest I could get to go down inside of the holes. Before I started gluing in the pins with the tip of my skew I cut the lines in where the tubes stop and start so they would not get removed during the glue up or clean up. I also precut and sanded all of the pins.
After giving all of CA time to dry naturally I came back and cut all the pins with diagonal wire cutters as short as possible. Then with a file finish removing the excess pin and CA down to the blank.
Then cut to little past your marks for the tube location line to give room for squaring. I would recommend drilling on the lathe as keeping everything centered is very important. As for turning I found the aluminum tig rod fairly soft and easy to cut.
Enjoy and as always comments and questions are always welcome.


