Pen Disassembly Press/Jig?

Signed-In Members Don't See This Ad

Cartaphilus

Member
Joined
Oct 6, 2021
Messages
19
Location
Massachusetts USA
Can anyone recommend a good commercial pen disassembly press or a shopmade jig for disassembling pens? The only one I've found is from Penn State Industries, and the mount for the lever on mine broke after just a few uses. I've since seen on a number of sites that this is a common complaint about the PSI disassembler.

Thanks...
 
Signed-In Members Don't See This Ad
Mine also broke after very little use. I bought this and fitted it to the PSI disassembler. MUCH MUCH more sturdy. You wont be able to use the stock plastic piece, I just turned a wooden one and it has been working fine.
 

Attachments

  • clamp.jpg
    clamp.jpg
    105.1 KB · Views: 149
Mine also broke after very little use. I bought this and fitted it to the PSI disassembler. MUCH MUCH more sturdy. You wont be able to use the stock plastic piece, I just turned a wooden one and it has been working fine.
Ken,

Looks like an elegant (and reasonably inexpensive) solution. I've ordered one from Amazon. Thanks for the tip.
 
Alan,

I have the PSI one that you are talking about. I used it to disassemble a couple of pens before finding an alternative. It did work; however, I didn't like all of the fiddling around getting it set up for disassembly and then putting it back when I got done -- I am just too darned impatient.

Since then I have been very happy with the "Soft Jaw Barrel Gripper" from PSI and their "Pen Disassembly Punch Set". I also make use of my 4-inch bench vise and an inexpensive 16oz. Double Face Mallet.

My process is to grip the body of the pen in the Soft Jaw Gripper, hold the gripper and pen body in my bench vise. This lets me apply just enough pressure so that I can tap on things and keep them from slipping without causing damage to the blank. Then I choose the appropriate punch and tap it a few times with the plastic face of my mallet. I have disassembled many using this method and so far haven't damaged anything.

I think the impact from tapping is much more efficient and reliable for disassembly than the constant force applied by the PSI press.

Regards,
Dave

PS Instead of the PSI Disassembly Punch Set I started out with an inexpensive set of transfer punches - the ones that have the sharp point on one end. They worked OK but I found that I liked them more for transfer punches, so I bought a set of the disassembly punches that are flat on both ends to use for pens. I also started out with a plain old claw hammer but changed to a plastic faced mallet as I found I was sometimes mushrooming out the ends of the punches with the hammer - not enough to cause burrs, but enough to make them go out-of-round or to have the diameter increased just a smidge on the very end.
 
Alan, I have had the PSI pen press for 5+ years. I have made several hundred pens with it as well as dissembled several dozen pens with no issues. I agree with Dave that it does take a bit of "fiddling" to go from assembly to disassembly mode, but I try to use that as motivation to help reduce mistakes that necessitate using it for disassembly.

Since you mentioned it broke after only a few uses, why not contact PSI and let them know what happened? Perhaps they would send you out a free replacement part and maybe you would have much better luck with it then? Hope you find a good solution regardless of your choice, David
 
Alan,

I have the PSI one that you are talking about. I used it to disassemble a couple of pens before finding an alternative. It did work; however, I didn't like all of the fiddling around getting it set up for disassembly and then putting it back when I got done -- I am just too darned impatient.

Since then I have been very happy with the "Soft Jaw Barrel Gripper" from PSI and their "Pen Disassembly Punch Set". I also make use of my 4-inch bench vise and an inexpensive 16oz. Double Face Mallet.

My process is to grip the body of the pen in the Soft Jaw Gripper, hold the gripper and pen body in my bench vise. This lets me apply just enough pressure so that I can tap on things and keep them from slipping without causing damage to the blank. Then I choose the appropriate punch and tap it a few times with the plastic face of my mallet. I have disassembled many using this method and so far haven't damaged anything.

I think the impact from tapping is much more efficient and reliable for disassembly than the constant force applied by the PSI press.

Regards,
Dave

PS Instead of the PSI Disassembly Punch Set I started out with an inexpensive set of transfer punches - the ones that have the sharp point on one end. They worked OK but I found that I liked them more for transfer punches, so I bought a set of the disassembly punches that are flat on both ends to use for pens. I also started out with a plain old claw hammer but changed to a plastic faced mallet as I found I was sometimes mushrooming out the ends of the punches with the hammer - not enough to cause burrs, but enough to make them go out-of-round or to have the diameter increased just a smidge on the very end.
Dave,

Thanks for the advice. I already ordered a Powertec clamp on Ken's advice and I'll try that first. But if I have any problems with that, your method is simple enough and therefore very attractive. Thanks again.
 
Alan, I have had the PSI pen press for 5+ years. I have made several hundred pens with it as well as dissembled several dozen pens with no issues. I agree with Dave that it does take a bit of "fiddling" to go from assembly to disassembly mode, but I try to use that as motivation to help reduce mistakes that necessitate using it for disassembly.

Since you mentioned it broke after only a few uses, why not contact PSI and let them know what happened? Perhaps they would send you out a free replacement part and maybe you would have much better luck with it then? Hope you find a good solution regardless of your choice, David
Dave, I'll try contacting PSI support, but I don't have much hope. Several reviewers have had the same problem I did report that they never heard back from Penn State.
 
The Beaufort pen press is nice but not the price. You can make one like it using a piece of 2x4 and 2 toggle clamps. One toggle clamp oon each end with a bock of wood or HDPE for the ends. Better yet mount the clamps on 1x4s and add a T track to the 2x4 for fast easy length adjustments.
 
Alan,

I have the PSI one that you are talking about. I used it to disassemble a couple of pens before finding an alternative. It did work; however, I didn't like all of the fiddling around getting it set up for disassembly and then putting it back when I got done -- I am just too darned impatient.

Since then I have been very happy with the "Soft Jaw Barrel Gripper" from PSI and their "Pen Disassembly Punch Set". I also make use of my 4-inch bench vise and an inexpensive 16oz. Double Face Mallet.

My process is to grip the body of the pen in the Soft Jaw Gripper, hold the gripper and pen body in my bench vise. This lets me apply just enough pressure so that I can tap on things and keep them from slipping without causing damage to the blank. Then I choose the appropriate punch and tap it a few times with the plastic face of my mallet. I have disassembled many using this method and so far haven't damaged anything.

I think the impact from tapping is much more efficient and reliable for disassembly than the constant force applied by the PSI press.

Regards,
Dave

PS Instead of the PSI Disassembly Punch Set I started out with an inexpensive set of transfer punches - the ones that have the sharp point on one end. They worked OK but I found that I liked them more for transfer punches, so I bought a set of the disassembly punches that are flat on both ends to use for pens. I also started out with a plain old claw hammer but changed to a plastic faced mallet as I found I was sometimes mushrooming out the ends of the punches with the hammer - not enough to cause burrs, but enough to make them go out-of-round or to have the diameter increased just a smidge on the very end.
I use transfer punches but I'm going to get a set of the PSI. 2 options with transfer punches are hit the pointed end with hammer or most likely get pointed end stuck in tube if you hammer flat end. I do like the soft jaw gripper.
 
I scored a assembly tool, Good Hand, and it does a good job of assembling. I fastened it to a piece of plywood for stability. There are some that are dual function- assembly and disassembly. I bought a set of punches for disassembly.
 
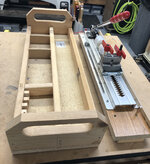
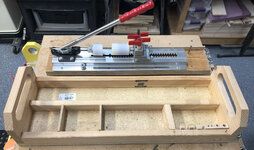
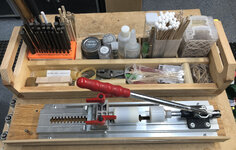
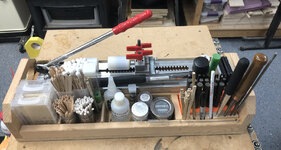
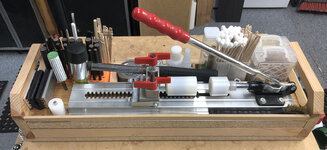
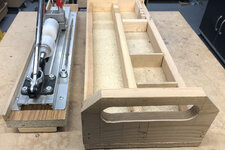
I started out fastening my press to a piece of wood also, then later I built a caddy to hold all of my assembly/disassembly stuff along with the press. I used FastCap TracPad stick on pads on the bottom. They are an amazing anti-skid pad. I think they might have been discontinued, but occasionally I see them advertised on some online companies like WoodCraft (along with Traction Dots, another one of their products). The caddy has several compartments to hold stuff and a hidden compartment under the assembly/disassembly press that holds various tools and supplies. The disassembly punches add enough weight to the caddy that it never moves at all when I am using it. When it is not in use I move it off of my work table to a storage shelf.

I turned covers out of HDPE plastic for both of the ends of the press, the plastic one, so I had a flat surface instead of the indented one that comes on the press (the indent occasionally left marks on the pen tips/nibs when I was pressing), and one for the aluminum end to give it a softer material to press against thus less likely to mar or damage the pen parts. The covers simply slip over the existing pieces on the press.

Here are a few thumbnails since pictures explain it much better than I could ever do. - Dave

Caddy with the press removed showing the hidden storage compartment.
IMG_2351 Cropped.jpg IMG_2353 Cropped.jpg IMG_2352 Cropped.jpg

Picture of the Caddy loaded up with stuff (with the press still removed to show stuff in the hidden storage compartment)
IMG_2350 Cropped.jpg

Pictures of the Caddy loaded up with the press in place covering the hidden storage compartment.
IMG_2347 Cropped.jpg IMG_2349 Cropped.jpg
 

Attachments

  • IMG_2354 Cropped.jpg
    IMG_2354 Cropped.jpg
    285.9 KB · Views: 79
  • IMG_2355 Cropped.jpg
    IMG_2355 Cropped.jpg
    312.7 KB · Views: 92
Back
Top Bottom