New (Old) Oven for Curing

Signed-In Members Don't See This Ad

greenacres2

Member
Joined
May 2, 2017
Messages
1,721
Location
Northwest IN
I've had trouble keeping an even temperature in my toaster oven. Seemed that no matter where i set the toaster, the temp would eventually creep to 220-250 forcing push-out of Cactus Juice (CJ). Picked up a controller, and found that if i set on at 162 and off at 165, i could stay really close to 200 which helped. (watching the digital display, the controller turned off at 165, but the air temp climbed to 225 after the oven turned off!!) Thought about an electric smoker with a digital control, but reviews were horrible on the controllers and elements.

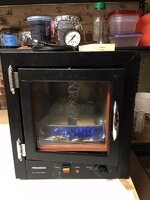
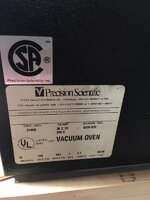
Anyway, started watching for a used lab oven, one came up on the auction site a week or so ago, less than 25 miles from me, and the guy cut the price on Thursday. So...i took a chance. Picked it up Friday, spent a few hours that night and on Saturday to figure out where 185 was on the analog dial. Since it is a vacuum oven (the door seals under vacuum--works awesome), in order to use without my pump i sealed with a pair of bar clamps.

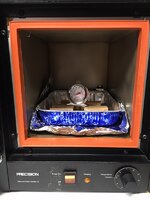
The insulation and mass are awesome, takes 20 minutes or so to come up to temp, but then holds absolutely steady. Tried my first batch of curing last night, shut off the oven at 1:45 am, and it was still 95 degrees at 6:15 am. Had almost no force-out for the first time ever. The outside of the box stays at ambient room temperature. Most importantly, the seal is so complete that there is NO ODOR of the CJ curing!!

Interior is about 7.5" wide, 11.5" high and deep. I'll figure out a clamping system for the door, have some thoughts already. Also need to find a low profile grate to hold the curing packs off the bottom, though some scrap oak in an aluminum pan worked great last night.

The vacuum would not be my first choice, but i wasn't seeing any gravity ovens within driving distance (shipping quotes are salty!!), and i can adapt for the difference. The 500 watt/4 amp elements are a whole lot more efficient than the toaster oven at 1500 watts too.

Now...i need a lab coat!!
earl
 

Attachments

  • Vac Oven 1.jpg
    Vac Oven 1.jpg
    139.1 KB · Views: 253
  • Vac Oven 2.jpg
    Vac Oven 2.jpg
    104.3 KB · Views: 224
  • Vac Oven 3.jpg
    Vac Oven 3.jpg
    144.5 KB · Views: 233
Signed-In Members Don't See This Ad
Cool!.....Well, Hot actually :biggrin:
Good info!
Perhaps a rack from a BBQ grill or refrigerator will work for you.

Actually, the one in my toaster oven would probably work--but i may still use that oven for drying. Honestly, 2 pieces of angle iron laid in the bottom with the point up would work fine now that i think about it.
earl
 
Finally got my valves and hoses set up last night and got some real testing done. Pulled 29" with less than 4 minutes of pump time. After 5 hours, was at 27", 10 hours 23.5", and 12 hours at 22". So, the seal isn't 100%, but not too bad on a few minutes of pump time. Took well under 2 minutes to run back up to 29" a bit ago and still there an hour later. When i ran it back up, i was able to do so without losing any ground. Will see where we are over the next few hours.

For drying wood to stabilize, that's plenty of vacuum since the vac is a bonus. For stabilizing--being able to stay at not less than 27" for 5 hours seems like it should be plenty to get good penetration. Next up will be drying a batch and trying a test batch to stabilize. Been looking around the kitchen, and the size of the oven chamber really opens up the number of clear plastic containers that can be adapted for small batch stabilizing--even if only for a single batch. A lot of recyclables may see a batch of CJ before they leave the house!!
earl
 
Pete--no drain. I cured 10 or so blanks last weekend, and had a little condensation on the glass about midway through, by the time i felt they were done there were a few drops when i opened the door. Haven't dried a batch yet--so you pose a great question. I'll keep an eye on that.

Drying to stabilize will likely generate more moisture (maybe not--since i'm not normally drying green wood?) With that little vacuum leak dropping me by 2" over 5 hours--a quick refreshing back up to 29" may actually evacuate the moisture. I've got 8' of hose between the oven and the pump, and the pump is on a shelf about 24" higher than the oven--so i can watch the settling.

Ended up paying $150 for the oven picked up about 20 miles from home. Was intially listed at $250, so i was "watching" it and a few others. I've gotten notice of a few reductions on some of the others too. Of the vacuum ovens i saw listed as i watched, this was one of only a few that still had the hose fittings and gauge attached.

Shipping estimates look huge on vacuum and gravity ovens. This one has an inventory sticker from St Jude's. Locally--i had checked with a local dental lab (usually no vacuum), they thought they might have had a few in storage, but had no desire to look. Medical labs, tech schools, high school chemistry, etc may all be sources. I got the idea from seeing a guy use an electric smoker to dry & cure, then sort of stumbled into the thought of a lab oven. Advantage of the lab oven is the temp stability that comes from mass and insulation. That Precision unit has a heating element in each side. Takes a while to come up to 180 F, but holds it very well without a controller. I can set my analog power dial to 31.5, and stay right at 185 for 5 hours. Some newer models have digital PID controls, but for 2 or 3 times the money used.
earl
 
Thanks. I never realized there were such things. I have a little book that is about vacuum kilns and you have a ready made solution although small. https://www.amazon.ca/Vacuum-Kiln-D...rying+wood&dpPl=1&dpID=517Av6eUjCL&ref=plSrch

Thanks, i put that book in my cart--may check with our library to see if they have it before buying. You called it right on the moisture--i'm 3 1/2 hours into drying a dozen pen blanks, and i'm battling moisture. Not a lot, looks like a little condensation on the glass, but the steam is keeping the vac down to about 24", and when i open the valve the moisture goes straight to my hose.

If i continue to dry under vacuum, i'll put in a moisture separator.
earl
 
All right--after a few batches of drying, infusing and curing, i have some thoughts:

Drying--started with very dry blanks and they still hold a LOT of moisture. As pointed out, vacuum drops as steam increases. Instead of risking my pump with the moisture, my next few efforts will be to draw the full 29" when i put the blanks in, isolate the chamber from the pump and let the vacuum drop over the first few hours. Break the vacuum, open the door for a few minutes to clear the moisture, and draw down a second time. Finish without vacuum--to dry the chamber.

Infusing--worked great, but i'm on the hunt for containers!! With only 11" of height in my chamber--vertical on a 5" blank is scary, so i laid them horizontal in a tupperware container and used tongue depressors for spacers. (a blue and a pink batch--cured the tongue depressors so they will be future segments!!) Infusion time comparable to my Turn Tex chamber, but i was able to do clear in my main chamber while doing small batches of blue and pink in the oven's chamber at the same time.

Curing--the door seals with vacuum only (no latch), so to cure i'm using a clamp. At 2" of vacuum the door is a tight seal, so i may give that really light vacuum a try in the future. Temperature holds a nice steady 185 to 190 so i'm getting much less force-out than with the toaster oven (at about 30% of the power consumption)--that was my main objective to start with...having the spare vac chamber is a bonus!!

All in all, still have some learning/experimenting to do, but fun stuff. The next vacuum oven will have PID controller built in as it's tricky to find the sweet spot on the analog dial--just need to find an exceptional deal and more budget!!

earl
 
Back
Top Bottom