Need help with getting desired mixing effect!!!!!!!!!

Signed-In Members Don't See This Ad

grz5

Member
Joined
Jul 23, 2011
Messages
268
Location
Upland, CA
So after casting for a few weeks and just about finishing off my first gallon of PR I am still having no luck with getting a partictular effect and if anyone could give me some pointers on how I should go about replicating the effect I would be very grateful. (Mixing methods, which should be poured 1st how to pour it etc etc....)

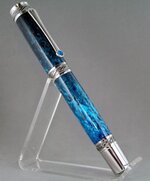
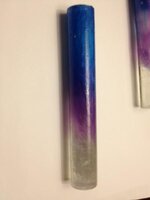
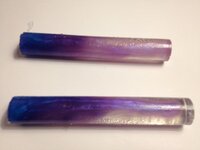
The mixing effect was inspired by a Brooks blanks (SHOCKING I KNOW! :tongue:) and I've attached an image of the blank.

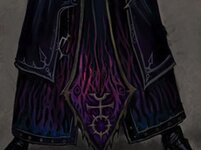
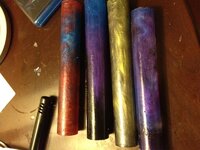
The color pallet can be seen in the 2nd attached images.

I would like to have one end of the blank be all black and then transition similar to the way that brook's blank does combined with the colors from the 2nd image.

I have seen several people get a similar flame/ribbon effect (BSea, Brooks, and many more) but I just cant get the fine lines and mixing to work.
 

Attachments

  • 100_2496581x700.jpg
    100_2496581x700.jpg
    25.3 KB · Views: 429
  • slaaneshcolor.jpg
    slaaneshcolor.jpg
    34.9 KB · Views: 442
Signed-In Members Don't See This Ad
To get the thinner ribbons, I pour thin streams of the accent color. To do somethiong like you are showing, will take some practice. And I'm not really much further down the casting path than you are. But it I were to try & get that effect. I would use a clear at the bottom, and gradually add in the accent colors and transition to more of the accent color the higher I got with less clear at the end. Then I'd reverse paint the whole blank black. I've only done a few pours like I've described, and my results weren't exactly stellar.

And if you are trying to do something to compliment that 2nd picture, then it looks like you'll need to do at least 4 or 5 colors. That will be a cool blank if you can pull it off.
 
That's the thing about following in the footsteps of a Mad Scientist...you'll have to dig up a lot of bodies before you get one to come alive. One gallon may not be enough I'm sorry to say! Not the answer you were looking for but the thing you'll need is time to both work out the process and let the resin start to set before blending the colors. I say this, but I haven't been able to do it either...I guess I'm not mad enough :bulgy-eyes: :biggrin:
 
Just got my 2nd gallon in the mail today and I have a feeling that the fumes from the PR are turning me into a mad scientist :hypnotized::bulgy-eyes: even with the mask. I actually have as much fun if not a little more making the blanks as I do turning them.:tongue:

Welcome to the other vacuum. You will find that you dont turn as much wood pens because you want to see what your newest creation will look like.
 
Just got my 2nd gallon in the mail today and I have a feeling that the fumes from the PR are turning me into a mad scientist :hypnotized::bulgy-eyes: even with the mask. I actually have as much fun if not a little more making the blanks as I do turning them.:tongue:

I'm the same way Garrett, as much as I love turning, I love making the blanks more. The worst part is when I make a batch of blanks for someone and I NEVER get to see how they looked once turned! There isn't enough time in a day to just turn down a few just to see what was hidden beneath the surface. That's where the "Mad" comes from!

Now on to the task at hand. It took me MANY MANY gallons of resin before I finally figured some stuff out. Much of it I wouldn't even know how to put into words. I'll give you a ity bity hint with the blank in question. Although it was a total mishap that I got that result I did enough trial and error to figure out how I did it. Take the picture of the pen and turn it upside down, that's how the raw blank was when I poured it. You've got the right mold to make it happen too :wink:

Luckily you can pour just 1 blank at a time so try this. Take your best 3 guesses as to how to make it and write each recipie down. Label the cavity on the mold and then label the blank itself. Turn each down and see what's the closest. If it's not 100% what you wanted, tweak that recipie until it is. Experimenting like that will not only get you what you want but will open up your mind to thousands of future casting ideas (trust me, I've only scratched the surface on all the ideas I've got written down!). If after all that you still haven't gotten it, shoot me a PM and I'll work with ya on it.

Btw: I like those colors in the 2nd pic so I'm gonna try and make one just so I can see how it'll look, plus so I can say I still remember how to make those kinda blanks!

Happy casting :bulgy-eyes::alien::clown:

Thanks for the advice! I'll be posting my recent attempts to help with further trouble shooting. Let me know when you pull off the blank! It would be great to see what Ill be aiming for :)
 
Most of the time the blank is only 2-3 colors then the 4th color comes from the paint underneath. In that picture i think he has blue and darker blue. He then reverse painted it black. I might be wrong but thats how i get the 3 color look in my blanks
 
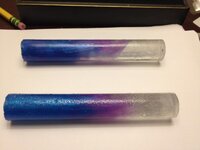
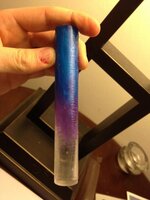
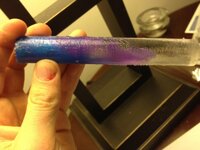
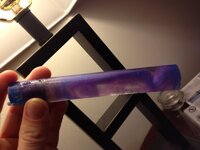
I did several casts today and here are the best results of the 4 batches. I was focusing on trying to get the ribbon/mixing effect down with 3 colors before I upped the anti with 4. As you can see the ribbon effect isn't working out too well. I was able to get a thin stream by pouring about 6inches above the mold..(Not easy at all) but it didn't work out too well. Any pointers on what I may be doing wrong would be huge.
 

Attachments

  • casting1.jpg
    casting1.jpg
    35 KB · Views: 155
  • casting2.jpg
    casting2.jpg
    18.3 KB · Views: 151
  • casting3.jpg
    casting3.jpg
    14.2 KB · Views: 127
  • casting4.jpg
    casting4.jpg
    28.7 KB · Views: 139
  • casting5.jpg
    casting5.jpg
    43.8 KB · Views: 180
What are you using to mix? For 'flames', I've had pretty good luck using a straight piece of wire with a very small bend at the tip.
 
What are you using to mix? For 'flames', I've had pretty good luck using a straight piece of wire with a very small bend at the tip.

im using 2 things to mix,
1) a curved dental pick
2) a set a 5 wires that are twisted together and branch off in 5 different directions at the bottom.

I'm not sure what im doing wrong...
How do you pour the colors prior to using the tool to get the flames effect?
Also do you mix the colors just before they're about to kick or is one farther along than the other usually?
 
What stage are you pouring at? ( see this thread )

You sound like you've tried my initial idea- a vertical mold and a high pour. Only item left was to make sure you poured it early- based on your examples I'm thinking you're waiting a bit and the resin is getting thicker so it doesn't swirl as aggressively. I'm thinking you want to pour that while it's almost like water.

Have you tried pouring in reverse order to see if density differences help?
(since you have a particular order you want that is a bit more challenging than normal).

You might try alumilite- I get much more aggresive swirls using it, but you pour it while it's like water and get it under pressure ASAP.

The last idea I have is pour it down a thin straw (coffee stirrer) that you're moving around in the base color, or try a more aggressive mixing tool- maybe a wire with a hoop on the end.


As much as I would like to try alumilite I dont have any way to put the blanks under pressure so I have to stick with PR.

Im pouring around 20minutes. (syrup/honey stage) I've had issues when I've poured the PR early in the past. In previous cases the 2 colors mixed together with no swirls (blue+white=light blue) So I've yet to obtain the aggressive swirls by pouring early. If it takes about 21-24 minutes for my pr to start to cure could you give me an approximate time on when I should pour?

I just popped todays attempts and the characteristics are as follows:
4 parts:
Clear
mauve quartz
orchid purple
cerulean blue

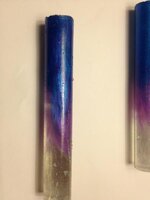
As with the previous attempt I poured from about 6-8inches in height and I poured the PR around 20min and the resin was not as viscous as the previous cast when I poured the colors into the mold. Again I used the wire tool I made to add swirls to the resin but I'm starting to think that if done properly I wont need to use it to add the swirls to the blank....

Am I doing anything wrong that I'm not catching?? Again any help would be greatly appreciated!!
 

Attachments

  • 2casting.jpg
    2casting.jpg
    33.8 KB · Views: 126
  • 22casting.jpg
    22casting.jpg
    25.6 KB · Views: 121
In the notes you're taking, are you recording the amount of time until the resin gels? If not, you should be.

My resin color library has data on MEKP+temp -> Gel Times, but they will vary based on other things like how old your resin is and the shape of your container. They can help get you started, but are no substitute for your own data.

I'd start pouring earlier to make the swirls finer. Maybe mix the 2nd color first, then about 3-5 minutes later mix the bottom color. Pour when the 2nd color gets to syrup stage, or just before. That way when you pour, the 2nd color will stick together a bit as it pushes into the bottom color. Of course, that'll make the 3rd color hard to get to swirl. OTOH, the thicker middle color should be more "draggable" by a stir rod, so a rod with fine ends might work, letting you pour the 3rd color while it's still runny.
 
You may not have what you're looking for yet, but I think they'll look pretty good reversed painted black. It looks like there is no blue near the bottom. Is that by design? When I'm doing multiple colors, I'll sometimes pour 1 of the colors like the blue, into the purple cup, then pour them together into the mold. That way I can pour 3 colors simultaneously. Another way would be to have someone help you pour. That way you can get 4 or more at the same time. Sounds like you are close as far as pouring. You might try mixing a little more aggressively.
 
In the notes you're taking, are you recording the amount of time until the resin gels? If not, you should be.

My resin color library has data on MEKP+temp -> Gel Times, but they will vary based on other things like how old your resin is and the shape of your container. They can help get you started, but are no substitute for your own data.

I'd start pouring earlier to make the swirls finer. Maybe mix the 2nd color first, then about 3-5 minutes later mix the bottom color. Pour when the 2nd color gets to syrup stage, or just before. That way when you pour, the 2nd color will stick together a bit as it pushes into the bottom color. Of course, that'll make the 3rd color hard to get to swirl. OTOH, the thicker middle color should be more "draggable" by a stir rod, so a rod with fine ends might work, letting you pour the 3rd color while it's still runny.

I've been logging: temp, # of MEKP added, amount of mica powder, and cure time. So i have rough estimates for the cure time but i'm still working on developing the 2nd nature of knowing when to pour.

Thanks for the pouring method I'll give it a shot tomorrow morning. Just to get the process correct:
Mix middle color 1st. (add mepk @ t:0.00min)
Mix top color 2nd. (add mepk @ t:1-2.00min)
Mix Bottom color (add mepk @ t:3-5.00min)
Mix colors together when 2nd begins to gel (~t:25.00 mins)

This is similar to my 1st attempt where I mixed the bottom color (clear) 1st then added the MEPK to the 2nd after 4mins. (I did this because I noticed that clear takes longer to cure than colored PR) so the colors would gel around the same time. The main difference is having the bottom color be less dense in order to get the more intense swirls correct?
 
You may not have what you're looking for yet, but I think they'll look pretty good reversed painted black. It looks like there is no blue near the bottom. Is that by design? When I'm doing multiple colors, I'll sometimes pour 1 of the colors like the blue, into the purple cup, then pour them together into the mold. That way I can pour 3 colors simultaneously. Another way would be to have someone help you pour. That way you can get 4 or more at the same time. Sounds like you are close as far as pouring. You might try mixing a little more aggressively.

I'll give that a shot. In the end I'm looking to get a layered effect where the color transitions from one to another along the length of the blank similar to the colors in the reference image.
 
I've been logging: temp, # of MEKP added, amount of mica powder, and cure time. So i have rough estimates for the cure time but i'm still working on developing the 2nd nature of knowing when to pour.

Thanks for the pouring method I'll give it a shot tomorrow morning. Just to get the process correct:
Mix middle color 1st. (add mepk @ t:0.00min)
Mix top color 2nd. (add mepk @ t:1-2.00min)
Mix Bottom color (add mepk @ t:3-5.00min)
Mix colors together when 2nd begins to gel (~t:25.00 mins)

This is similar to my 1st attempt where I mixed the bottom color (clear) 1st then added the MEPK to the 2nd after 4mins. (I did this because I noticed that clear takes longer to cure than colored PR) so the colors would gel around the same time. The main difference is having the bottom color be less dense in order to get the more intense swirls correct?

Close. You want to mix before the 2nd gels- I'd be swirling around the honey stage. Wherever that resin starts to stick together.

It's not about density as much as viscosity. As you've discovered, there's always a tradeoff between the definition of your colors and how fine of swirls you get. Pour too soon, and you lose definition. Pour too late and you get weak swirls.

What you're trying to do here is get the middle color to stick together so you have definition, while the other colors are runny enough that they "get out of the way" of that middle color, giving you swirls. By having the middle color gel, it also serves as a barrier to keep the top and bottom colors apart.

When to pour is definitely one of the hardest things to get a grip on- in part because it moves. I've thrown away numerous cups of resin where I waited 1 minute too long.
 
frustrated

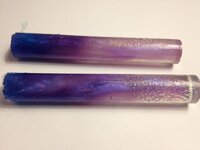
so I attempted to do several casting incorporating the different pieces of advice from everyone and the results were less than spectacular:mad:.

I mixed and timed everything as jason_r recommended but I get the feeling that yet again I was probably too early. (This is for both purple/blue blanks) I tried to do a regular 2 color pour to see if I could get a feel for the necessary timing but I was too late on the red/blue and it seems that I was too early on the green/dark silver..... So I'm going to take a break for the rest of the day and come back at it tomorrow if I have time.....
 

Attachments

  • 31casting.jpg
    31casting.jpg
    62.4 KB · Views: 164
  • 32casting.jpg
    32casting.jpg
    39 KB · Views: 166
Take a break and reverse paint some of those blanks. I think the purple + clear one has definite potential, and the red/blue isn't bad. The others may be hiding inside- often the outside will be dominated by 1 color while the inside has more swirls.
 
Thanks everyone. The blanks are somewhat transparent by design (i wanted the reverse painting to play a big role in the blank) so I can see through when I hold then to the light. The blue in the blue/red is located in one area and didn't spread when I mixd it. Probably because it was too far gone to mix properly but I think I can salvage the blank. I'll try to drill and reverse paint them after my classes later today.

Thanks again for the help so far. I really appreciate it! Brooks, can't wait to see what they look like!
 
On a side note. I'm currently Turning them down by holding them in my chick but I'm looking to use the centers to I can turn down the entire blank at once and not in sections. Any recommendations on a good drive center to use?
 
You might want to let the lower color (clear I guess in your case) gel first, then pour on your top colors and use a thin stick (like a popsicle stick) to push the top colors downward in a linear fashion... similar to how mostangrypirate gets his web effect he posted about here: http://www.penturners.org/forum/f43/my-tru-stone-recipe-92181/

Looks like its worth a shot. Thanks for sharing! I'll be drilling and reverse painting the blanks tomorrow so I'll be posting some pictures of the results. Fingers crossed I'll be pleasantly surprised. :p. regardless after today's break I'm looking forward to trying again.
 
Back
Top Bottom