Need Advice

Signed-In Members Don't See This Ad

penmaker134

Member
Joined
Dec 17, 2016
Messages
96
Location
Ohio
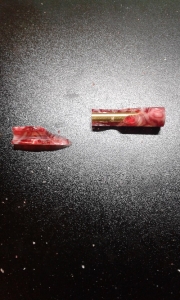
This blank is one i bought about 3 months ago when i started getting into pen turning and the last blank i had got a blowout on the cap but was able to hide it thankfully this one blew up on me while i was turning I use Easy wood Tool Rougher for my pens I cant even think of what might of happend some insight would be much appreciated

View in Gallery
 
Signed-In Members Don't See This Ad
Looks like poor glue coverage on the tube. It needs to be completely coated.

FYI, it would be easier to read your posts if you used periods at the end of your sentences.
 
I would say a combination of not enough glue adherence and too aggressive of a cut. The more force or aggressive the cut, the higher the chances of blowouts. Hurrying the glue stage will do the same.

Your are using a carbide cutter, so I am going to assume that it is sharp. Slightly dull blades will add to the probability.

Some material is more prone to blowouts than others, but then that is overcome by watching the above 3 situations closely.
 
Last edited:
Very often, when a problem occurs, it is a combination of things that are the cause (or rather "the causes"). It appears that you sanded the tube, seeking better adhesion. Some do not think that sanding is necessary. I am of the belief that sanding the brass is the better way to go, and have seen way too many photos of blowouts where the glue joint between tube and blank failed, AND where the brass was left bare, meaning the glue-to-tube was the fail point. So keep up the tube sanding (roughens the contact surface and removes contaminants). You are new to the forum and pen turning, but your general turning experience is unknown. As one gains experience, the problems fade away. To expedite that process, look at the following procedures to try ID the problem area:
1. Too aggressive turning habits
2. Tools not sharp enough. (Carbide inserts last...but not forever.)
3. Tool-rest too far away from the work.
4. Cutting tool at incorrect angle vs designed angle
5. Work turning too slow
6. Possible sloppy habits vs very precise and consistent control of cutting chisel
7. Poor lighting and/or needing updated vision correction.
8. Some blanks are more brittle, have tendency to chip and blow.

I could continue the list, but you are in the best position to analyze the problem. Additionally, can you get with someone else who can perhaps help? Maybe a turners club??
If you are on your own, try to analyze all your turning practices, and also look over some vids on line. Maybe some here at IAP can suggest training videos. I know Ed at Exotic Blanks has made a whole series of videos that are generally short and to the point, and good for someone wanting to learn and gain experience. You might want to try some practice turning, to develop techniques (instead of turning pens with a finished pen as the goal). Do training turning, with training as the goal.

Keep having fun, and enjoying the sport of pen turning!

Edit in: I see that due to slow typing, my thoughts are repeating what others stated.
 
Last edited:
When you are gluing your tubes in ... make certain it's not too tight a fit (you want glue in the gaps) and make sure you use a little more glue than you think you need (you want it to squeeze out, to ensure coverage). Also, while inserting the tube into the barrels, you want to use a back and forth twisting motion, to spread the glue out evenly in the barrel.

If you are using epoxy, you can take your time and even pull the tube back out to put more glue on it and insert from the opposite end, but if you are using CA, you typically have less than 10 seconds to do all of the glue spreading before it begins to set, so don't waste time and put it exactly where you want it as soon as you think you have the glue properly spread for coverage.


I liberally coat my tube with CA - give it a good 50% - 60% coverage on the tube before I insert ... I twist it in and back out twice, and then I push the tube into the barrel blank as far as I dare (I work bare handed, don't want CA on my fingers), flip the barrel upside down and press the tube the rest of the way by pushing the barrel against the table (with paper towel on the table for the CA drippings). This also cleans the CA off the insert end of the barrel, making it a little easier to work with.


Once the CA is cured, I grab an exacto-blade and use it to cut away any glue inside the tube with a curved twisting motion that reams the brass barrel's edges ... knocking off any brass spurs or bits of metal that may get in the way along with the glue. I always make sure I can see a tiny curl of brass cutting away from the tube when I ream it. I then double check to make sure that the tube is clear of all CA.

A lot of people like to plug their brass tubes with something to prevent glue infiltration ... dental wax, play-doh, a slice of potato ... ect. I just ream it with the exacto and that works for me.


If, while you are gluing up, the CA seizes early and you have brass tube sticking out of your gorgeous blank .... this may NOT be the end of the world! The brass tube is there to allow you to connect the rest of the pen components, and to provide extra durable structure to keep the pen intact. If the material you are making the barrel out of is also durable enough to withstand use and is opaque (so that you can't see the gap in the brass tube), then it's a simple matter to cut off the section of brass tube that is sticking out, and clean the cured glue off of it ... and glue it into the opposite end! (Who's gonna open the pen and look inside to see if the brass tube is in one piece???)
 
Mix a wee bit of red paint with some 2-part 5 minute epoxy.
Use that to glue the pieces back together and onto the tube.
It will probably just look like another of the lines in the blank.
Also, when using the carbide tool, present it at an angle to the blank instead of flat on the tool rest. It acts more like a shear cut and is less likely to dig in.
 
I never thought of putting the carbide at an angle i will give that a go for my next pen. Would it then act kinda like a skew at that point
 
Just to be clear. This image shows what I mean by putting the tool at an angle.
 

Attachments

  • tool_angle.jpg
    tool_angle.jpg
    84.3 KB · Views: 178
Won't leave the best surface behind, as you move the chisel, but if you present a carbide bit at a 30 - 45 degree angle with the bevel horizontal (chisel flat on the toolrest), you'll be cutting with just the corner of the bit. With such little contact area, there is lower friction. Add this to a high speed turning rate, and there is less chance of a blowout and the chisel will cut easier.


By lifting the TRAILING EDGE of the chisel up off the tool rest and drawing the chisel towards yourself, you can achieve a type of shear cut that can give a better finished appearance as you work, but it will still not give a decently flat surface behind it unless you move your chisel VERY SLOWLY and evenly. Depend on sanding to achieve a nice appearance and flat surface.

Keep in mind that if your chisel is not flat against the toolrest, you have much less control over it. The chisel will cut better, but as is the case with most lathe tools ... they cut their best right before you lose control!


The usual use for a carbide chisel is to act as a scraper, rather than a gouge or a skew. Keep the tip of the carbide BELOW the center of your lathe spindle, and the handle of the chisel level or ABOVE the carbide bit. Keep the chisel flat against the tool rest, but you can TURN the handle to present just the corner of the bit, using the tool rest as your pivot point. This is the safest way to use carbides, and is generally the method taught to beginners using any type of scraper on the lathe.


There is no bevel to ride, just present the working tip properly while keeping the tool under full control and you're good to go! :)


Skews are a totally different animal. They can be used as scrapers, parting tools, bead and cove turning tools, tenon cutting tools, roughing using a peel cut, ect ... extremely versatile and extremely dangerous till you get the hang of it.


Bowl gouges are fairly versatile and generally very easy to learn to use. They are round on the bottom, so that you can present the tip or edges of the cutting surface to the work at an infinite variety of angles. They also have a bevel under the cutting edge that you can use to help guide your chisel, but there are methods of using gouges that do NOT use the bevel. Remember what I said about a tool cutting best right before you lose control of it? No bevel contact = extremely little control. But the shear cutting method utilizes this for one of the best cut surface appearance you'll likely ever see.

To achieve this (typically done on endgrain for fine box work), you tip the chisel up on it's SIDE, with the toolrest at an angle that allows you to present the flute itself right at your work ... you'll be cutting with the very side of the cutting edge on the lower flute, and you'll be turning at fairly high speed. This is an extremely fine cut, with almost NO PRESSURE AT ALL, barely tickling the surface as you slowly and carefully draw the chisel back towards you. If you get a catch while in this position, you could very well lose hold of the chisel itself and have it fly off, or other catastrophic things could happen ... this is a technique best practiced carefully with full safety equipment. It also works best with a bowl gouge that has been properly ground to best take advantage of this effect ... an Ellsworth grind or fingernail grind may work best.


The reason it works like that is that there is usually an extremely fine burr on the inner edges of the flute that doesn't get knocked off with typical use of the gouge ... only the tip gets the grunt work, so the side edges remain pristine much longer.


Use caution as you build your skills, so that you can enjoy using them without injuries in the way once you've mastered them!
 
The blank may have had a crack in it before you started to turn from drilling and or heat. Add that to the long list of maybe's. Agree though needs more glue.
 
Thank you everyone for all the advice it really helps and it will prepare me for future blanks. This has to be the most fun I have had working with the lathe and everything else that goes along with it
 
Back
Top Bottom