robutacion
Member
Hi peoples,
I wouldn't remember my thread about the glow in the dark beads made into a bowl, here...????
Well, some of you may also remember that, I wan't happy at all with the casting results and that, I promised to try again, some other time, right...???
Some time ago I saw on sale these same beads but in blue, instead of the green from last time, they were sold in packs of 100, I had no idea how many I used the last time, as they were sold per bag never saying the quantity inside.
Anyway, when I got the pack, I realise that, the bag was way smaller then my previous one, about 1/3 or so, that meant that, I couldn't used the same mold as before as intended but, a smaller one that I need to find.
I remembered a set of 3 stainless steel containers that the wife had in the kitchen, we use them often so, I grabbed 2 of then (the biggest and the smaller one from that one), they were made with the same angles so, they would be ideal for the top and bottom molds needed.
Never said anything to the wife, until a couple of days later, she asked me if I have seen those 2 containers and I replied asking her to go to the work-shop and have a look on top of the bandsaw table...!
This was she found,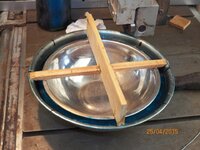
The only thing she asked was, "how are you going to get them out...???"
I explained that, I had cover the resin contact areas with the demolder liquid I have so, I wasn't expecting any troubles at all in remove them after the glue was set/harden...!
Now, going back one day, I constructed the beads frame as before, thick CA and accelerator on the contact points, after that I had to make some high spots with CA to bring the beads frame, up a little allowing some resin to be poured and stay a few mm thick from the beads, this was also made on some inner spots for the same purpose/reason.
The idea was to make the cast thicker than the first time and do it in such way that, after turning the both surfaces to satisfaction, I would never cut through the beads, they would be suspended in the clear resin. Those hight spots were made by putting a drop a the thick CA and accelerator immediately, I required about 4 or 5 drops to achieve the desired hight...!
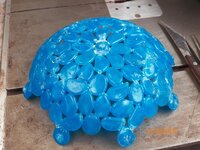
I needed to make sure that this time, I would use the same Pearlex powder but, I tiny bit of it, I wanted only a small ting of the blue pearl swaying in the almost clear resin.
I believe, I had it right, it looked good in the clear glass mixing container so, I poured it very gently to avoid trapping any air bubbles. Why was this important...??? because the mold was just about 5mm to wide to fit in my pressure pot, and that was a big worry to me.
The way the mold was made and secured, is visible in this pic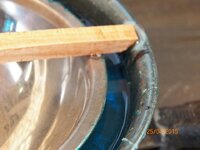
You can also see that, the mold is not totally filled, that is because I wanted to build the rim of the bowl with a lawyer of the dark purple/Shimmered violet, and I had a little wire tool that I was going to use to created some effects of the dark violet, right down the outer surface of the bowl.
It was a very cold night, when I was doing this, I have used a reduced amount of the hardener to avoid any cracks, I was aware that the mix would take longer to gell so, I waited 30 minutes or so, and kept testing the resin viscosity all of the time. I had the shimmer violet already mixed so, it could be poured at any time.
I waited, and waited, and waited, after an hour of waiting, I was cold, Merissa was calling for dinner and, I had enough so, I poured the darker resin and buy the time I grabbed the wire piece I had made, I could hardly see any of the darker violet on the surface.
I knew that, this shimmered violet powder, is extremely heavy, I new container comes almost empty, compared with most other colours so, being heavier was nothing new but, having the first resin pour so soft still after 1 hour, that was strange and unexpected so, I never used the wire, it would have been useless...!
I knew that the shimmered violet would be on the bottom of the mold, I was uncertain of how much darker it would male the first resin pour and if would spoil the whole thing to me, again...!
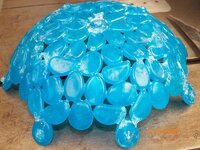
Well, it did, and I'm not happy about it, the molds used gave a prefect cast surface both in and out, the blue PVC demolder liquid worked as it was suppose to, the molds were clean of resin, the only problem I had in the demolding process was because, the inner mold had a rolled lip and some resin got into those crevesses, making it very difficult to separate but, with some perseverance the inner mold come out.
I could then see where the dark violet resin was, and how it did not sunk all to the bottom, some was suspended as it went through the first pour and as I was predicting, making that pour a lot darker than intended.
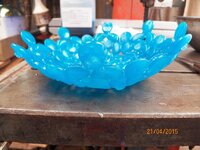
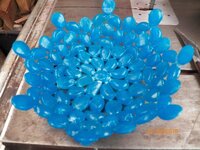
This was the result...!
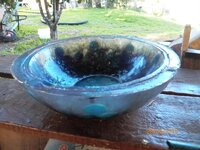
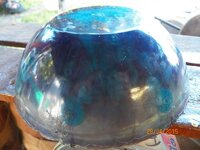
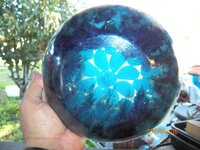
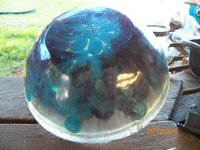
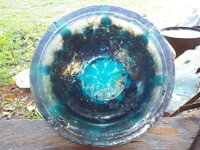
An improvement from the last one, no doubt but, nothing compared to what I wanted/visualized. The cast has not been turned yet to clean any of the demolding and other residue seen in the resin surfaces, and I am in no rush to do any more to it for a while, if ever.
In general, was a disappointment and certainly the end of my intentions/wishes to try again, I had enough of these illuminous beads bowl making/casting...!:frown:
Sometimes, you just need to cut your losses, and move on...!
Cheers
George
I wouldn't remember my thread about the glow in the dark beads made into a bowl, here...????
Well, some of you may also remember that, I wan't happy at all with the casting results and that, I promised to try again, some other time, right...???
Some time ago I saw on sale these same beads but in blue, instead of the green from last time, they were sold in packs of 100, I had no idea how many I used the last time, as they were sold per bag never saying the quantity inside.
Anyway, when I got the pack, I realise that, the bag was way smaller then my previous one, about 1/3 or so, that meant that, I couldn't used the same mold as before as intended but, a smaller one that I need to find.
I remembered a set of 3 stainless steel containers that the wife had in the kitchen, we use them often so, I grabbed 2 of then (the biggest and the smaller one from that one), they were made with the same angles so, they would be ideal for the top and bottom molds needed.
Never said anything to the wife, until a couple of days later, she asked me if I have seen those 2 containers and I replied asking her to go to the work-shop and have a look on top of the bandsaw table...!
This was she found,

The only thing she asked was, "how are you going to get them out...???"
I explained that, I had cover the resin contact areas with the demolder liquid I have so, I wasn't expecting any troubles at all in remove them after the glue was set/harden...!
Now, going back one day, I constructed the beads frame as before, thick CA and accelerator on the contact points, after that I had to make some high spots with CA to bring the beads frame, up a little allowing some resin to be poured and stay a few mm thick from the beads, this was also made on some inner spots for the same purpose/reason.
The idea was to make the cast thicker than the first time and do it in such way that, after turning the both surfaces to satisfaction, I would never cut through the beads, they would be suspended in the clear resin. Those hight spots were made by putting a drop a the thick CA and accelerator immediately, I required about 4 or 5 drops to achieve the desired hight...!


I needed to make sure that this time, I would use the same Pearlex powder but, I tiny bit of it, I wanted only a small ting of the blue pearl swaying in the almost clear resin.
I believe, I had it right, it looked good in the clear glass mixing container so, I poured it very gently to avoid trapping any air bubbles. Why was this important...??? because the mold was just about 5mm to wide to fit in my pressure pot, and that was a big worry to me.
The way the mold was made and secured, is visible in this pic

You can also see that, the mold is not totally filled, that is because I wanted to build the rim of the bowl with a lawyer of the dark purple/Shimmered violet, and I had a little wire tool that I was going to use to created some effects of the dark violet, right down the outer surface of the bowl.
It was a very cold night, when I was doing this, I have used a reduced amount of the hardener to avoid any cracks, I was aware that the mix would take longer to gell so, I waited 30 minutes or so, and kept testing the resin viscosity all of the time. I had the shimmer violet already mixed so, it could be poured at any time.
I waited, and waited, and waited, after an hour of waiting, I was cold, Merissa was calling for dinner and, I had enough so, I poured the darker resin and buy the time I grabbed the wire piece I had made, I could hardly see any of the darker violet on the surface.
I knew that, this shimmered violet powder, is extremely heavy, I new container comes almost empty, compared with most other colours so, being heavier was nothing new but, having the first resin pour so soft still after 1 hour, that was strange and unexpected so, I never used the wire, it would have been useless...!
I knew that the shimmered violet would be on the bottom of the mold, I was uncertain of how much darker it would male the first resin pour and if would spoil the whole thing to me, again...!
Well, it did, and I'm not happy about it, the molds used gave a prefect cast surface both in and out, the blue PVC demolder liquid worked as it was suppose to, the molds were clean of resin, the only problem I had in the demolding process was because, the inner mold had a rolled lip and some resin got into those crevesses, making it very difficult to separate but, with some perseverance the inner mold come out.
I could then see where the dark violet resin was, and how it did not sunk all to the bottom, some was suspended as it went through the first pour and as I was predicting, making that pour a lot darker than intended.
This was the result...!


An improvement from the last one, no doubt but, nothing compared to what I wanted/visualized. The cast has not been turned yet to clean any of the demolding and other residue seen in the resin surfaces, and I am in no rush to do any more to it for a while, if ever.
In general, was a disappointment and certainly the end of my intentions/wishes to try again, I had enough of these illuminous beads bowl making/casting...!:frown:
Sometimes, you just need to cut your losses, and move on...!
Cheers
George
