My Second Batch

Signed-In Members Don't See This Ad

Russianwolf

Member
Joined
Jul 13, 2007
Messages
5,690
Location
Martinsburg, WV, USA.
Tried the Non-Stick baking pan that I showed a link to in another post that's about 8x8 and Using blue painters tape to make a seperation in the pan, cast two colors at once. The results came out really good.


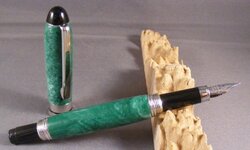
Green and White Swirl I've dubbed Arbor Mist. It also has white, silver and green sparkles.
20087152273_ArborMist.jpg


White with Red sparkles dubbed Raspberry Cream.
200871522714_RaspberryCream.jpg


The whites came out perfectly white, it looks like fresh coconut shavings coming off.

I do need to work on my swirl a bit more so that the colors aren't so one sided, but it's an interesting effect too.
 
Signed-In Members Don't See This Ad
okay here's the green pen.

Put it on a Platinum Euro Fountain Pen, bought some on clearance to have an entry level Fountain. The Nib holder is completely plastic!
 

Attachments

  • Arbor.jpg
    Arbor.jpg
    55.9 KB · Views: 225
Man, that's awesome. I want to get into casting, how hard is it to get the swirls? Do you set the initial color and just work it in while it's in the mold? Thanks for any info, new to this and going to michaels to get my first "casting kit" tomorrow from advice I read on the forum.
 
The way I've done it so far is to mix the colors in seperate cups. Let them sit a spell to start to harden. Then pour them into the mold one on top of the other. then swirl them together with a toothpick or something similar.

On my most recent cast, I didn't let them sit and even though I swirled them once, the two colors separated back to top and bottom for the most part. If I had checked on them before they set up I might have been able to reswirl them, but I was busy elsewhere. It's still an interesting cast due to the colors I used, but I think it could have been better.
 
Thanks for the info Mike, so are you making the blanks then drilling them out? I would think that the tube would get in the way of the swirling, but I very well may be missing something. As far as doing better, I think we all can look back and monday morning quarterback even our own stuff, but dont feel that you did any less than a hell of a job on it. I would have bought that blank in a new york minute if I saw it at woodcraft on the rack. The subtilies (sp) of the white in the pen are what draw me to it. Gives me something to aspire to :)

Bob
 
mine are solid casts. I'm using an baking pan that's about 7.5 inches square so I cast about 12 blanks at a time. The tubes are drill afterwards.

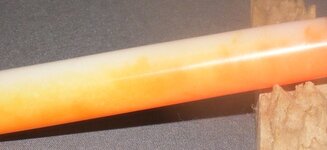
The Arbor Mist (Green and White) came out just the way I wanted. But the one I mentioned that could have been better isn't so subtle.

I give you:

Plasma Orange
 

Attachments

  • Plasma Orange.jpg
    Plasma Orange.jpg
    45.2 KB · Views: 145
Very nice! So if I can bug you with one last question, you do the mix, pour it, and then what, just let it set? I've seen in some of the posts where people are using pressure pots, but I'm just not that into it yet, and would love it I can just pour it, stir in some color later, then come back to it in a few days <or weeks, etc...>. Does the pan require any kind of treatment beforehand <silicon spray, wax paper>? I've looked for an faq on it, but havent had any luck. Hope I'm not throwing this thread too far off, my apologies if so

Bob
 
not pressure pot needed if you are only working with resin. If you want to cast something inside the resin (coffee bean, worthless wood, cactus skeletons, etc.) then you need vac or pressure.

I've only done 6 casts so far and my steps are.

1) pour resin in mixing cup.
2) add color and mix. (usually 2 or more cups, one for each color I want in the mix)
3) add catalyst to each cup and mix.
4) let sit for a few minutes so that they thicken a bit.
5) pour into mold (pan in my case) and swirl with a toothpick or stick.
6) check in about 5-10 minutes to see if colors have seperated and stir a bit if so.
7) let sit a couple hours.
8) once hard, flip pan and tap until it falls out.
9) let them air out for a day or so.

Since the PR resin shrinks a little as it cures, if you aren't using pressure/vac then it will pull away from the sides by itself and usually just fall out. The pan I use was teflon coated, but the third casting I used it for pull most of the teflon out. I'll just spray the pan with pam for the next case.

Warning. PR is strong stuff and I'm now doing all my castings on my deck. Even cutting it a day after it cured made my shop (and the house) smell horribly. I will wait at least 3 days before cutting the next one, and I'll space it out until I find the spot where the offgassing has dropped enough.

I'm working on something that might help with the odor. I forgot to do it in the last two casts, but once I cast some more I'll be needing a couple people who turn PR regularly to give me opinions on the odor as they turn it.
 
Thanks! Great details and some cool tips. I decided against michael's for the resin, Mr. Fiberglass just sent me a quote on the silmar41 so I am sending him a check in the morning. I have been working with store bought acrylic's, but always been more into the do-it-yourself style anyways, not so much for cost savings <which can help sometimes> but for individuality, so I'll be glad to toss any opinions you are looking for, as long as you dont mind answering stupid questions from me :) BTW, checked out your site, absolutely beautiful stuff!

Bob
 
Back
Top Bottom