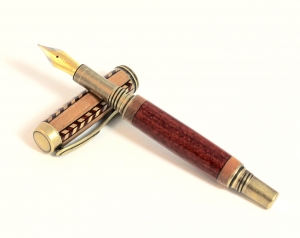
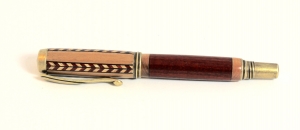
More Chevron Fun!

Signed-In Members Don't See This Ad
I probably like this one the best because the elements flow better. It has a theme to it. I like what you are doing with these. Is there a tutorial in the future??? I have to ask because any time I show something that is what I get asked. Or how about photos of the before turned pen??

Serious though how are you cutting the small pieces?? Maybe you can share that part with us. If not all is understood and keep up the great work. Love seeing this kind of work for sure.

Hi John.

I have submitted a full library article to Wayne on how I (may not be the best way) make the Chevron Blanks. As you easily understand, knowing HOW it's done is only a small part of the challenge - then you have to work out the precision yourself.

I'll transfer some pics in a few minutes.

Oh, thank you for the kind comments!
 
JT asked for some hints...
 

Attachments

  • IMG_3012.jpg
    IMG_3012.jpg
    267.1 KB · Views: 331
  • IMG_2920.jpg
    IMG_2920.jpg
    125.1 KB · Views: 345
  • IMG_2924.jpg
    IMG_2924.jpg
    117.8 KB · Views: 332
  • IMG_2933.jpg
    IMG_2933.jpg
    112 KB · Views: 303
  • IMG_2935.jpg
    IMG_2935.jpg
    166.5 KB · Views: 325
  • IMG_2936.jpg
    IMG_2936.jpg
    107.1 KB · Views: 324
Man I wish there was a "love" or "wow" button to click on this post!!! Beautiful pen! Reminds me of some of the patterns you see on strip built canoes and kayaks! thanks for the photos! I was able to follow your thought process on how you did this. I wonder if you could take a pre-made spectraply blank and achieve similar results versus gluing up your own? The only reason I say that is I have no clue where to get thin pieces like that and my bandsaw was a $60 estate sale 1984 craftsman that wobbles beyond belief! Even after switching out the tires to the nice urethane ones and balancing the wheels. There is no way I'd be able to resaw such thin pieces.
 
Mark, thanks for the photos and look forward to see the tutorial. The amount of work that goes into these type segmented blanks is tremendous and yes accuracy is a major key because you are always looking at something to compare each cut with and the eye sometimes sees things that are not there but most times can see mistakes. As mentioned your work on this type segmenting continues to improve. Look forward to see what you come up with next. This kind of work gets my brain thinking.
 
Man I wish there was a "love" or "wow" button to click on this post!!! Beautiful pen! Reminds me of some of the patterns you see on strip built canoes and kayaks! thanks for the photos! I was able to follow your thought process on how you did this. I wonder if you could take a pre-made spectraply blank and achieve similar results versus gluing up your own? The only reason I say that is I have no clue where to get thin pieces like that and my bandsaw was a $60 estate sale 1984 craftsman that wobbles beyond belief! Even after switching out the tires to the nice urethane ones and balancing the wheels. There is no way I'd be able to resaw such thin pieces.


Lee there is no reason that it can not. The key as you may have picked up in Marks photos is to have a blank glued up long enough that when you make the diagonal cut it is one strip. The spectraply blanks need to be glued together but you need the proper orientation if you get my meaning. Now you can do smaller or shorter segments and they work fine. You can do this with all kinds of medium and the sky is the limit. Maybe we get to see others try this now that Mark has shared some of his secrets.
 
Wonderful blank and great to see the pictures.

Mark, I wish we were closer that I could watch over your shoulder as you work. Your skills are terrific.
Of course, I would also hold the bourbon till you were ready.
 
Wonderful blank and great to see the pictures.

Mark, I wish we were closer that I could watch over your shoulder as you work. Your skills are terrific.
Of course, I would also hold the bourbon till you were ready.

LOL... Yea, and eventually I would get an empty glass :bad:. Be Well!

That looks great Mark!! You do really great work...

Thank you!

Awesome! Thanks for the pictures :biggrin: That's a really nice jig also.

Thanks Chuck!

Man I wish there was a "love" or "wow" button to click on this post!!! Beautiful pen! Reminds me of some of the patterns you see on strip built canoes and kayaks! thanks for the photos! I was able to follow your thought process on how you did this. I wonder if you could take a pre-made spectraply blank and achieve similar results versus gluing up your own? The only reason I say that is I have no clue where to get thin pieces like that and my bandsaw was a $60 estate sale 1984 craftsman that wobbles beyond belief! Even after switching out the tires to the nice urethane ones and balancing the wheels. There is no way I'd be able to resaw such thin pieces.


Lee there is no reason that it can not. The key as you may have picked up in Marks photos is to have a blank glued up long enough that when you make the diagonal cut it is one strip. The spectraply blanks need to be glued together but you need the proper orientation if you get my meaning. Now you can do smaller or shorter segments and they work fine. You can do this with all kinds of medium and the sky is the limit. Maybe we get to see others try this now that Mark has shared some of his secrets.

Lee: As John stated and I agree - keep fiddling with what you have. Truth be told, my band saw and table saw are both entry-level Sears Craftsman from the early 1990's. I do have a Byrnes Thickness Sander and Table Saw, but I used the Craftsman table saw and got these thin slices.

Go for It!!
 
Another fabulous pen, Mark !!!!! . What woods did you use ?
 
Last edited:
Another fabulous pen, Mark !!!!! . What woods did you use ?

Thank you Mal. Bloodwood and Hard Maple. Be sure to apply a sanding sealer to prevent the bloodwood from staining the maple (and don't use with an open grain wood like oak... DAMHIK).
 
Mark,
I missed this thread earlier, great work. I am really looking forward to seeing your article. Did I say this was great work? Thanks for sharing your ideas and techniques.

Cody
 
Mark,
I missed this thread earlier, great work. I am really looking forward to seeing your article. Did I say this was great work? Thanks for sharing your ideas and techniques.

Cody

Thank you Cody.

I began to get inquiries on"How did you...." So rather than make folks hunt through old threads for the pictures, a library article seemed more time efficient.

I am enjoying making these and have 5 more designs in process, but they are time consuming.

And since it will be in tutorial form - I fully expect other pen turners who like this design feature to use it. Besides, I am taking inspiration from others, so if there is anything I can give back, so be it.

Joe Schneider (wood128) has been a wonderful mentor to me. He gives me suggestions, has showed me how he has made some of his designs, and has encouraged me. All with no hesitation, although he sells his blanks. I have mentioned him before, and this is simply to acknowledge that I share his attitude to share "what we know."

Personally, Having a Library Article is an honor and recognition enough that I may have made a contribution that others can benefit from. I seriously doubt someone in Colorado will take away sales from me in Ohio. If they simply copy my blank and claim it as their unique creation, well - that's on them.

My time left with my family and friends will be far too short to be bothered by lack of recognition.
 
You've sparked so many ideas. Thanks.

What type saw blade are you using? Seems like there would be a lot of waste due to the kerf.

Hi Rick:

I have a Home Depot Diablo Thin Kerf blade on the table saw. With my jig (simple to make), I am easily getting .073" slices.

For the blocks I have made - they were 1" H x 1 1/2" W x 6" L. I was getting about 25-26 slices. This is enough for 3 pens, using the way I was making the chevrons. You may get several more slices, but I kind of like my fingers.

I may start gluing up 3/4" H blocks, then I can use my Byrnes Model Maker Table saw which has blade kerfs of .06" (carbide) or .02" regular. This may yield up to 1-2 more pens.
 

Attachments

  • IMG_2922.jpg
    IMG_2922.jpg
    243.7 KB · Views: 167
Mark what angle are you making your cuts??? Have you tried doing various angles to change the look???

Hi JT:

So far I have just used my 45 degree jig/sled. Other angles are in play, but only 24 hrs in a day... :) (I know you understand). I have 2 more dry blocks to play with, but have been doing a lot of household chores the past 10 days, mowing and weeding, etc... so no new ground (pen turning) was attempted.

A different angle will be fun to see the results. As the angle gets modified, I may need to use the thickness sander to get the strips equal... just thinking off the top of my head - (not usually a good idea)!. But, a great idea. :wink:

So, maybe some Chevrons with different angle dimensions.
 
You have to try a steeper angle and check out the difference. 60 degree :)

Not sure why the thickness sander:confused:

Oh I can relate to that time thing for sure. I am having fun again in my shop and can not wait till I can dedicate some time to making things for this site. Getting inspiration from your work and others. Thanks.
 
Last edited:
You have to try a steeper angle and check out the difference. 60 degree :)

Not sure why the thickness sander:confused:

Oh I can relate to that time thing for sure. I am having fun again in my shop and can not wait till I can dedicate some time to making things for this site. Getting inspiration from your work and others. Thanks.

I can try a 60 degree.

If the slice is thicker or thiner, when combined with the other half, the overall thickness may be different, altering the inlay. My results have been good for certain dimensions, so I may need to keep the final Chevron (2 layered slices, 3 veneers) a certain thickness. The thickness sander allows me to adjust the chevrons.


I got you. Working with all the same dimensioned pieces right from the start makes for an easier time . Good luck and keep them coming.
 
Good work Mark....The pen is beautiful. Yes, try some different angles , wood combinations and even corian or plastic resin. Glad to be able to help you even a little bit ....and now see you get experience and progress to be a true segmentologist !!! Take care.

Joe
 
Last edited:
Good work Mark....The pen is beautiful. Yes, try some different angles , wood combinations and even corian or plastic resin. Glad to be able to help you even a little bit ....and now see you get experience and progress to be a true segmentologist !!! Take care.

Joe

Hi Joe (Obi Wan)!

Yes, I need to try some different angles and see what unfolds.

I have plenty of timbers, as well as Corian, so my stock is good.

...Segmentologist... Hmnn... Sounds close to proctologist...

I'll have to ponder that!

Be well, my friend!

Mark
 
Back
Top Bottom