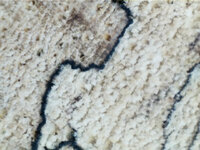
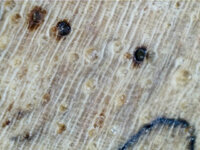
Interesting super close up pictures of stabilized and unstabilized wood

Signed-In Members Don't See This Ad

MesquiteMan

Retired Head Moderator
Joined
Oct 18, 2005
Messages
5,678
Location
San Marcos, TX, USA.
I bought a USB micro-scope camera to play around with and decided to see what stabilized vs. unstabilized wood looks like at 200x magnification. The wood is spalted pecan and the pictures are taken of the end grain on a couple of cross cut blanks. Both blanks came from the same board and both were cut on the same 40 tooth Tenyru blade.

The first pic is unstabilized and the second is stabilized.
attachment.php

attachment.php
 

Attachments

  • unstabend2.jpg
    unstabend2.jpg
    55.6 KB · Views: 1,681
  • stabend2.jpg
    stabend2.jpg
    56.2 KB · Views: 1,681
Last edited:
Signed-In Members Don't See This Ad
Very strange looking stuff. Looks like stabilized is a lot better. I see your back to work already after a nice trip.
 
Great pics Curtis and certainly a well worth investment those USB micro-scopes, I've used mine in many situations with surprising results, always...!

This test is quite demonstrative of the action of the "cactus juice" but, I would suggest you repeat the test but this time on the centre surface of a stabilised blank Vs an identical non-stabilised one. The objective would be to see the penetration results of the solution at the furthest point from its surface.

The reason to this test is that, the surfaces you used on this test are exposed surfaces, therefore under reaction from the oven curing process and air so, compare that with un-exposed surfaces where the solution penetrated, will probably give you a very different set of pics to compare.

Curiosity is the reason to my quest, as curiosity was the reason why you got the USB scope and done this test so, you can play around a little more and waste a stabilised blank by slicing it in half and see what the scope sees....!

Have fun...!

Cheers
George
 
The advantages are clear. Magnification sure speaks volumes as to the differences. W/O looks like cotton balls or fluffy carpet. The bottom looks like a 72 tooth cut.

Thanks for taking the time to do this and post it.
 
Last edited:
but, I would suggest you repeat the test but this time on the centre surface of a stabilised blank Vs an identical non-stabilised one.

George,

This is pretty much what this blank shows. The stabilized blank started out as a large test blank that was 2" square. After getting the weight data I was after, I decided to cut it up into pen blanks so what you are seeing IS the inside of the larger blank, not the outside of a normal pen blank.
 
Thanks so much for posting.....I'm a Noob at all of this but I have trouble visializing without the benefit of Hands on as when someone explains something via the Web/forums and this makes things so much clearier to understand about stablization.
 
but, I would suggest you repeat the test but this time on the centre surface of a stabilised blank Vs an identical non-stabilised one.

George,

This is pretty much what this blank shows. The stabilized blank started out as a large test blank that was 2" square. After getting the weight data I was after, I decided to cut it up into pen blanks so what you are seeing IS the inside of the larger blank, not the outside of a normal pen blank.

Curtis,

Thanks for your explanation, was no way for me to tell if the photographed surfaces were outside or interior surfaces, that makes the test even more plausible and clear...!

Thanks,

Cheers
George
 
thanks for the pics, they came out very nice. actually you could enalarge,frame and hang them on the wall. Could be an interesting side job, unique enlarged photos of peoples favorite things!!
May pay for the equiptment.
 
Back
Top Bottom