Insect casting?????????

Signed-In Members Don't See This Ad

toyotaman

Member
Joined
Jun 24, 2010
Messages
925
Location
NW Georgia (USA)
Has anyone tried to add insect parts into a clear casting material?I've noticed alot of dead Jar flies around and I had the thought of that.,or any other insects for that matter.If you can work with snake skin,cereal,dried soup, why can't you use bugs?I still haven't started casting yet but I did make a mold today. I'll find out how it turns out tomorrow when it cures.I'm getting close to start casting.
Toyotaman
 
Signed-In Members Don't See This Ad
someone has shown a scorpion cast in clear PR...just in the last few days. It looked really good. Give it a try and report back to us.
Do a good turn daily!
Don

Has anyone tried to add insect parts into a clear casting material?I've noticed alot of dead Jar flies around and I had the thought of that.,or any other insects for that matter.If you can work with snake skin,cereal,dried soup, why can't you use bugs?I still haven't started casting yet but I did make a mold today. I'll find out how it turns out tomorrow when it cures.I'm getting close to start casting.
Toyotaman
 
Since I started casting, I see everything in a new light. I'm sure bugs will work. Just might get bug guts on you when you start to turn the blank:eek:
 
I've seen the results of it on here, but you need to be careful with the moisture in their little bodies. Do some research in the search options and see what you come up with.
 
I was thinking of the bugs that has been dead a few days and is now chrunchy instead of smushy.I'll have to expierment in the near future and see how it turns out.
Toyotaman
 
I tried to do a scorpion once. I guess there was some moisture inside him still cause as the PR was setting up, He farted and cracked the whole thing. Ruined it.

I would consider dehydrating them first.

And Ernie is right... When you start casting, EVERYTHING looks different. Things that could never be used on a pen all of a sudden make sense!

Several species of cactus fiber
Loofah
bugs
Hillbilly Jones
cat crap
fishing lures, and flies
Ivory from several animals
other plant matter
braided wire
briaded wire cover
chunks of old blanks
wood shavings
hay
acrylic blank shavings
metal filings
stickers and labels
glow in the dark powders and pigments
seashells
candy
coffee
pasta
circuit boards
stamps
snake skin

and the list goes on and on and on and on.

I bet almost every person that casts has some "Top Secret" thing he or she is working on. Messing with new materials that have yet to be seen. I know I have a couple of such projects!

The key is to keep an open mind and HAVE FUN!!
 
I'm glad you started this thread. I just killed some wasp/hornets and found myself standing there staring at them wondering if I could get them into a pen. I geuss I will have to pick up some and give it a shot.
 
"I tried to do a scorpion once. I guess there was some moisture inside him still cause as the PR was setting up, He farted and cracked the whole thing. Ruined it"

He farted! Hilarious :bananen_smilies051: :bananen_smilies051: :bananen_smilies051:

There are tricks to working with organics and resin...try using a syringe when setting your bugs...mix a small amount of resin/catalyst and inject it into the voids. Then cast as normal.

You could inject with PVA glue, CA, or other but insure that the glue is completely cured before adding to the resin as it may cause a reaction.

Good luck with your project :bananen_smilies046:
 
For those of you have done alot of casting before, I have one question.,When you are casting a larger object such as bugs or something kindly large how would you work it into the size of the pen blank?,or say you only had one object and the rest is just the tube how would you work that out so it would look right?I've heard of someone using dried soup and how would you turn that without tearing up the soup pieces?
Donny
 
I think tearing up the soup pieces is Ok, but I want to know how he turned the scorpion without tearing it up.
 
Wood Ticks, that what I want to try. In the late spring they are so thick you can even go out to empty the garbage without one jumping up on you. They are flat and I think would turn nicely.
 
That's what I was wondering.Scorpions(large). How can that be done like if you wanted to turn it with 2-3 scorpions without messing it up?What about bees,worms,spiders? I like to catch bugs,snakes.
Toyotaman
 
Scorpions are basically flat, so it is just a matter of the right size, wrapping the legs/tail, etc..

I am putting together an interesting project, one that carries over from a planned sculpting project that fell through due to a stay at the hospital and then a few chapters of "well that is life" :banana:

But I will keep these and my process a bit closer...or some clever scamp may get it into product before me.

*********

As for what can go into resin, just about anything...but the idea of ticks, that one caught me off guard...why on Earth would you want to use ticks?

Yikes and egads!
 
I guess it would be just because bugs are so interesting and a bug pen would be neat.I bet Ants would work out great. Lord knows I have plenty of them around here.Believe it or not I have put ants in the microwave before for 3-4 min. and it did not phase them.I just knew they would be dead but they acted like nothing was wrong.
Donny
 
Ants are good...worms are right out, never dry enough to be useful...spiders could be fun...the main point would be like considering flowers for drying, only the firm stemmed flowers actually dried nicely...only bugs that you can dry out and maintain the form would be useful...now you could try and put any bug in the resin, but you will end up being sad if they are soft/squishy.

I look forward to seeing what you put together.
 
As for what can go into resin, just about anything...but the idea of ticks, that one caught me off guard...why on Earth would you want to use ticks?

Yikes and egads!

For the novelty of it. Everybody hates them and probably would like to see'm all cast. I'll do a few just to see how it works. I'll have to wait until next spring now though.
 
I tend to agree that quite a few people have some super secret castings they are working on. I got 2 or 3 right now I'm trying to get cast. And by the way, Hillbilly Jones casts very well, if you can find some:wink:
 
My son cast an insect in amber color in a worthless wood. It looked great. He gave the pen away or I would post the picture.
Alice
 
I have several projects in the works for an amber resin...a large egg (private collector), over a dozen smaller chunks with bugs, and now a series of pens with insects.

Better to pour all on the same day for me, that way there is no waste. I keep more projects at the ready so just in case I have some extra resin...

There is more to an amber pour than just mixing the right color...yet another of those badges of honor among the resin community. To get a realistic, rich, and flavorful (full of character) amber it is a real trick.

You can just mix a decent amber color and call it good...but it would be the same as painting a sky with just one blue.

I would love to see some other examples of the mock amber that has been made by the IAP community...I have ordered my mold making material and have plans for pieces for my self as well as blanks for trade/sell.

There are a number of tricks to making the mock amber just right...this comes with trial and error...but unlike the common resin project information which I love to banter about, this is a trade secret that I am going to keep close.

I will say that the best way to simulate amber is to consider what is involved with the amber process...the amber is not "pure" and it is not "clean". It is petrified tree sap/resin that traps detritus as well as organic particulates. Keep this in mind and play with it. Color is not always a constant; light refractions develop color in the eye.

I hope the blanks turn out the way I would like and are useful. :bananen_smilies051:
 
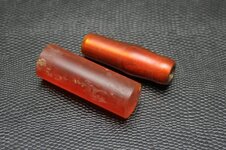
I pulled off some nice amber.. or even honey look.

Alumilite Clear - Yellow Liquid Dye.

Nice and Transparent with the hint of ambery, orangish brownlike look.

I have several projects in the works for an amber resin...a large egg (private collector), over a dozen smaller chunks with bugs, and now a series of pens with insects.

Better to pour all on the same day for me, that way there is no waste. I keep more projects at the ready so just in case I have some extra resin...

There is more to an amber pour than just mixing the right color...yet another of those badges of honor among the resin community. To get a realistic, rich, and flavorful (full of character) amber it is a real trick.

You can just mix a decent amber color and call it good...but it would be the same as painting a sky with just one blue.

I would love to see some other examples of the mock amber that has been made by the IAP community...I have ordered my mold making material and have plans for pieces for my self as well as blanks for trade/sell.

There are a number of tricks to making the mock amber just right...this comes with trial and error...but unlike the common resin project information which I love to banter about, this is a trade secret that I am going to keep close.

I will say that the best way to simulate amber is to consider what is involved with the amber process...the amber is not "pure" and it is not "clean". It is petrified tree sap/resin that traps detritus as well as organic particulates. Keep this in mind and play with it. Color is not always a constant; light refractions develop color in the eye.

I hope the blanks turn out the way I would like and are useful. :bananen_smilies051:
 
What about "Green" grass.If you cast it with insects will the grass stay green?, or turn brown under the resin? I'm letting my thoughts run right now so bare with me.I'm thinking of an insect eco system.Maybe a few ants with some other bugs with a little grass.Something to make it look realistic.
Toyotaman

Any color that is not fast set will most likely change due to the chemical heat involved with the catalyzing process...so it is best to use materials that are desiccated. About the only chance you will have for creating the setting you want.

Work with fresh materials that have a woody stem if possible...the less the soft fleshy tissue the better your chances of developing a castable material...air dry hanging upside down, it does not take long...a week or so, unless you have a hot attic, then put them up there, dry quick.

Or use silks...but be careful as these might melt if they are not truly silk...polyester fabric tends to return to the gel state with the catalyst.

Woody and fibrous leaves will work best, in my experience. If someone else has had luck otherwise I would love to hear how they did it.

There are some products that you can use to color set flowers/leaves while they are fresh...it is a silicone fluid that replaces the water while the plant can still draw moisture through the cells. You should be able to use this on grasses, soft stems, etc. as well as casting.

Good luck!
 
There are some products that you can use to color set flowers/leaves while they are fresh...it is a silicone fluid that replaces the water while the plant can still draw moisture through the cells. You should be able to use this on grasses, soft stems, etc. as well as casting.
Good luck!

If I remember right it's silica gel and you can find it at hobby lobby around the fake plants. My wife used it on some of her wedding flowers.
 
What about "Green" grass.If you cast it with insects will the grass stay green?, or turn brown under the resin? I'm letting my thoughts run right now so bare with me.I'm thinking of an insect eco system.Maybe a few ants with some other bugs with a little grass.Something to make it look realistic.
Toyotaman

Grass was successfully cast by Eric a while back

http://www.penturners.org/forum/showpost.php?p=905892&postcount=17

As far as you can see, it turned out great and stayed green. Unsure if it is still green today but I would think once cast it should stay...
 
Well done with the grass...so there you go.

I would be curious if that was cast with Alumilite?

Most of the ultra clear resins tend to be a bit less thermic but it looks like that grass kept its color just fine.

So take what I said with a grain of salt, find out what kind of resin was used for that grass cast and use that
:bananen_smilies051:

I would be interested in what happened after the material degrades...if there is a minute amount of air trapped in those grass pieces I would suspect that there would be a break down of the organic mater...a very curious cast to be sure.

I figured someone would step up with an example of soft grass and there it is...good stuff.

PS
I will still use dried/treated materials for my pieces...but I can not wait to see more examples of other soft organic inserts, without any issues like a farting scorpion
:bananen_smilies046:

Raymond
 
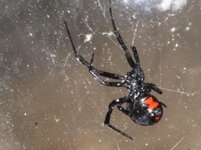
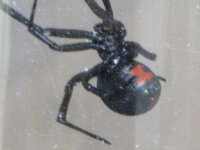
This is what I would really like to cast.I like to collect bugs and spiders.
Toyotaman
 

Attachments

  • IMG_0632.jpg
    IMG_0632.jpg
    86.2 KB · Views: 131
  • IMG_0634.jpg
    IMG_0634.jpg
    40.4 KB · Views: 181
I've tried preserving spiders in resin and have no luck. They either explode or the abdomen shrivels. Hope your luck is better than mine.
 
I've tried preserving spiders in resin and have no luck. They either explode or the abdomen shrivels. Hope your luck is better than mine.

I have a fix for that one!

Use a syringe to draw out fluids from the body cavity and then fill with CA. Allow to fully cure and you should have no issues.

If you start with a fresh spider then use the above trick for the body and set the legs...I have used ball bearings to get a clutching position and aluminum foil to make flat envelopes to spread the legs out if desired.

Good luck with your projects! :RockOn:

Raymond

Awesome Raymond,

What about the coloring??? I have some large Black and yellow "Zipper" spiders that lose their coloring.
 
Thanks Raymond. I wondered about using a syringe but never got around to it. It's now on my long list of things to try.
 
Last edited:
Awesome Raymond,

What about the coloring??? I have some large Black and yellow "Zipper" spiders that lose their coloring.
Ah into one of my passions...would that be a Argiope aurantia http://www.google.com/images?hl=&q=...tle&resnum=4&ved=0CDMQsAQwAw&biw=1280&bih=589 the writing spider, a common orb spider?

I loves me a spider!

Well you have a tough one in that...I have been drafting plans to work with the ones I have collected this season.

Again I have had good results with my sculptures in resin with dried insects...I do not have any of these laying around but I have not heard about any issues with color loss with my prior projects.

But as you have had some color loss I would assume that perhaps high lighting with a brighter hue of non-reactive paint or even make small amounts of gelcoat (gelcoat is what we use to "paint" boats) which is resin + finishing wax + pigment, and this will stay color fast and will not react to the casting process.

That is an interesting issue...I have been giving it some thought and I am confident that the gelcoat will solve your and my potential color issues.

I would love to get a follow up of what you do to make the project work :bananen_smilies035:
 
Last edited:
No, that would be a Black Widow and very poisonious.A friend of mine at work was bitten by one of these and he said it was extreamly painful and it sent him to the hospital for about 2 weeks in intensive care.He now has a tatoo of a black widow on his hand to remind him of his expierence.They live in damp,dark places like under fallen trees.I had one build under my mailbox a few years ago.The nests are almost white and very thick.They usually have 2 egg sacks that are about the size of a pencil eraser.I've studied these little things and catch one everytime I find one.Always use gloves and a nice stick.
Toyotaman
 
I pulled off some nice amber.. or even honey look.

Alumilite Clear - Yellow Liquid Dye.

Nice and Transparent with the hint of ambery, orangish brownlike look.


Here is the picture... At least it looks like prehistoric sap I think. :)
 

Attachments

  • Amber.jpg
    Amber.jpg
    80 KB · Views: 164
I was looking for an appropriate example and found this http://www.8edwin.com.au/index.php?controller=product&path=25&product_id=46 hard to compete with at that price, but I was thinking the amber to look more like this http://www.google.com/imgres?imgurl...MDaBw&esq=1&page=1&ndsp=18&ved=1t:429,r:5,s:0 or better still this http://www.google.com/imgres?imgurl...dsp=19&ved=1t:429,r:13,s:121&biw=1264&bih=573

I do like how that honey color turned out, warm and rich. Well done.

Raymond
:bananen_smilies027:
 
Signed-In Members Don't See This Ad
Back
Top Bottom