How many holes in wood is too many?

Signed-In Members Don't See This Ad

McBryde

Member
Joined
Jan 13, 2010
Messages
686
Location
Humnoke, Arkansas
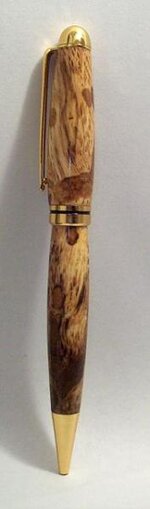
I was out at a buddies place the other day, and he had a persimmon tree that had the top broken out of it. When it fell to the ground, a piece of it broke off, and I saw the inside of it, it looked sweet, all spalted up and had a few worm holes in it. I managed to haul off some pieces and when I got it home and cut up, here is what I found:

100_3052.jpg

100_3050.jpg


My question is, how many holes is too many to do a bowl, or a pen? Is this stuff salvageable? Or is it too far gone? It is a really pretty wood that I still could get some large pieces from the tree , but not if it isn't worth it. How would you go about making this where you would not crumble it when turning it? Would it just have to be stabilized? Or how would you go about making it turnable?

Thanks and God bless,

Emerson
 
Signed-In Members Don't See This Ad
Could you stabilize it so that the sawdust from the worms is solid and adds color and character to the blanks. Just a thought...

Jim Smith
 
If the sawdust is loose enough, id chip/blow it out and cast it like a piece of worthless wood, that would turn out awesome! i made a pen a while back like that out of wormy ash...
 
I've done some oak that looked like that. Hit it with thin CA, turn down and repeat until finished. Yes, it will take a lot of CA, but it makes for a fantastic looking pen.
 
I wouldnt be afraid to turn one as is with some thin CA as Monty said. Drill it then squirt some thin CA in the hole to harden the wormholes, then epoxy the tubes. You will want to work these blanks very slow and gentle. They will probably blow out easily. I would probably sand them to shape, while repeating with thin CA, instead of turning them to shape. But thats just me. I tend to blow things up. lol Here's my wormhold oak pen I did a while back. Not as many holes as your blanks. You have more character. Good luck!
 

Attachments

  • Wormhole Oak.jpg
    Wormhole Oak.jpg
    11.8 KB · Views: 239
Still a good looking pen though John, and I'm sure it was a booger to work in itself. I am like you, I tend to blow up blanks! Sanding it down might be a way to go, never thought about that.

How do you CA it down, then work it, then CA more? Would you not just be working the CA then, instead of the wood? I guess I don't understand that process. Can someone elaborate on that one? I just might have to go try to sand one down after I turn it with a tool to round it up. Should be interesting at least.

And I forgot to mention, the sawdust in them is pretty well packed in there tightly.

E


Emerson, what it meant by the CA technique is to let thin CA soak into the wood. Turn it down until you feel like you are getting out of the CA soaked wood, and then let the thin CA soak in again. Keep repeating until you get to size.
 
Exactly what Cav said. You are sanding down the CA but thats whats holding the wood and holes together. When you sand them down, add a little more CA to soak in deeper and let it dry some and then sand down some more. The nice thing about the CA is it will mix with the sanding dust and be a natural filler for any voids in the wood as you work it down.
 
You could also soak it in Minwax hardner for a few days and then let it dry for about a week. That will also be absorbed into the wood and then you can use CA as needed when turning. This works well on punky wood. I just put a weight on the wood so it is completely covered and doesn't float.
Once you turn it you can fill the holes with CA and saw dust while sanding or fill the holes with ground stone or some other contrasting material like brass shavings, etc.
 
Well, I can tell you the main problem with this stuff so far, and that is finding a spot to drill it where it doesn't bust out on the end! And if I don;t screw it up within the next hour, I'll have a pretty sweet looking sierra to show ya'll. Knock on wood!

E
 
Well, I can tell you the main problem with this stuff so far, and that is finding a spot to drill it where it doesn't bust out on the end! And if I don;t screw it up within the next hour, I'll have a pretty sweet looking sierra to show ya'll. Knock on wood!

E


DON'T drill through. Stop short of the end, then use your bandsaw to cut off the blank and expose the hole.

Another thought, send it OUT to be stabilized. Several sources on IAP, I believe.
 
firstsierra.jpg


Well, I do have to say that it was a fun pen. My first sierra, as well as my first worm wood pen. I think it came out rather nice if I do say so myself, lol.

I ended up doing the soak thing with ca, and it seemed to work pretty well. I turned it down to roughly size, then sanded it the rest of the way. I had to fill in one spot with some shavings and ca, but that was it. I don't like the fact that if you have an area that is not up to the same height it fills with white sandings from the ca. It just makes it look not so good in the long run. I had to do a few spots at the end with ca just to fill those voids, and turn them not white, then MM it all again.

Hope you all enjoy.

God bless,

Emerson
 
..... I don't like the fact that if you have an area that is not up to the same height it fills with white sandings from the ca. It just makes it look not so good in the long run. I had to do a few spots at the end with ca just to fill those voids, and turn them not white, then MM it all again....
Here's a trick to work around that. CA accelerator acts somewhat as a solvent (to a slight extent) for CA. Slightly dampen a paper towel with accelerator and quickly rub it over the blank while it's spinning on the lathe. This will "melt" the white CA dust and somewhat even out any ridges/valleys that may be present.
 
Thanks Monty, I have accelerator headed this way in the mail as I type! Don;t have any other that that though, or I would have probably done a drop inthe hole and a drop of accelerator on top of it. Would that have worked?

E
 
You could also soak it in Minwax hardner for a few days and then let it dry for about a week. That will also be absorbed into the wood
That was my first suggestion as well. Drill a 1/4" hole through the center of the blank, prior to soaking in the wood hardener, then the hardener can soak in from the inside as well.

You'll still require CA as you turn it down.
 
Mackc, if you will still have to use the CA as you go down with teh wood, would it not just be wise to not use it and go with the CA as you work it down?

E
 
Mackc, if you will still have to use the CA as you go down with teh wood, would it not just be wise to not use it and go with the CA as you work it down?

E
Well that method certainly seemed to work for you! My thought was to get some hardener into the blank from the inside. Soaking it as well in the hardener could lessen the amount of CA you need to use.
 
Sorry Monty, I was talking about if I would have just put a drop of CA into a hole, then sprayed it with accelerator to fill the void hole. It just came out all wrong, lol.

E
 
Back
Top Bottom