How are you thickness sanding?

Signed-In Members Don't See This Ad

Carl Fisher

Member
Staff member
Joined
Jun 7, 2011
Messages
2,775
Location
Cape Coral, FL
So I've been fighting with this for a while and figured I'd put this in the new forum :)

For partial cut segmenting where you have to match a kerf width exactly, how are you thickness sanding the inserted piece? A cut piece has too many imperfections from the saw blade that exposes gaps in the segment and sanding by hand leaves you with the possibility of an irregularly shaped service.

I've also tried the sanding drum on the drill press route and find that to be worse than hand sanding :confused:

For wood, I could build a shooting board of sorts and use hand planes to do the job, but that won't work for acrylics.

So what's your method short of paying through the nose for a drum sander?
 
Signed-In Members Don't See This Ad
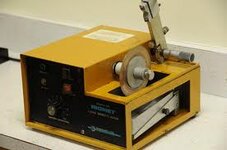
I use a variation of this slow speed diamond wet saw. It was designed to prepare metallurgical samples but I have repurposed it for pen making. It has a micrometer adjustment for thickness that I can control in increments of .001". The blade is smooth so it leaves a smooth surface. It takes a while to cut pieces and not very efficient for production but you can let it run while you do something else. I have plans to build a larger version of this, but for now it suits what I need. I have used it for plastic, mother of pearl, abalone, jade, amber, metals etc.

The material is held on an arm which slowly advances through the blade. The arm is attached to a micrometer for positioning. I get my blades from Dads Rock Shop but I'm sure there are other places that sell lapidary blades.

attachment.php
 

Attachments

  • slow speed saw.jpg
    slow speed saw.jpg
    7.4 KB · Views: 1,352
Cool way to re-purpose Bruce. Love seen that type of thing.

For those saying to use the benchtop combo sanders, how are you thickness sanding to hit an exact repeatable target thickness that is perfectly flat and even all the way across the piece and perfectly true front and back?

i.e. give me a piece that is exactly 3/32" thick no matter where I measure with no twist or unevenness that will show a glue line.

I'm not criticizing and I'm open to trying new techniques but in my experience I just can't see how.
 
Last edited:
I just hold the two ends and press it perpendicular against the disk and use a pair of calipers to measure for consistency. Use the leading edge of the disk so it's pushing down into the table.

If you wanted to "mass produce" pieces, you could take a piece of wood and some flat bar stock (say 3/32" thick) and mount the bar stock to the wood with a gap for your pieces that you want to thickness. Just insert a piece of wood in the gap and sand it down until it just hits the metal.
 
Unfortunately I've tried similar methods and typically end up in throwing away the piece either due to over sanding or uneven pressure causing a taper in any given axis.

I may just have to break down and buy a big one. Just seems like overkill when dealing with 3/4" stock but I suppose I'll find an occasional use for it on larger projects. Just didn't want to spend $450-750 for one.
 
Try making a holding jig. A 2x2 block with a "step" machined in one end. Mill the end down 3/32 deep all except for the bottom 1/2". Then You could put a say 3/8 thick piece with one sided already smooth in the step. Set the side of the block against the disc sander miter gauge and gently push into the disc util the piece is flush with the 1/2" step. Kind of hard to explain what i mean without a picture. You could make it out of very hard wood or a plastic. You would have to take your time making the jig, but after that you thickness sanding would be much easer.
 
Try making a holding jig. A 2x2 block with a "step" machined in one end. Mill the end down 3/32 deep all except for the bottom 1/2". Then You could put a say 3/8 thick piece with one sided already smooth in the step. Set the side of the block against the disc sander miter gauge and gently push into the disc util the piece is flush with the 1/2" step. Kind of hard to explain what i mean without a picture. You could make it out of very hard wood or a plastic. You would have to take your time making the jig, but after that you thickness sanding would be much easer.

That's not a bad thought. I haven't tried that method yet. I was trying something similar on the belt portion but the belt was just too aggressive to maintain the jig tolerances.
 
Why not make a drum sander attachment for your lathe?

That's what I'm doing right now.

There are two articles over on Woodturning Online about how to make an attachment for your mini-lathe. There is also at least one article on making your own standalone drum sander.
 
I use a oscillating drum sander with a block of wood clamped tom the bed.. the thickness that you want the material to be is the gap between the drum and the clamped block , works real well..
 
Try making a holding jig. A 2x2 block with a "step" machined in one end. Mill the end down 3/32 deep all except for the bottom 1/2". Then You could put a say 3/8 thick piece with one sided already smooth in the step. Set the side of the block against the disc sander miter gauge and gently push into the disc util the piece is flush with the 1/2" step. Kind of hard to explain what i mean without a picture. You could make it out of very hard wood or a plastic. You would have to take your time making the jig, but after that you thickness sanding would be much easer.

That's not a bad thought. I haven't tried that method yet. I was trying something similar on the belt portion but the belt was just too aggressive to maintain the jig tolerances.


If you decide to gown this path, post some pix :biggrin:
 
I am abit confused. How are you cutting the slices??? I use my tablesaw and no sanding needed. Use a good quality blade and saw blade marks are just about nonexistant. Just need to mention you need the tablesaw to be finely tuned.

If that does not work do you have a router table?? You can run through with a flush trimming bit and sneak up on the thickness needed.
 
Honestly because any saw blade, no matter how good, will leave tooling marks especially in acrylic or PR. I don't want to turn a blank down and find a glue line visible because there was a slight track mark that could have been sanded out ahead of time. I'd rather cut 1/16" or 1/32" over sized and sneak up on the fit.

As for the router, I may build a jig similar to how you would use it to flatten a board. That would at least give me the micro-adjustability I'm after for a truly precise fit.

I asked because I'm looking for precision, not close enough. A thickness/drum sander is really the right way to go, I just don't have the budget for one yet and was looking for alternatives.

Thanks all. I may try a few things with a jig for the disc sander before I go down the router path.

Carl in my opinion you are overthinking it. Maybe I am missing how you want to do segment work but it is the edges that are seen so no saw marks will be seen. If there are saw marks it will give the teeth to the glue joints. Sander is used to sneek up on the dimention not necessarily for taking saw marks out in my opinion. Like I said I maybe missing what you are trying to do. Precision is hard to achieve but good luck. If you are really concerned about track marks as you put it. Make the cut of the piece and take a block of wood and wrap some sandpaper around it and a couple swipes over the piece and you are done.
 
Last edited:
Back
Top Bottom