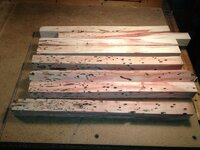
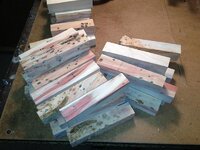
Holey flaming boxelder, Batman!

Signed-In Members Don't See This Ad

Russknan

Member
Joined
Mar 13, 2012
Messages
537
Location
Nanuet, NY
Sorry, I couldn't resist. Awhile back, I purchased a couple pieces of wormy flame boxelder at a woodworking show. I finally got around to cutting it up into pen blanks, today. I've just started out in casting, and haven't done stabilization yet. Have done a whole total of . . . one . . . blank so far. The Alumilite pour with red coloring over a piece of trash wood turned out better than I had anticipated but, obviously, I have no reason to be confident in what I'm doing yet. Here's my question for those more experienced: Any suggestions to make it more likely that the resin will fill all of the holes? I figured I'd pour a little into the mold, press in the wood, tape the wood down, finish pouring, and then into the pressure pot. Am I right, or is there a better way? I also have to figure out how to color the resin in order to have it compliment the grey, white and red in the blanks. TIA, Russ
 

Attachments

  • IMG_1397.jpg
    IMG_1397.jpg
    68.6 KB · Views: 342
  • IMG_1398.jpg
    IMG_1398.jpg
    71.4 KB · Views: 338
Signed-In Members Don't See This Ad
Thanks, Wayne, for your help! I really like the blanks, and want to do what I can to have them turn out well. Russ
 
Id blow out the pores first try and clean them out so more gets inside.
also would stabilization work better for getting color into those holes?

Yes, stabilising with or without colour will insure that the sawdust inside those holes is hardened as, worm holes where sawdust is blocking the holes, is almost impossible to make the resin soak through, unless the resin is warmed up to a very thin consistency, poured quickly and have it in the pressure pot ASAP as high as your pot will allow safely, in pressure and prey...!

Sometimes is easy enough to clean the worm holes with a little wire and the air blower, that way the resin will fill each one of them quite easy at 50 PSI pressure. Casting blanks with holes (or bits missing) needs to be done in a mold that has enough hight to allow for the extra resin that has to the poured.

Is no magic amounts, as experience will tell you how much over fill (over the wood) you require to get the casting done in one go, If anything, I always suggest a little more than not enough, there is always a small amount of resin that is "wasted" when trimming the blanks to size, I put the word wasted under brackets because, it doesn't need to be a waste, you gather all those bits of resin cut-offs, put the in a box and one day, when you have plenty of all colours, you fill a heady duty sock with them and you "introduce" a wooden mallet to it, over some cement and take your frustrations on that sock, it will make you feel good and you endup with lots of small bits of resin of all colours, that you putr in a mold and pour some fresh resin into it and voila, you got yourself a bunch of very colourful mosaic acrylic blanks:wink::biggrin:

Cheers
George
 
I never bother to clean the holes , although it will give you a `cleaner` cast without specks of frass or sawdust in the resin .

Alumilite doesn`t hammer up into small pieces very easily . It is polyurethane , not PR or acrylic . It`s toughness is one of it`s major advantages . It`s main disadvantage is a fairly rapid set up time . I suspect that pre-heating to make it flow more easily into the holes will hasten the cure , so double ASAP into the pressure pot .
 
Last edited:
Back
Top Bottom