Hole tapping question

Signed-In Members Don't See This Ad

Dale Allen

Member
Joined
Oct 27, 2012
Messages
1,384
Location
Massillon, OH
Can any of you machinists recommend a good brand and type of thread tap?
I am trying to tap 6-32 through holes in 1018 and 12L14 steel. The 1018 is 1/2" thick and the 12L14 is 3/8". The taps are through-hole type.
I had a $6 HSS tap from McMaster that broke about half way through the process. I then went to the local hardware and wasted $4 on a Hanson that broke just as quick. I am using a #36 cobalt steel bit and the steel is drilled out fine. That bit is supposed to be a 75% thread cut.
I can drill and tap 8-32 holes without much trouble. However, I noticed that the Hanson 8-32 tap that has done about 4 holes has nicks in the lower taper threads and I am sure that is making it more difficult than it should be.
Seems to me that taking these to a machine shop would cost more than a $22 cobalt steel tap.
Any suggestions are much appreciated.
Dale
 
Signed-In Members Don't See This Ad
Ken nailed it. I am an electrician and I have tapped hundreds of holes in all kinds of material. especial steel I beams and have used all brands of taps and it really does not matter. the key is lubricant. I prefer micro-finish tap fluid only because I use for tapping stainless steel. But Tap Magic is just as good.

The other key is you need to back off alot of times to clear the slag from the hole and the bit. I like to pull the bit out and dip along with spraying the hole. Those 6-32 bits are delicate. Make sure you are using the correct drill bit for the tap also. Some times I will ream the hole just a tad bit after it is drilled just to get a little more clearance. Do not force the tap. If you have access to many bits you may want to try a metric bit that is a shade larger than the #36 bit. With as many threads as you have in that thick steel will not affect the integrity of the holding strength.

http://www.victornet.com/reference/Tap_Drill.html
 
Last edited:
Using all purpose motor and bearing oil....probably not good enough!
Removed the tape and cleaned out the hole about every half turn.
After doing more research, I may need to be sure I am starting the hole straight, or straighter. The cheap taps seem to have a lot of trouble going straight if it is not started straight.


Not really. Same thing goes for WD40. Not made for that but if the steel is soft enough you may get away with it. Being as thick as you say I would not waste my time. Always better than nothing but you see the results. Like i said any tap unless some real cheapo will do the job. Heck i many times chuck it it up in a VS drill and have at it. Saves alot of hand cranks. Have to develop a touch for that though.
 
There are 3 types of taps, starter taps, regular taps and bottom taps. What changes is how many threads at the beginning of the tap are only partial depth. For hard material or small taps, a starter tap is much easier since less cutting is done for each turn. Of course if it is a blind hole, the bottom threads aren't completely cut - that is when you switch to a bottom tap. For softer metals like aluminum, this is less important.

Backing out at least a half turn every turn helps a lot in clearing the chips. You have to use a cutting fluid both to make it easier and to make the tap last longer. You really don't want to break a tap off - they are brittle.

Try to drill the hole at right angles to the surface but what is important is that the tap starts at the same angle that was drilled. You can either use a tapping block (hardened metal with holes in it) or drill your hole through a wood block and then start the tap through that hole. If you get the angle off just a bit, you put enormous stress on the tap.
 
Starting straight is critical. No magic oil will save you if you start one of those smaller taps crooked. Buying or making a tap guide will save you a lot of grief.


Ed
 
Are these for locating fixtures? Do you really need that much thread?

You can always drill thru with your tap drill and flip the part over and drill a 1/4 of the depth with a drill just over the major diameter of the thread. This will reduce the stress on the tap.

As mentioned, get some tap majic or equivalent.

After the tap is started, turn a 1/2 turn. Back it out a 1/4 turn to break off the chip. The chip will fall thru the hole easier that way.
 
Been there, done that. Last year I prepared several mild steel bars to hold carbide cutters, and my tap to hole ratio was good for the tap makers, but pretty bad for me. It's really an ego-bummer when you buy a tap at the hardware store, and tell the clerk that you need to buy two because you are sure you will break one. And then show up a couple of hours later to buy another tap.

I found that two things help. One is lubricant - not WD-40! I keep a can of 3-in-1 in my shop for drilling, tapping, and sharpening with oil stones. You really can't beat the old, reliable products.

Second, technique. With small taps, I find that if I advance the tap NO MORE THAN 1/4 turn, then back it out to clear chips before advancing another 1/4 turn, I'm usually successful. But if I try to go any more than 1/4 turn, the tap will bind in the metal and snap off.
 
Update. I'm learning.

Ken, I think I will get some tap magic...can't hurt!

Ed, you are exactly right, it needs to be started straight. Thank you.
That was the major part of my problem.

And to Allan...what a great idea about drilling the other side out larger.

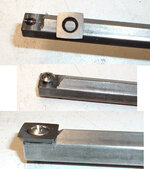
As you all probably guessed, these are carbide cutter holders.
I made the one for the EWT cutter that I bought earlier and that one is huge and takes an 8-32 hole. The smaller ones I ordered from the Big Guy take a 6-32 screw. I was considering using 8-32 screws for these but the flat head sits high and I would need to grind them down like an oval head. Not my preferred method.
So, I got to looking at the old, and I mean old, tap wrench that I use and it does not clamp down hard on the small tap size. Also, the end of the collet is broken/cracked so that was just adding to the problem.

I set up to do another 8-32 with the tap that was grabby on the last hole. I made sure the steel stayed in the clamp that it was drilled in and set up an alignment pin in the drill chuck that set into a centerhole on the tap wrench. Everything was kept straight as I cut them in and this time I only had to back it out 3 times when it seemed to start binding. Each time I cleaned off the tap and power sprayed the hole with wd40 to clean it out. A 200 percent improvement!
Thanks to all you kind people for the help and advise.
Now I think I'll place another order for some tools and magic stuff!
Thanks all.
Dale
 
Dale
I run a shop, if you get it to me we can tap it for you, no charge.

Gotta help out a fellow Akron Guy.
 
Bob, it may come to that but I want to give this another shot.
I appreciate the offer and if I end up breaking the next 2 taps I'll have you do them.
Just hate to not be able to use the small cutters.
Now that I 'think' I know what went wrong I'm stubborn enough to try again.
 
For small taps like that, I actually prefer to use a cordless drill to spin the tap. Easier to line it up, constant force compared to trying to spin a tap wrench. I always use tap magic.
 
I have had ZERO, and I mean ZERO luck power taping anything...

Going careful and slow, with plenty of lube, has always worked for me.

Remember, your mileage may vary...

No warranty expressed or implied...

you know the rest...
 
I imagine that the tap would last about .015 seconds for me using a power drill. And once you break one off it is time to saw off the end and start again.
 
I imagine that the tap would last about .015 seconds for me using a power drill. And once you break one off it is time to saw off the end and start again.

Your no fun. I have taped holes with broken taps before too. Once a hole is started the threads just follow along. Just as long as there is enough tap left after the break and you can get the broken piece out.
 
Clamp the steel in a vise that is clamped to the drill press table. Drill with the correct size drill bit, then switch the bit out with the tap without moving the steel. A few drops of Tap Magic or other cutting lube on the tap. Lower the chuck and hand turn the tap until it feels like it is about to bind up, back the tap out blow out the hole with compressed air. Repeat, and repeat until you get the hole tapped. The trick is to not let it bind up and keep the tap and hole clean of the cuttings as you tap the hole.

Using the drill press as your guide will keep the hole and the tap lined up, going in a little crooked and you can usually kiss the tap good by. Don't forget to lubricate the tap.
 
I imagine that the tap would last about .015 seconds for me using a power drill. And once you break one off it is time to saw off the end and start again.

Your no fun. I have taped holes with broken taps before too. Once a hole is started the threads just follow along. Just as long as there is enough tap left after the break and you can get the broken piece out.

Tried that. It broke again. Tried a 3rd time with the same broken tap and it broke again. :mad:
No more threads left.:beat-up:
Wasn't anything fun about it!:biggrin:
 
Clamp the steel in a vise that is clamped to the drill press table. Drill with the correct size drill bit, then switch the bit out with the tap without moving the steel. A few drops of Tap Magic or other cutting lube on the tap. Lower the chuck and hand turn the tap until it feels like it is about to bind up, back the tap out blow out the hole with compressed air. Repeat, and repeat until you get the hole tapped. The trick is to not let it bind up and keep the tap and hole clean of the cuttings as you tap the hole.

Using the drill press as your guide will keep the hole and the tap lined up, going in a little crooked and you can usually kiss the tap good by. Don't forget to lubricate the tap.

See post #10...that is exactly what I did.
Now I know it is the best way for me so when I get my new tools I expect to be able to tap out a 6-32 with no problems. Maybe, if I hold my tongue and stand on one foot!:rolleyes:
 
For small taps like that, I actually prefer to use a cordless drill to spin the tap. Easier to line it up, constant force compared to trying to spin a tap wrench. I always use tap magic.

I see I'm getting no agreement on the use of a drill. Just a reminder, I'm not pulling the trigger to max speeds. A very slow rpm in low range is the way to go, and I do stand by my success. I was a model maker before retirement, and cutting small threads was a daily task for me.
 
I'm not pulling the trigger to max speeds. A very slow rpm in low range is the way to go

As Mr Scott would say....well now that's different! If my hand was steady enough to know it is staying straight it may work for me. Good to know it works though, especially on small taps. Maybe when I'm done with the required ones I'll give it a try.
 
I am also an electrician and have tapped more 6/32 and 8/32 holes than I can count. I just make sure the drill bit is the proper size, and when I tap, I do not wait until it starts to get tight, I regularly go a bit, back it out, more lube, repeat. I figure if it takes me a bit longer to tap it is still faster than starting over when I break a tap.
 
For small taps like that, I actually prefer to use a cordless drill to spin the tap. Easier to line it up, constant force compared to trying to spin a tap wrench. I always use tap magic.

I see I'm getting no agreement on the use of a drill. Just a reminder, I'm not pulling the trigger to max speeds. A very slow rpm in low range is the way to go, and I do stand by my success. I was a model maker before retirement, and cutting small threads was a daily task for me.

Did you read my posts????:smile: I do that alot but it does take a fine touch. I have drilled and tapped 100's if not 1000's of holes over a 41 year career and if I had to turn a tap handle that many times I am pretty sure I would have CTS:eek:
 
I have used a cordless drill on very low speed to tap holes, but never 6/32. I think my touch with the trigger is not delicate enough. It works great for 10/32 and above for me however. :) :)

You mean to tell me all those junction boxes for switches and receptacles that you installed never needed tapping??? I can not tell you how many panel boards I had built over my career that used cube relays and terminal blocks. Back when I started we built our own panels and control panels. Today everything is shipped in and plugged in. I installed complete electrical rooms that were dropped in with a crane and every panel, transformer, and lights and junction boxes were all made up. I see it now with Data centers too. So much work is done off site and just shipped in. I have left just in time because this stuff bothered the heck out of me. From where I started to where the industry is now, no wonder so many people are out of work.

Sorry for the sidetrack on this tapping topic. I hope the OP works out his problems.
 
Well, I feel like I may have passed the first semester exam in the 'metal working for dummies' class!:biggrin:
I was able to modify my cheap drill press to mill the end flat, which gave me a much better surface than grinding and filing.
After the hole was drill I maintained the alignment and started with a 6-32 starter tap. Ran that in and out 2 times and finished with a through hole tap. Went smooth as butter. Hardly any resistance at all and no catches at all.
I did take the suggestion of drilling from the other side a short ways. There is still at least 1/4" of threads.
And the tap magic is good stuff! :smile: I used it for the milling as well.
These small cutters from Capt Eddie are really sharp and this thing cuts like a dream. Got 2 more cutters so I'll make at least one more tool.
Thanks all for your help with this.
Dale
 

Attachments

  • hex1.jpg
    hex1.jpg
    73.7 KB · Views: 145
Back
Top Bottom