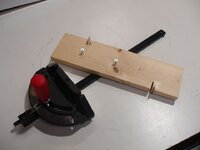
I make box joint jigs for the table saw as needed from scrap boards. They go so fast that I hardly think about them. I needed a box joint jig to make "tabs" for a razor stand counter a few months ago, so I made the gap wider than the finger width. All I did was make a box joint jig, but with the gap between the "finger" and the second slot wider than the finger width. After I made the jig and used it to make the "tabs", I cut them apart with a hand saw.
This will yield a box joint with wider "fingers" and thinner "slots", but with a regular pattern.
The issue with using this approach for making irregular box joints is that you will need a matching "template" to make the mirror image of for the other side of the box joint. I have not found a need to do this myself, but what I would do is clamp the newly made fingers and slots to the mating board. Use a marking knife or very sharp pencil to outline the first board's fingers and slots onto the second board. Using the miter gauge and a miter fence with an appropriate blade in the table saw, cut the two "shoulders" of each gap at the marks, then "hork out" the space in between, leaving the thin fingers that will match the slots on the first board. Do test fittings as you go. Do a practice run on scrap. That is what I would do.
Before writing the above, I wrote the text below yesterday but did not post it. I am leaving it here in case it helps. It is missing the comments about how I would make the matching side.
Previously written, but not posted until now:
Maybe I don't get it, but I just make box joint jigs as needed, using a table saw with a dado stack or sometimes a standard kerf blade with a flat top grind:
- Cut a thin finger the width you want. This will be your box joint slot width. It must match your blade width or chosen dado stack width.
- Make a test cut in scrap and verify that the finger matches the test cut width.
- Cut a slot in a scrap board so the finger fits snug and sticks out. Don't glue it yet.
- -> Cut a second slot in the scrap board. This is the part that determines the box joint finger width. Choose the gap between the slots according to your needs. This is why you make quick-n-dirty box joint jigs as needed - you pick the gap. (Note: You may have to make a matching jig with
- Jam or glue the finger in the first slot.
- Attach the box joint jig to the miter gauge on your saw:
Unplug the saw. Raise the non-running dado stack and place the board so that the second slot is over the dado stack to align your jig. Use screws to attach the scrap board (the box joint jig) to your miter gauge. Use a square to verify that the box joint jig board is square (perpendicular) to the blade.
- Done. Use the box joint jig. To reuse, save the pieces and repeat steps 5 and 6.
I needed a box joint jig with wider gaps between fingers, to make the counters for this razor stand. After making the fingers, I cut them apart using a hand saw. See:
https://www.penturners.org/threads/razor-stand-with-counters.173245
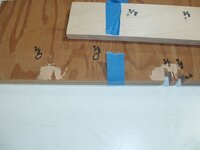
Photos: I got out a couple of old box joint jigs from a bin for you to see. I pulled out the miter gauge so you can see how the screws attach through the slots. The circles make it easier to locate the miter gauge screw holes for next time.


