Help!!! I'm new here!

Signed-In Members Don't See This Ad

franco32

Member
Joined
Feb 25, 2017
Messages
19
Location
Omaha
I'm new...so new I'm not sure where to post this question. But I'm sure someone will point me in the right direction. I have the lathe, the tools, the imagination...maybe...and by pure chance today, Enough burl to last me a lifetime! I came upon a Box Elder tree that has blown down this winter covered in burl from the base to about 12 ft up the trunk. The trunk measures over 7 ft round. One side of the trunk has a single burl that is close to 3 ft long and 2 ft wide and it sticks out away from the trunk a ft! It's mine for the taking! Now my problem is...how is the best way to cut this tree up without destroying too much? It's hollow on the inside about 2/3s the way up the trunk and the outside is pretty dry. I'm sure it's going to need most of the wood stabilized before anyone can use it. I'll try to post some pictures of a piece I cut off next to the ground where the tree broke off. Any advice would be so much appreciated....thanks!!


box%20elder%20burl_zpssgs9hvob.jpg
[/URL][/IMG]
 
Signed-In Members Don't See This Ad
Hi Gary, Welcome to IAP!

I can't help with your Burl cutting questions but there will be some who can. Pics will help immensely. I think your answers will depend on what you are making from those burls. Seems natural to go for bowl blanks on the blister burls.

Head over to the Introductions page and introduce yourself so you can get a proper welcome there.
Good luck with the burls! Sounds like a great find!
 
Wow, what a find! I haven't been presented with such an opportunity, so I won't be able to offer much in the way of how to process such a haul.
 
A little sample


I put a little pecan stain to highlight the figure and a coat of laquer to make it pop!
 
Last edited:
I'm new...so new I'm not sure where to post this question. But I'm sure someone will point me in the right direction. I have the lathe, the tools, the imagination...maybe...and by pure chance today, Enough burl to last me a lifetime! I came upon a Box Elder tree that has blown down this winter covered in burl from the base to about 12 ft up the trunk. The trunk measures over 7 ft round. One side of the trunk has a single burl that is close to 3 ft long and 2 ft wide and it sticks out away from the trunk a ft! It's mine for the taking! Now my problem is...how is the best way to cut this tree up without destroying too much? It's hollow on the inside about 2/3s the way up the trunk and the outside is pretty dry. I'm sure it's going to need most of the wood stabilized before anyone can use it. I'll try to post some pictures of a piece I cut off next to the ground where the tree broke off. Any advice would be so much appreciated....thanks!!

You're a lucky man with such a find, congrats.

I will be able to give any advice you may need to handle the task, but I need to have some pics of the whole thing to give me a perspective of what we are talking about here.

Cheers
George
 
UPDATE

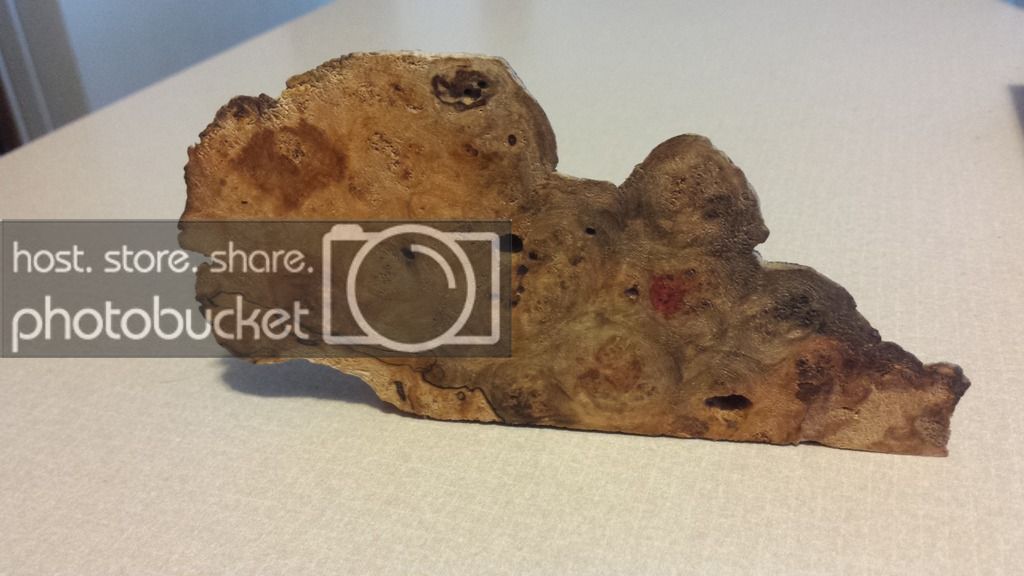
I managed to harvest my burl. Seems most of the burl was only at the most 4 inches thick. It had been standing for years and rotted from the inside. I did manage to cut it up into pieces and found a lot of figure and some spunky spots. Lots of spaulting and great color. This will work out great for pens and knife scales. I can't wait to make a set of handles for my 1911! I took about 20 pieces 2x12 and put them in plastic tote. I cut a hole for small hair dryer at the bottom and placed the wood inside. I put my moisture meter on the wood and it varied from 15% to 30%. The wettest was of course where it was the softest. I ran the air on low for most of the day until this morning. The pieces were considerably lighter this morning!! I checked the moisture level on just about all the pieces and couldn't get a reading higher than 5%. No cracking, checking anything!! I think it could be this wood has been air drying for years and it had been holding moisture from snow rain humidity. I'm not planing on turning any of this with out stabilizing it. Now It's in a plastic bag and I'm going to let it set and see if any moisture will draw from the inside out. I didn't want to stick my moisture probes too deep and ding up the wood. This picture is typical of 75% of the pieces so it will need stabilizing.

20170301_080751_zpsxohurore.jpg
[/URL][/IMG]
 
Back
Top Bottom