Grey areas when casting my steampunk blanks. Help!

Signed-In Members Don't See This Ad

sdivot

Member
Joined
Apr 9, 2014
Messages
39
Location
Texas
I hope someone can help me on this.
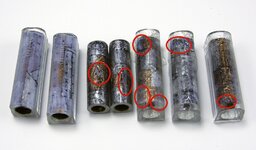
As you can see in the photo, I am getting "grey" areas on some of my steampunk blanks when casting. I've circled some areas, but it's really all over the place on some of them (like the first two, especially).
This is not a new phenomenon for me. The two on the left were cast probably a year ago, while the others are more recent.
It doesn't happen every time, but enough to be unpredictable and annoying. Sometimes I get great results. I just never know when it will happen!
I am using Silmar 41, as usual, and using my pressure pot with maybe 30lbs pressure.
The brass tubes are wrapped with the aluminum and copper material, then I rub an acrylic paint on them and let them dry a couple days. Then I use mod podge and let that dry 2-3 days. Then cast.
I started thinking maybe it is moisture. I live in south Texas, where it is humid in the summer. Also, we've had a lot of rain lately. The last three in the pic were done yesterday and today, since it's not rained for a week or so. The very last one, on the right was done today. I tried putting it in the oven on low temp for about 10 minutes before casting to see if it helped. Still getting a bit of the greying.
Anyone else seen this? Any ideas?
Thanks very muc,
Steve
 

Attachments

  • Grey areas on Steampunk blanks.jpg
    Grey areas on Steampunk blanks.jpg
    158.5 KB · Views: 439
Signed-In Members Don't See This Ad
I have no experience casting. . But I am wondering why you use the Mod Podge over the acrylic paint ? . Just a question ... not a criticism ... and not a suggestion as to why you are having the problem.
 
Good question Mal. I suppose I have been using the mod podge because that's what I was using when casting stamps (with mixed success). I have made some really cool steampunk blanks, but I'm at a loss as to the cause of my current problem. I'm certainly willing to try doing without the mod podge.
That may be my next experiment!
Steve
 
I haven't done many steam punk blanks. But I don't use mod podge on them. I've only used mod podge for stamps. I'm thinking the cloudy areas are because of moisture, but based on your notes, I don't see why that's a problem.

My only suggestion is before casting, put blanks in a toaster oven at about 125 to 130 for about 15 minutes. Then seal them in a plastic bag with some rice for about a day before casting. The rice should absorb any excess moisture. I've never tried this, but I've considered it. So far, I haven't had the cloudy issues you're having. (knock on wood).
 
I'm not a fan of Mod Podge but several use it quite successfully. The grey areas look like trapped air or separation from the surface. Have you tried "wetting" your blanks with the poly resin prior to actually pouring the PR into the mold? Give the tube a coat of resin and make sure it gets into and over all areas of the surface.

Be sure what ever plugs you use have a good seal to keep any air in the tubes from escaping. Are you casting horizontally or vertically?

I know how frustrating these problems can be. All goes well for several months and then the casting demons appear and all goes south.

I don't think moisture is the problem. I've cast in a complete downpour with no problems.

Do you ream the ends of the tube to make sure you have a nice smooth surface on the inside edge of the tube for the plugs to seal against?

Do a good turn daily!
Don
 
Don,
Thanks for the reply. I think I'll try "wetting" the blanks with a brush dipped in the PR before I pour the bulk of the PR in the mold. I'll also make sure my plugs are smooth and not leaky from a build up of PR. I'm using a PTownSubbie mold.
Also, I have not reamed the ends of the tubes before casting. Sometimes the material kind of wraps over and inside the brass tube. I'll trim that off before casting.
We'll see what happens!
Thanks again,
Steve
 
I had this problem on a couple of my first castings. I determined that it was areas of MP that were too thick and not fully dried. I now dilute my MP 50/50 with water, use thin coats and let each coat dry thoroughly before added another coat.
 
Not sure if that is it but maybe it will help.

I have found when casting with smooth surfaces if you use too much MEKP the resin will shrink away from the surface of the blank creating an air pocket between the resin and the blank. This may look grey or silver at times. Not sure if that is what it happening here or not.

I would try decreasing the amount of MEKP. I use 3-3.5 drops per ounce of resin to make sure that I don't get failures like that. I have to say though that it will depend upon your environment, temperature, and other factors.

Hope that helps someone. ;)
 
If those are made of metal foil tape, not foil on paper, you don't need anything on them. If there is paper or similar on the tubes use thin CA to coat the blank and let it dry a day or two before casting.
 
Thanks for the replies, folks.
Last night I started prepping two more blanks. The aluminum and copper material have been applied, along with the black acrylic paint. This morning I put a thin layer of Mod Podge on one of them, but none on the other. I have carefully trimmed the ends of each blank to prevent any potential leakage of the PR. I put them both into a warm oven for 10-15 minutes, then into a bag of rice. They should be thoroughly dry after all this!
I think tomorrow I'll do the casting, being sure to "pre-wet" the blanks with PR using a small brush just to make sure there is coverage before filling the molds completely. I also cleaned all residual PR from my plastic plugs, just in case they were allowing some leakage around the seal.
I'm trying to be thorough, so we'll see what happens. Also, I'll see if using the Mod Podge makes any difference at all.
Thanks again,
Steve
 
Watch out for dislodged hairs from the brush. Nothing worse than having that nice cast with a hair or two in the mix.

I clean my molds and plugs with acetone after each cast.

For brushes I use acid brushes. Get them for about 15 cents each on sale at various places. Use and toss.
Do a good turn daily!
Don


Dono
Thanks for the replies, folks.
... being sure to "pre-wet" the blanks with PR using a small brush just to make sure there is coverage before filling the molds completely. I also cleaned all residual PR from my plastic plugs, just in case they were allowing some leakage around the seal.
Steve
 
I have never had consistent results using Mod Podge as a coating. It frequently turns "milky" which really shows badly against a dark background. I do use it to glue the older "lick" type stamps to tubes. It is fine for that, but I have to be careful to get none on the front of the stamps. I seal with a light coat of thin CA. Everything goes in a toaster oven at about 140°. At least 15 minutes after CA sealing, at least 4 hours and usually longer if I used Mod Podge as an adhesive, and that is before sealing.

I'm probably doing a lot of extra stuff, but I rarely lose a blank this way.
 
So I cast two more steampunk blanks using the exact procedure I mentioned in my last post. They look great! No problems.
I also saw that using the Mod Podge did not seem to make any difference. I'll go without it from now on.
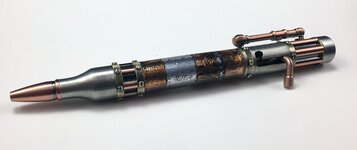
Here's a pic of a finished pen. Excuse the iPhone pic.
Thanks for all the replies.
Steve
 

Attachments

  • Steampunk 3.jpg
    Steampunk 3.jpg
    87.9 KB · Views: 189
Back
Top Bottom