Dying Alumilite

Signed-In Members Don't See This Ad

Cwalker935

Member
Joined
May 18, 2014
Messages
3,517
Location
Richmond, Va
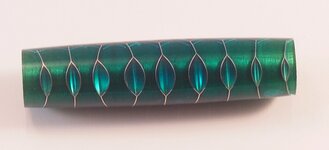
I have not worked with alumilite very much and am trying to get a handle on alumilite dyes and blending. In working with aluminum honeycomb, my blanks are somewhat transparent even though I am adding more dye than called for. I am also having trouble when trying to swirl two colors. This blank was supposed to be a blue and green swirl but the colors blended after the pour. Thoughts, suggestions, etc?

IMG_2120.jpg
 
Signed-In Members Don't See This Ad
Hi Cody - You may not have gotten what you wanted but you did get a great looking blank. I'm assuming that you are using Alumilite Clear with a 7 minute working time, I use that exclusively.

I pre-mix all of my colors completely with a little "A" resin in as many cups as colors to pour. So if I'm using 3 colors I'll have three cups with the color mixed before I mix the A+B. If I have a 15oz pour, with 10oz base color, 2.5oz accent color, then another 2.5oz for the third accent color I will have three cups of color mixed with a little "A" resin, then in a fourth cup mix the 7.5oz of A and the 7.5oz of B. I start my 7 minute timer, then I mix with a small paint mixer on a drill. After that 15oz A+B is mixed I'll pour off the amounts decided upon into the "color cups" and remix by hand to mix in the colors. Then after that I start pouring them all together in the mold. Due to the thermal activity of the resin setting it's hard to gauge how much mixing will go on.

I have found that more intense coloring helps to define or show differentiation better.

Consider painting your tubes if you don't want the transparency. There are a number of ways to go there, paint the same approximate color as your pour, go with black or white, or contrast your pour color.

I'd like to try some of that aluminum honeycomb, was it hard to acquire?

Happy turning - Tom

Thanks. Link for the honeycomb:

https://www.amazon.com/Aluminum-Hon...1493907366&sr=8-1&keywords=aluminum+honeycomb
 
Hi Cody,

To expand a little on what Tom posted: The Alumilite dyes, with the exception of white and black, which are pigments, are transparent, so no matter how much you add, you are always going to see through them. Try adding a little Alumilite white to the mix. It doesn't take much to completely eliminate the transparency.

It will certainly change the effect, so painting the tube may be the better option.

Just another thought.

BTW, Agree with Tom; Great looking blank!

Bill
 
Last edited:
Hi Cody - You may not have gotten what you wanted but you did get a great looking blank. I'm assuming that you are using Alumilite Clear with a 7 minute working time, I use that exclusively.

I pre-mix all of my colors completely with a little "A" resin in as many cups as colors to pour. So if I'm using 3 colors I'll have three cups with the color mixed before I mix the A+B. If I have a 15oz pour, with 10oz base color, 2.5oz accent color, then another 2.5oz for the third accent color I will have three cups of color mixed with a little "A" resin, then in a fourth cup mix the 7.5oz of A and the 7.5oz of B. I start my 7 minute timer, then I mix with a small paint mixer on a drill. After that 15oz A+B is mixed I'll pour off the amounts decided upon into the "color cups" and remix by hand to mix in the colors. Then after that I start pouring them all together in the mold. Due to the thermal activity of the resin setting it's hard to gauge how much mixing will go on.

I have found that more intense coloring helps to define or show differentiation better.

Consider painting your tubes if you don't want the transparency. There are a number of ways to go there, paint the same approximate color as your pour, go with black or white, or contrast your pour color.

I'd like to try some of that aluminum honeycomb, was it hard to acquire?

Happy turning - Tom

Sorry to revive an old thread, but I'm trying to research this before starting a new one...
Above, Tom mentions mixing 3 colors in "a little" A resin then pouring portions of a fully mixed 15 oz A/B into each color cup.
Ive just started making resin blanks, I am not at all happy with my color swirling results. I wouldnt have thought to try this technique, because I am REALLY meticulous about measuring precisely equal volumes of A and B, always to within 0.1 gm. It would seem to me that the amount of A in the color cups would throw off the equalness. Am I being too fussy about measuring?
 
Back
Top Bottom