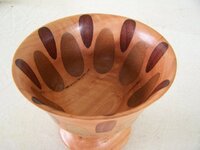
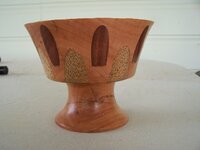
Dowell Bowl.

Signed-In Members Don't See This Ad
See more from Bob Wemm

Bob Wemm

Member
Joined
Mar 9, 2012
Messages
1,994
Location
Kalbarri, Western Australia
Finished this one off today, the body is Queensland Box with Jarrah and Broom Handle dowells. I think the broom handle is Tassy Oak.???

Finished size is 6in x 4 1/2in and is polished with Shellawax Glow.

C & C welcome as usual.

Thanks for looking.:biggrin:

Bob.
 

Attachments

  • 001.JPG
    001.JPG
    80.8 KB · Views: 273
  • 002.JPG
    002.JPG
    76.1 KB · Views: 227
  • 003.JPG
    003.JPG
    65.5 KB · Views: 249
Signed-In Members Don't See This Ad
G'day Bob,

Those bowls of yours have a very interesting technique and looking, a great way to utilise the broom handles, just joking...!:wink::biggrin:

What would happen if you have the holes filled with coloured resin, and even some "filling" material that is specially made to thicken/give volume to the resin instead of being resin only...??? I reckon it would look very "posh", also...!

Anyway, great job, mate...!

Cheers
George
 
George,
Never thought about doing that. I would have to use a 'hard' blank, otherwise there would be severe sanding problems, with the hard/softer material.
Thanks for the suggestion.

Bob.
 
Very nice bowl, hope you dont mind if I steal the idea for my next craft show! But one question, what are you using to sweep the shop now?
 
George,
Never thought about doing that. I would have to use a 'hard' blank, otherwise there would be severe sanding problems, with the hard/softer material.
Thanks for the suggestion.

Bob.

Probably not as many, as you may be thinking of, there is, will all depend of the method you would used for sanding.

Hand sanding with the fingers as the sandpaper backing, isn't reccomended for obvious reasons but, with a good finishing surface from the gauge(s) any rotary sanding tools such as electric sanders, etc., and with the lathe running, gentle passes with some fine grit such as 240 or 300, will be sufficient. The most important detail is having the lathe spin to the opposite direction of the electric pad sander, this is I found, the most effective way to sand/finish turned surfaces with various density parts...!

As I mention previously, that is a considerable waste of resin doing these things, reason why I suggested some special filling stuff sold by the resin people, this would also reduce considerably the chance of resin cracking and would brace most of the hardness of the PR, making the densities of both materials, wood and resin mix, a lot more closer...!

You can always find some of those small pods that will fit in the holes and use them with the resin, stack them up in the hole first (dry) and them pour your coloured resin in...! There are a few little technical issues here, suck as floating but that you can sort out quite easily.

Your drilled style bowls, offer a tremendous number of possibilities, indeed...!

Cheers
George
 
Damn it, never thought about that, Ohh well, it will just have to get messier than it is now.

No problem with using the idea.

Bob.:biggrin:

Very nice bowl, hope you dont mind if I steal the idea for my next craft show! But one question, what are you using to sweep the shop now?

Hahahahahm, you probably by now, regret to have listen to that fellow in SA that put you into the sticky resins, huh...???:wink::biggrin:

George
 
Awesome job!

Mrs. Chevy is starting bowl turning in addition to our pens, seam rippers, styluses, etc. Do you mind if she uses your type of design?
 
Bob, how were you able to get the holes so evenly spaced?

Hi Mark,
It's quite simple, work out where you want them and draw a circle at that distance from the centre. 8 dowells works out to be 45degrees apart, just mark that on your circle and Bobs your Uncle. I used two circles or rows for this one, others have had large and small dowells in the same circle.

Different side contours will give you different pattens.

Make sure you use heaps of glue and that the dowells go right to the bottom of the holes.:biggrin:

Have fun,
Bob.
 
Back
Top Bottom