
Well, for a year or so now, I've been photographing my turned items for my Etsy store. I started out with a fairly simple setup, which improved my photos a bit. Over time, I kept refining the setup, looking for ways to improve it more and more. My setup is now fairly refined, but still rather simple, and given its simplicity I thought I would share it. Hoping this might help some of you to find ways to create your own setups and step up your pen photography to a new level.
There are a few key elements of the approach here that I think are fundamental ( = essentials;
  = useful but optional):
A primary light source at the very least, is essential. Natural daytime light often provides the best lighting for scenes, however it is possible to use artificial lighting if you prefer. Having at least one notable secondary light to provide fill lighting is also extremely useful, and having that source be mobile adds extra flexibility. All of my photography relies on both a primary light source and a notable secondary light source, and occasionally tertiary sources to more finely control lighting, highlights, etc. I'll go into details about how these sources can be produced later.

Second to lighting is the scene itself. The scene can be kept simple with just a backdrop, or you can add props. Props are not necessary, but they can add some interest, and they can be as simple as some leaves, perhaps a simple notebook, or more complex involving several props.
Lighting Options
Light. The most important aspect of any still photography scene. The light can make or break the scene, especially if it results in harsh shadows, stark highlights, or other aspects that do not allow the subject, your pen, to draw the eye and exhibit a pleasing presence.
While starting with a single natural light source, such as a broad window, can provide a great starting light source, in the long run you will likely find you need more lights. Diffuseness, concentration, and portability are useful aspects of the lights you might use to illuminate your scene.
Here are some lighting options that can help you illuminate your scene effectively. I currently use all of these except a spotlight:
Most of these kinds of lights can be found with color temp configurability option, with color temps ranging from 2500K - 9000K depending on model. Color temp adjustable light sources are very useful for configuring the scene. It is often beneficial to use say a cooler primary light source, and a warmer fill light source (or vice versa, depending on your goals.) If you buy any light sources, it is worth buying color temp configurable ones, even though they usually cost a little more.
Natural Window Light
I rely on natural diffuse light from a large window during the day most of the time. I generally try to avoid direct sunlight. It is significantly brighter, produces harsh shadows, is warmer than I generally prefer (although not bad in all cases), and cannot really be controlled. It moves over time, so can produce some inconsistencies.
The best window light IMO is diffuse indirect light. Daylight, as it is properly termed. When the light is generally from the blue daytime sky, or perhaps from an overcast sky. This light is usually cooler than daylight, but not actually blue (i.e. 9000K) so it is a great, generally neutral primary source of light that will softly illuminate your scene, producing softer shadows.

If I must use my window for primary light when the sun is directly shining, I will try and use my blinds to prevent any direct sunlight from directly illuminating the scene. Sometimes this is possible, and I can redirect some of that light off my ceiling, which will still illuminate my scenes brightly and softly. I generally do not find this as pleasing as diffuse daylight, but it works in a pinch.

For my setup, the window light is to the LEFT of my scene, which is set up on my dining table. So my primary lighting is leftborn, producing shadows to the right of my scene objects. The direction of your primary light is ultimately a personal choice. In my case, it was largely a necessity as I don't have many places in my house where I can do this kind of photography, and the best option (by a long shot) just so happened to have the window on the left. I don't get direct sunlight until later in the afternoon, thereby delivering good, soft, diffuse light for most of the day from morning to early afternoon.

On the subject of the area where I set up my scenes. This photo from the "back" side shows a simple and relatively cheap free standing curtain rod on wheels. I originally just draped my backdrops over this chair (in front of which sits a couple taped-together pieces of black craft board), however sometimes that was not quite sufficient. It could allow unwanted light to spill into the scene from behind, and further sometimes I needed to tape or otherwise attach either a light source, reflector, or something higher up. Draping the backdrops over this curtain rod here solved that problem, and more.
Softbox Light
My most used light is a large softbox light that has color-temp adjustability and a remote control. I think I spent around $50 or so on a set of two of these, several years ago. I have one of these lights set up to the right side of my scene. This puts it on the opposite side from my primary light source. This is important, as it allows me to fill in the shadows from the primary source.

Filling in the shadowed side of your scene helps to reduce the contrast of the scene, which is often one of the primary reasons why the scene ends up with high contrast. Bright light to one side, dark shadows to the other, the contrast (and also dynamic range) increase dramatically.
Filling the "back" side of your scene with a large, diffuse light not only adds more light (allowing faster shutter speeds, which is key for any hand-held photography), but softens shadows, diminishes contrast, reduces the dynamic range of the scene, and generally helps to produce just more pleasing illumination overall.


I highly, highly recommend purchasing at least one large softbox light. You can often find sets of two, including stands and color-temp adjustable bulbs, for as little as $40-50. You don't have to spend a ton of money here, and it will probably be one of the most useful purchases you make for stepping up your pen photography. They will ultimately pay for themselves over the long term (and not really that long) by giving you significantly more control over the quality of your scenes.
Barn Door Light
A barn door light is a good way to get some broad scale diffuse light that you can control well, if you need a bright, diffuse primary light source for lighting your scenes at night. Normally I will use a big window (sans any direct sunlight) as my primary light source, however sometimes this is neither optimal (can't control the color) and of course at night its simply not an option.

One of my most commonly used light sources is a barn door, set up a bit behind the edge of my backdrop for my scene, reflecting off of a large white foam-core art board onto my scene. This is a great way to simulate that broad scale natural window light, without suffering from the harsher shadows that directly using a barn door will usually cause. I will adjust the doors to make sure that no light from this source directly illuminates the scene.

I picked up a couple of LED panel barn door lights as a set. They use LEDs behind a diffusing panel. Color temp is adjustable, however with this particular set there are two sets of LEDs...a cool blue (which natuvely are 5600K) and a warm yellow-orange (which natively are 3200K). Color temps are achieved by adjusting the intensity of the blue vs. orange LEDs. This is not particularly color accurate, but its plenty good enough for the use case of pen photography. At the extremes (3200K and 5600K) half the LEDs are lit, so there is a slight drop in brightness. There are better barn door lights, and you can spend a decent amount of money on full RGB barn door lights that offer much more fine grained configurability, brighter illumination throughout a wider color temperature range, and of course full RGB hue adjustments.

Spotlights
I currently do not use spotlights for my scenes. As such, I cannot offer a lot of direct advice here. A spotlight (and many often come with barn doors as well) will offer more direct, targetable and bright light. This can be good to add light to a specific area of a scene, especially if you add a snoot (a telescoping type of light hood for concentrating light).
This may be useful for specific kinds of scenes, and in my earlier research into product photography (which I started getting into back in 2021 originally), spotlights combined with black panels to block light, can be a great way to gain EXTREME control over exactly where light falls on your scene. This can be used to great effect in many cases. One of the most intriguing uses I've come across is for backlit rim lighting, which is a really great way to add some intringuing illumination to darker objects in dark scenes. I have not tried anything like this yet, and have thus far not found a need for a spotlight, so I can't speak much more to their use in pen photography.
Small Portable Lights
Full blown RGB configurability is generally not required for most lights, but if you can afford such lights, they can offer a lot more options. I myself generally rely on my small, portable lights to offer full RGB configurability. I have a couple of small sized RGB lights that allow for multiple orientations when set up in the scene, allowing for quite a bit of colorful, targeted lighting. Sometimes I use these to fill in the scene with colored light from a particular direction, or maybe just to illuminate the background of the scene, to add specific highlight lines on reflective surfaces when I cannot get them any other way, etc.

Small, portable RGB lights are one of the most versatile forms of scene lighting. I think I spent around $20-25 each for mine. The two I have are about 2-3" long, so quite small and portable. There are also RGB lights that are more like a wand, 8-12 inches long or so. These can be useful for backdrop lighting, if you wish to light your backdrop independently from your foreground scene. This can be useful for producing certain kinds of special effects (I may write a post on that in the future.)

I commonly use my small RGB lights to help me control the highlight lines reflecting off of my pens, especially when reflecting panels are insufficient to produce the lines I need. I may also use these small lights to produce explicit, somewhat concentrated light of a particular color temperature, just slightly out of the scene. This can help add more interesting lighting to the overall scene, and increase the illumination in areas that are otherwise poorly lit.

Reflecting Panels
A final way to control the illumination of your scene is reflecting panels. There are a lower cost option, are quite portable, generally diffuse (although gold, copper and silver foiled panels will diffuse light in a more...specular manner), and can also be used as a reflection blocking tool.

You can find reflecting panels in cardboard or fabric form. Sometimes fabric will include a rod at either end of the panel, or they may have the fabric stretched between a full wire border. Some panels may be gold or copper on one side and silver on the other, so that one side is "warming" while the other is more of a neutral reflector. Some fabric based reflectors might include a diffusing layer over one or both of the foiled surfaces. In my case, my one fabric panel is copper+diffusing layer on one side, and strait silver foiled on the other. A diffused panel won't reflect as much, but it will help warm the scene in a diffuse manner.

Cardboard based panels are often designed with specific folds. You can find dual or tri-panel reflectors, with folds between the halves or thirds, so that the panel can be set up angled and thus free-standing on its own. Most cardboard panel reflectors have a gold or silver foiled panel, a black panel (non-reflecting), and then the back side of the whole thing is white. I picked up a set of two dual-paneled reflectors in a set. One is gold/black on one side, white on the other, and the second is silver/black on one side, and white on the other. Sometimes you may get a tri-paneled reflector, where one side has gold/silver/black and the other is all white.

My most frequent use case for these kinds of panels is to add and configure specular highlight lines on my pens or other reflective products. Sometimes I will set my cardboard panels up like a tent, then drape my larger fabric panel over that to produce a longer and brighter specular highlight. Other times I may just hand-hold my fabric panel and use a remote shutter release to control my camera. For most highlight lines, I'll use the silvered side. In some cases, to really get the highlights the way I want, I may use multiple panels, white sides, to surround the object with white reflecting my primary light source to get the highlight line to fully encompass the object.
Backgrounds and Base Surfaces
Lighting is important, and having the right lights to illuminate your scene is very important. However once you have some useful light sources, you'll want to work on the nature of your scene. There are many materials that can work wonders here. Its certainly ok to start with whatever materials you have, which may just be the surface of whatever table you are going to use for your scene. However as you gain experience, you will likely want to increase your control over how the scene looks. Especially if you want to produce a particular effect for particular pens.
Here are a few materials that work well for scene backdrops and base surfaces:

One of the most versatile background and base surface materials is weathered, mostly gray colored wood. It can frequently be found for FREE (i.e. craigslist), so the cost barrier is non existent. Weathered wood seems to go with just about everything, and has become one of my most used materials for both backgrounds/backdrops, as well as the base surface upon which I set up each scene. I acquired a large amount of weathered, reclaimed wood when my deck collapsed a number of years ago. I've cut several of the old deck boards down to a couple feet long to serve as an excellent backdrop and underlay for the majority of my scenes these days.

Fabrics are also a useful option. I originally started with fabrics, which definitely improved the quality of my scenes from what I was originally doing back a few years ago. Fabrics don't produce a scene that is quite the same quality as wood a lot of the time, however, with a few exceptions. Fabric is low cost, and can be found for anywhere from $5-15 a yard or so. You only need a yard, yard and a half most of the time. You can find a lot of decent fabrics at Walmart, but other good sources include Joanne's or Hobby Lobby. I use fabrics less often these days, but they are a more cost effective way to get started! The most used fabrics I have now, I think, are the canvases and burlaps.

I started looking for more interesting materials, and ultimately found a range of faux leather materials also sold by the yard. These leather-like materials, IMHO, offer much more intriguing materials for backdrops and underlay. Over the last few years I have acquired seven different kinds of faux leather materials that give me some options. I find these are most useful for "richer" desktop type scenes, where I might want to present a more masculine style for more masculine pens. Two sets of the materials I have, are effectively the same kind of texture, but in both black and brown. Some of these were around $8-10/yd, while others were around $12-15/yd or so. The more elegant and rich were more expensive, found at Hobby Lobby, while the others were all sourced from Walmarts.
Basic Props
Before we get into setting up a scene and getting some photos, lets talk a bit about props. Props are not necessary, and many of you may prefer to focus on JUST the pen, with nothing else. I would encourage everyone to consider that props, even when used very minimally, can add just a bit more intrigue to your scenes, and can also be useful to helping you orient your pens in more ways to better capture light. Props can be used very sparingly, or with more complexity, depending on your tastes and goals.
There is almost an infinite number of things that can be used as props. I will not even try to get into all of the options. Here is a list of just some of the things I've used as props in my scenes:
Many of these things can be found in those potpuri packs. I originally started cherry picking particular pieces from the various bowls full of potpouri around my house. I then started noticing new potpouri packages as well as decorative item packages at some local stores (including Walmart and Hobby Lobby), which all contained a multitude of very interesting items. I've since distributed a lot of these by specific kind/type of material (seed pods, pinecones, sticks, flowers, etc.) into various containers for easy selection and use. I've purchased a number of these over the last several years, and have colors of prop and "scene fill" materials ranging from black and white, browns, beiges, reds, oranges, greens, blues, turqouises, etc.
Some of the decorative item packages came with these various spheres made from a variety of materials. These can often add an interesting background object in a scene, that can either contrast with or enhance the colors of your pen. Or they can just help create the illusion of, say, someone's real desk. I like to have a bottle of wine or scotch on hand, as they also make for great props that can set the stage for a "home office desk" type scene.

Some of the more frequently used items for my pen scenes include blank cutoff pieces, dried leaves, paperclips (often of various colors, ideally something that either matches or contrasts with the materials of the pen), mopani wood (amazing wood with incredible bark, often used as a decor item for reptile enclosures...look for these at pet stores!), and sometimes even beads (you would be surprised what a few beads can do to provide some complimentary color contrasts and bring out your pen!) Something else that can sometimes work are dried grasses with their seed pods in full form. These can be used to subtle effect when they are just a background characteristic (often cropped and out of focus, but they can improve color contrasts in a scene.)

Mapani Wood Pieces from Petsmart
I would say the most used prop for my pen photography these days, is a notepad. If you use no other props, a single notepad can offer a highly relevant base to use underneath your pen, a support to hold one end of your pen up, or as a stabilizer to hold a pen in a certain orientation for particular kinds of photos. They are one of the most relevant kinds of props for pen photography, and could be the sole prop you use. A black notepad is probably the most broadly compatible with most pens.
Over time, I have accumulated close to a dozen various kinds of notepads, ranging in colors from black, to white/creame, blueish and pinkish/purple, to brown. I would like to add tan, however there aren't that many in that color, and the price of the only tan notepads I've found (Moleskin) were $29!! (That's a lot for a simple, relatively small notepad.) One of the more cost effective ways to get a notepad-type prop is to buy one of those "on the go" artists notepads. These have plain papers, no rules, grids or anything like that, and they can be found for as little as $4-5. Often a nice quality notepad will cost $12-15, which is roughly the cost of most of mine. I have found some fairly nice ones with leather covers, leather+magnetic latches, and including at least one (sometimes two) bookmark ribbons inside, with either college rule or graph grid.

One last tip. For pen scenes, especially if you want a "desktop" like scene, a lamp is quite useful. Aside from adding that desktop look and feel, its also a light source, and can add useful illumination to your scene. You can pick up nice little lamps off Amazon for anywhere from $10-$30, incluidng ones with color temp selections (or even full RGB.)
If you want to use a prop, I highly recommend picking up at least one black notepad. If you want another, as odd as it may sound, go to a pet store and find Mopani Wood in the reptile terrarium/enclosure decoration area. Mopani Wood, as you can see below here, is AMAZING. I have several pieces now, and they make for EXCELLENT background props. Then just, figure out what your taste is, and how many props you even like in a scene, and buy what suits your fancy.

A Basic Scene
Lets walk through setting up a basic scene. In this scene, I'll be using my weathered wood as both backgound and base. I've come to use this material most often for most scenes, and I fall back to the faux leather for more specialized ideas. Sometimes I may use the leather as a base and the wood as a background, or vice versa. Together, these make the most versatile baseline scene material.

For now, lets use some weathered wood to create our background and base surface. Not much to it, if you can get ahold of some old decking wood, and cut it down to lengths around 1.5 feet. These will usually be 2x6" You can see my approach in the picture below here...vertically aligned for the background, horizontally for the base. I also placed a short length of 2x4" along the back where the "seam" between the base and background would be...this will act as a simple shelf to hold up a prop.

Alright, now for some props. I've added a lamp, set to a middle color temperature (neutral), along with an animal horn (not sure exactly what, bovine of some sort perhaps; picked up at an antique store), and a small box I turned a while back. Now, before adding the pen, I always like to use a clean, soft microfiber cloth to clean it. Fingerprints often show up much more readily in photos than to the naked eye, and a clean pen adds a professional touch.


For illumination, I'll start by using my bay window there, as well as my large softbox. The softbox I'm setting to a slightly warmer color, as the window light will be very white/neutral. I find its best not to have totally neutral light across the entire scene. If your primary light is warmer, your fill could be cooler (higher color temp, say 6500K.).

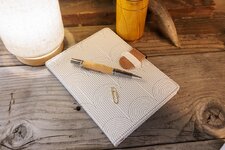
As my final prop, I am placing the pen on one of my notepads. For this particular pen, a chrome Elegant Sierra-type with Port Orford Cedar, I've chosen a light colored notepad. I also tossed a gold paperclip in there.
With no other setup, I captured the scene officially. Here is the result (in this case, with my Canon EF 16-35mm @ 35mm):

In this case, I did not fiddle a lot with the lighting, or try to do anything to manage the specular highlight lines or anything like that. The photo is good. It could be better, but its great for an initial photo. The highlight line can be improved, and another mistake I noticed in this final photo was the seam in the lamp shade. I rotated that around to the back so it is not present in future photos.
A Night Scene with Lighting
Alright. As I wrote the above, my daylight faded, so lets take a crack at a nighttime setup. Same scene, however we are going to fiddle with the lighting more. We need to replace our primary light source with an artificial one. For this, I'll be using my barn door light at maximum illumination, maximum color temp of 5600K (cool.) I have a large foam core craft board that I'll be using as a diffuser and reflector to bounce the light onto my scene. I'll adjust the barn doors to keep any direct light from the lamp from spilling onto the scene.

With the same scene, the goal now will be to force a better specular highlight line on the pen. This can be done a few ways. For this case, I'll use my reflecting panels to try and fill in the highlight line, just by reflecting the primary light and the lamp. The original scene withouot any reflectors is shown here:

Now, adding only a white reflecting panel, which primarily captures the table lamp light and reflects it back to the pen, we get the following:


Ok, but not great. I'd like a thinner highlight line, and one that does not overpower the pen but just shows its reflective. Using a silvered panel, the highlight line on the reflective pen nib improves, but still not quite what I'm looking for. The changes so far are primarily only affecting the nib as well:


Adding more white panels wrapped around the silver panel, we reflect more light onto more of the pen, and the highlight line does seem consistent in both the finial and the nib...but, its fat, not thin and specular:


Finally, I flip one of my reflecting panels into a tent, and then drape my reflecting fabric panel over that. Voila, a real nice, fine, thin specular highlight appears. I had to fiddle with the orientation of the panels to get the specular line to stretch across the whole pen, and it does not quite appear on some parts of the barrel, but this was more what I was looking for:

The final shot here was with a 100mm f/2.8 macro lens, which just produces nicer photos than the 16-35mm lens. Note the closeness of all the setup around the pen here:

The camera is set up on a tripod, and reaches over the intervening foreground reflecting panels in order to photograph the pen. You don't necessarily have to worry about placing reflecting panels in the foreground, and often that is the best place for them. Sometimes I may have the camera relatively low over the top of any panels to get the shot, but being able to utilize that foreground space is often critical to getting the most optimal light.
Reflecting panels bring a whole lot of light control power to the table. Panels are cheap, and with a combination of reflection (white, gold, silver) and blocking (black), you can gain an exceptional amount of control over your scene lighting, if you are interested in achieving very specific results like a fine, notable highlight line that does not overpower the pen itself.
Props as Prop-ups
Extending from this same prior scene, lets rearrange things a little bit. Instead of using the notepad as a prop, lets ise the horn as a way to prop up our pen for a different kind of shot. I rearranged the scene by removing the 2x4 that was acting as a "shelf", and put the horn between the lamp and the box. The idea is to have the pen cross over the pointed end of the horn in an interesting way.
After placing the pen (remember to clean off any fingerprints before your final placement, and it helps to only touch the barrel, as fingerprints often don't show up there, or at least not as well as on metal plating), I set about adjusting reflecting panels to maintain the highlight lines I wanted, and make sure that the whole scene was lit well enough. I placed a white reflecting panel to assist in filling in some of the background with light.

Once the scene was settled, and I was getting the reflections I wanted...from the vantage of the camera...I captured the shot:

After you have an initial scene set up, it takes a lot less effort to juggle things around and capture additional photos of the pen to show off different aspects, in different ways. I like to get a number of shots with each scene if I can. For certain pens that have particularly intriguing features, I will sometimes also capture close up macro shots of interesting aspects of the pen. Say details on a clip or band, any custom engraving, etc. A macro lens, or some extension tubes so you can make the lens you have macro, is very helpful for these cases.
Minimalist & Prop-Free Isolation
A propped scene is a great way to grab a prospective customer's initial attention. Views on my pen listings in my Etsy store, went from a handful a year (maybe, maybe 10 or so), to dozens or more per week once I started setting up these kinds of scenes. A simple pen on an isolated white or otherwise very neutral background, as your only way to grab attention...it seems to get lost in the sea of other sellers doing exactly the same thing. A more interesting scene creates something unique, something that can potentially stand out against the sea of pens dressed in whitewash...
However, isolating a pen in a photo doesn't have to be bland! You can leverage all of the above, to create well lit, quality photos of your pens in isolation. Perhaps with just the background and base surface (or even just the surface, with the right camera angles.) The biggest takeaway you should have from this article is the lighting. You can dispense with all the props, the lighting is still king! Utilizing the above scene, lets put our pen in isolation, but maintain our lighting, our specular highlights. I moved the lamp around until it left me with more pleasing highlights, which was mostly on the clip (in particular, the specular on the end of the clip):

Now, sometimes isolation doesn't mean 100% prop-free. The original photo at the top of this article showed two pens on top of some oak leaves. Something very minimal and simple can still often help show off a pen in near-isolation. The leaves in the first photo are more like a background texture...they don't distract much from the pens, but define a setting and a "feel"...ah, the feel of fall! Sometimes you may wish to prop your pen up. Pen stands can help you do that, and there are numerous clear acrylic and metal stands you can guy for relatively cheap. Another option is to craft your own stand...a simple piece of wood with a tapered hole for the nib of your pen, or perhaps crafting your own uniquely designed stand from wood, is another way to prop up your pen, but otherwise generally keep it isolated.
A simple, cheap but great way to prop up a pen is to use either the pen cap (if you have one) or to use a blank cutoff as a stand. I will usually set the finial end on the cap or cutoff. In this scene, I removed the lamp, and used one of my small RGB lights to tune the highlights, again mostly the specular on the top end of the finial:

The cutoff of the same wood as you used for the pen is a nice touch, but its not entirely necessary either. You could also rest the pen on other whole blanks as well. Finally, another great way to prop up a pen in an isolation photo, is to use any included (or optional) enclosure. A pen sleeve or box, especially if included with the pen, is a useful minimalistic additive to the scene.

When selling a pen, it is useful to include an isolated shot that shows the product (and ideally the whole product, including pen sleeve or box if one is included). Its not entirely necessary, my experience is buyers know what the product is based on the title and description of a listing, but isolating is still handy to make it very clear what they are getting, and to fully show off THE PEN in all of its own glory.
Continued Experimentation
Now that you have a scene set up and usable, keep exploring. Adjust the pen, the props, even the lighting. Swap out some props for different props, or eliminate them altogether. Try adding a pen box. Maybe try writing in a notepad with the pen to show off how its script looks. Once you have control over your lighting, then you have solved the most significant issue. From there on, its just a matter of tweaking and tuning the scene to your liking, and capturing the photos you think best show off the pen. That may even involve no props, and just a background and base texture, with effective lighting.
I will try to share additional threads in the future, covering different kinds of scenes. I have an upcoming pen that should provide an opportunity to get into more interesting lighting off the beaten path. I've been wanting to explore rim-lit dark objects in dark scenes for a while, which should push my existing still-photography skills to the limit. I'll try to document that and share again in the near future!
@Wayne Let me know if you would like to preserve this.
There are a few key elements of the approach here that I think are fundamental (
= essentials; = useful but optional):- Primary Natural Light (): Use a window as a primary source of natural light to generally light the scene
- Primary Artificial Light (): It is possible to set up a scene without natural light, using artificial lights to provide primary illumination, say at night if necessary)
- Notable Secondary Light (): A notable secondary light that can be controlled and positioned as general fill
- Small Mobile Lights ( ): One or more artificial lights that can be controlled and positioned as targeted fill, highlight, etc.
- Quality Surface & Backdrop (): Wood or a couple yards of a basic "fabric"
- Props (): Things to fill in some of the space, add some life beyond just the pen itself, but which are SECONDARY to the pen
A primary light source at the very least, is essential. Natural daytime light often provides the best lighting for scenes, however it is possible to use artificial lighting if you prefer. Having at least one notable secondary light to provide fill lighting is also extremely useful, and having that source be mobile adds extra flexibility. All of my photography relies on both a primary light source and a notable secondary light source, and occasionally tertiary sources to more finely control lighting, highlights, etc. I'll go into details about how these sources can be produced later.
Second to lighting is the scene itself. The scene can be kept simple with just a backdrop, or you can add props. Props are not necessary, but they can add some interest, and they can be as simple as some leaves, perhaps a simple notebook, or more complex involving several props.
Lighting Options
Light. The most important aspect of any still photography scene. The light can make or break the scene, especially if it results in harsh shadows, stark highlights, or other aspects that do not allow the subject, your pen, to draw the eye and exhibit a pleasing presence.
While starting with a single natural light source, such as a broad window, can provide a great starting light source, in the long run you will likely find you need more lights. Diffuseness, concentration, and portability are useful aspects of the lights you might use to illuminate your scene.
Here are some lighting options that can help you illuminate your scene effectively. I currently use all of these except a spotlight:
- Softbox Light
- Provides medium to large scale diffuse light source
- Generates softer shadows
- Barn Door Light
- Provides bright, strong medium to smallish scale light source
- Barn doors allow control over where light goes
- Will generate moderately harsh shadows when directly illuminating
- Spotlight
- Provides bright, strong, direct light source
- Will often create hard, sharp shadows
- Can allow targeted lighting
- Small, portable RGB Light
- Can be found in small, medium, narrow and broad forms
- Allow total control over light color
- Color temperature ranges (2500K - 9000K depending on model)
- Full RGB color spanning the spectrum
- Configurable brightness
- May also come with special effects modes (strobes, candle light sim, etc.)
- Highly portable, smaller models can allow exceptional light targeting
- Cannot light a whole scene well on their own
- Reflecting Panels
- A very low cost, but often highly configurable, means of lighting parts of your scene
- Reflective panels can be found in cardboard form as well as reflective fabric panels
Most of these kinds of lights can be found with color temp configurability option, with color temps ranging from 2500K - 9000K depending on model. Color temp adjustable light sources are very useful for configuring the scene. It is often beneficial to use say a cooler primary light source, and a warmer fill light source (or vice versa, depending on your goals.) If you buy any light sources, it is worth buying color temp configurable ones, even though they usually cost a little more.
Natural Window Light
I rely on natural diffuse light from a large window during the day most of the time. I generally try to avoid direct sunlight. It is significantly brighter, produces harsh shadows, is warmer than I generally prefer (although not bad in all cases), and cannot really be controlled. It moves over time, so can produce some inconsistencies.
The best window light IMO is diffuse indirect light. Daylight, as it is properly termed. When the light is generally from the blue daytime sky, or perhaps from an overcast sky. This light is usually cooler than daylight, but not actually blue (i.e. 9000K) so it is a great, generally neutral primary source of light that will softly illuminate your scene, producing softer shadows.
If I must use my window for primary light when the sun is directly shining, I will try and use my blinds to prevent any direct sunlight from directly illuminating the scene. Sometimes this is possible, and I can redirect some of that light off my ceiling, which will still illuminate my scenes brightly and softly. I generally do not find this as pleasing as diffuse daylight, but it works in a pinch.
For my setup, the window light is to the LEFT of my scene, which is set up on my dining table. So my primary lighting is leftborn, producing shadows to the right of my scene objects. The direction of your primary light is ultimately a personal choice. In my case, it was largely a necessity as I don't have many places in my house where I can do this kind of photography, and the best option (by a long shot) just so happened to have the window on the left. I don't get direct sunlight until later in the afternoon, thereby delivering good, soft, diffuse light for most of the day from morning to early afternoon.
On the subject of the area where I set up my scenes. This photo from the "back" side shows a simple and relatively cheap free standing curtain rod on wheels. I originally just draped my backdrops over this chair (in front of which sits a couple taped-together pieces of black craft board), however sometimes that was not quite sufficient. It could allow unwanted light to spill into the scene from behind, and further sometimes I needed to tape or otherwise attach either a light source, reflector, or something higher up. Draping the backdrops over this curtain rod here solved that problem, and more.
Softbox Light
My most used light is a large softbox light that has color-temp adjustability and a remote control. I think I spent around $50 or so on a set of two of these, several years ago. I have one of these lights set up to the right side of my scene. This puts it on the opposite side from my primary light source. This is important, as it allows me to fill in the shadows from the primary source.
Filling in the shadowed side of your scene helps to reduce the contrast of the scene, which is often one of the primary reasons why the scene ends up with high contrast. Bright light to one side, dark shadows to the other, the contrast (and also dynamic range) increase dramatically.
Filling the "back" side of your scene with a large, diffuse light not only adds more light (allowing faster shutter speeds, which is key for any hand-held photography), but softens shadows, diminishes contrast, reduces the dynamic range of the scene, and generally helps to produce just more pleasing illumination overall.
I highly, highly recommend purchasing at least one large softbox light. You can often find sets of two, including stands and color-temp adjustable bulbs, for as little as $40-50. You don't have to spend a ton of money here, and it will probably be one of the most useful purchases you make for stepping up your pen photography. They will ultimately pay for themselves over the long term (and not really that long) by giving you significantly more control over the quality of your scenes.
Barn Door Light
A barn door light is a good way to get some broad scale diffuse light that you can control well, if you need a bright, diffuse primary light source for lighting your scenes at night. Normally I will use a big window (sans any direct sunlight) as my primary light source, however sometimes this is neither optimal (can't control the color) and of course at night its simply not an option.
One of my most commonly used light sources is a barn door, set up a bit behind the edge of my backdrop for my scene, reflecting off of a large white foam-core art board onto my scene. This is a great way to simulate that broad scale natural window light, without suffering from the harsher shadows that directly using a barn door will usually cause. I will adjust the doors to make sure that no light from this source directly illuminates the scene.
I picked up a couple of LED panel barn door lights as a set. They use LEDs behind a diffusing panel. Color temp is adjustable, however with this particular set there are two sets of LEDs...a cool blue (which natuvely are 5600K) and a warm yellow-orange (which natively are 3200K). Color temps are achieved by adjusting the intensity of the blue vs. orange LEDs. This is not particularly color accurate, but its plenty good enough for the use case of pen photography. At the extremes (3200K and 5600K) half the LEDs are lit, so there is a slight drop in brightness. There are better barn door lights, and you can spend a decent amount of money on full RGB barn door lights that offer much more fine grained configurability, brighter illumination throughout a wider color temperature range, and of course full RGB hue adjustments.
Spotlights
I currently do not use spotlights for my scenes. As such, I cannot offer a lot of direct advice here. A spotlight (and many often come with barn doors as well) will offer more direct, targetable and bright light. This can be good to add light to a specific area of a scene, especially if you add a snoot (a telescoping type of light hood for concentrating light).
This may be useful for specific kinds of scenes, and in my earlier research into product photography (which I started getting into back in 2021 originally), spotlights combined with black panels to block light, can be a great way to gain EXTREME control over exactly where light falls on your scene. This can be used to great effect in many cases. One of the most intriguing uses I've come across is for backlit rim lighting, which is a really great way to add some intringuing illumination to darker objects in dark scenes. I have not tried anything like this yet, and have thus far not found a need for a spotlight, so I can't speak much more to their use in pen photography.
Small Portable Lights
Full blown RGB configurability is generally not required for most lights, but if you can afford such lights, they can offer a lot more options. I myself generally rely on my small, portable lights to offer full RGB configurability. I have a couple of small sized RGB lights that allow for multiple orientations when set up in the scene, allowing for quite a bit of colorful, targeted lighting. Sometimes I use these to fill in the scene with colored light from a particular direction, or maybe just to illuminate the background of the scene, to add specific highlight lines on reflective surfaces when I cannot get them any other way, etc.
Small, portable RGB lights are one of the most versatile forms of scene lighting. I think I spent around $20-25 each for mine. The two I have are about 2-3" long, so quite small and portable. There are also RGB lights that are more like a wand, 8-12 inches long or so. These can be useful for backdrop lighting, if you wish to light your backdrop independently from your foreground scene. This can be useful for producing certain kinds of special effects (I may write a post on that in the future.)
I commonly use my small RGB lights to help me control the highlight lines reflecting off of my pens, especially when reflecting panels are insufficient to produce the lines I need. I may also use these small lights to produce explicit, somewhat concentrated light of a particular color temperature, just slightly out of the scene. This can help add more interesting lighting to the overall scene, and increase the illumination in areas that are otherwise poorly lit.
Reflecting Panels
A final way to control the illumination of your scene is reflecting panels. There are a lower cost option, are quite portable, generally diffuse (although gold, copper and silver foiled panels will diffuse light in a more...specular manner), and can also be used as a reflection blocking tool.
You can find reflecting panels in cardboard or fabric form. Sometimes fabric will include a rod at either end of the panel, or they may have the fabric stretched between a full wire border. Some panels may be gold or copper on one side and silver on the other, so that one side is "warming" while the other is more of a neutral reflector. Some fabric based reflectors might include a diffusing layer over one or both of the foiled surfaces. In my case, my one fabric panel is copper+diffusing layer on one side, and strait silver foiled on the other. A diffused panel won't reflect as much, but it will help warm the scene in a diffuse manner.
Cardboard based panels are often designed with specific folds. You can find dual or tri-panel reflectors, with folds between the halves or thirds, so that the panel can be set up angled and thus free-standing on its own. Most cardboard panel reflectors have a gold or silver foiled panel, a black panel (non-reflecting), and then the back side of the whole thing is white. I picked up a set of two dual-paneled reflectors in a set. One is gold/black on one side, white on the other, and the second is silver/black on one side, and white on the other. Sometimes you may get a tri-paneled reflector, where one side has gold/silver/black and the other is all white.
My most frequent use case for these kinds of panels is to add and configure specular highlight lines on my pens or other reflective products. Sometimes I will set my cardboard panels up like a tent, then drape my larger fabric panel over that to produce a longer and brighter specular highlight. Other times I may just hand-hold my fabric panel and use a remote shutter release to control my camera. For most highlight lines, I'll use the silvered side. In some cases, to really get the highlights the way I want, I may use multiple panels, white sides, to surround the object with white reflecting my primary light source to get the highlight line to fully encompass the object.
Backgrounds and Base Surfaces
Lighting is important, and having the right lights to illuminate your scene is very important. However once you have some useful light sources, you'll want to work on the nature of your scene. There are many materials that can work wonders here. Its certainly ok to start with whatever materials you have, which may just be the surface of whatever table you are going to use for your scene. However as you gain experience, you will likely want to increase your control over how the scene looks. Especially if you want to produce a particular effect for particular pens.
Here are a few materials that work well for scene backdrops and base surfaces:
- Wood Panels and Boards
- Weathered, generally grayish wood makes one of the best materials with the broadest compatibility
- Wood boards (lumber) can also make for great backgrounds or base surfaces, but with more specific compatibilities
- A "cookie" or a slab cut from an entire tree trunk, can also offer a GREAT base surface
- Can often be found FOR FREE!
- Fabrics
- Fabrics are one of the most versatile background materials
- Neutral colors can work with almost everything
- Textures can add interest to your backdrop
- One of the cheapest options
- Faux Leathers
- Offer a more refined and richer appearance for both backdrops and base surfaces
- Provide real textured surfaces that can add some depth for base surfaces
- Are a bit more expensive than fabrics, but often not by much
One of the most versatile background and base surface materials is weathered, mostly gray colored wood. It can frequently be found for FREE (i.e. craigslist), so the cost barrier is non existent. Weathered wood seems to go with just about everything, and has become one of my most used materials for both backgrounds/backdrops, as well as the base surface upon which I set up each scene. I acquired a large amount of weathered, reclaimed wood when my deck collapsed a number of years ago. I've cut several of the old deck boards down to a couple feet long to serve as an excellent backdrop and underlay for the majority of my scenes these days.
Fabrics are also a useful option. I originally started with fabrics, which definitely improved the quality of my scenes from what I was originally doing back a few years ago. Fabrics don't produce a scene that is quite the same quality as wood a lot of the time, however, with a few exceptions. Fabric is low cost, and can be found for anywhere from $5-15 a yard or so. You only need a yard, yard and a half most of the time. You can find a lot of decent fabrics at Walmart, but other good sources include Joanne's or Hobby Lobby. I use fabrics less often these days, but they are a more cost effective way to get started! The most used fabrics I have now, I think, are the canvases and burlaps.
I started looking for more interesting materials, and ultimately found a range of faux leather materials also sold by the yard. These leather-like materials, IMHO, offer much more intriguing materials for backdrops and underlay. Over the last few years I have acquired seven different kinds of faux leather materials that give me some options. I find these are most useful for "richer" desktop type scenes, where I might want to present a more masculine style for more masculine pens. Two sets of the materials I have, are effectively the same kind of texture, but in both black and brown. Some of these were around $8-10/yd, while others were around $12-15/yd or so. The more elegant and rich were more expensive, found at Hobby Lobby, while the others were all sourced from Walmarts.
Basic Props
Before we get into setting up a scene and getting some photos, lets talk a bit about props. Props are not necessary, and many of you may prefer to focus on JUST the pen, with nothing else. I would encourage everyone to consider that props, even when used very minimally, can add just a bit more intrigue to your scenes, and can also be useful to helping you orient your pens in more ways to better capture light. Props can be used very sparingly, or with more complexity, depending on your tastes and goals.
There is almost an infinite number of things that can be used as props. I will not even try to get into all of the options. Here is a list of just some of the things I've used as props in my scenes:
- Blank cutoff pieces
- Dried leaves
- Sticks
- Pinecones and other seed pods
- Dried grass w/ seed pods
- Dried flowers
- Notepad
- Mopani Wood Pieces (Reptile Enclosure Decorations)
- Animal Horns
- Beads
- Paper Clips (black, white, silver, gold)
- Lamps
- Wine, Liqueur & other spirits bottles
Many of these things can be found in those potpuri packs. I originally started cherry picking particular pieces from the various bowls full of potpouri around my house. I then started noticing new potpouri packages as well as decorative item packages at some local stores (including Walmart and Hobby Lobby), which all contained a multitude of very interesting items. I've since distributed a lot of these by specific kind/type of material (seed pods, pinecones, sticks, flowers, etc.) into various containers for easy selection and use. I've purchased a number of these over the last several years, and have colors of prop and "scene fill" materials ranging from black and white, browns, beiges, reds, oranges, greens, blues, turqouises, etc.
Some of the decorative item packages came with these various spheres made from a variety of materials. These can often add an interesting background object in a scene, that can either contrast with or enhance the colors of your pen. Or they can just help create the illusion of, say, someone's real desk. I like to have a bottle of wine or scotch on hand, as they also make for great props that can set the stage for a "home office desk" type scene.
Some of the more frequently used items for my pen scenes include blank cutoff pieces, dried leaves, paperclips (often of various colors, ideally something that either matches or contrasts with the materials of the pen), mopani wood (amazing wood with incredible bark, often used as a decor item for reptile enclosures...look for these at pet stores!), and sometimes even beads (you would be surprised what a few beads can do to provide some complimentary color contrasts and bring out your pen!) Something else that can sometimes work are dried grasses with their seed pods in full form. These can be used to subtle effect when they are just a background characteristic (often cropped and out of focus, but they can improve color contrasts in a scene.)
Mapani Wood Pieces from Petsmart
I would say the most used prop for my pen photography these days, is a notepad. If you use no other props, a single notepad can offer a highly relevant base to use underneath your pen, a support to hold one end of your pen up, or as a stabilizer to hold a pen in a certain orientation for particular kinds of photos. They are one of the most relevant kinds of props for pen photography, and could be the sole prop you use. A black notepad is probably the most broadly compatible with most pens.
Over time, I have accumulated close to a dozen various kinds of notepads, ranging in colors from black, to white/creame, blueish and pinkish/purple, to brown. I would like to add tan, however there aren't that many in that color, and the price of the only tan notepads I've found (Moleskin) were $29!! (That's a lot for a simple, relatively small notepad.) One of the more cost effective ways to get a notepad-type prop is to buy one of those "on the go" artists notepads. These have plain papers, no rules, grids or anything like that, and they can be found for as little as $4-5. Often a nice quality notepad will cost $12-15, which is roughly the cost of most of mine. I have found some fairly nice ones with leather covers, leather+magnetic latches, and including at least one (sometimes two) bookmark ribbons inside, with either college rule or graph grid.
One last tip. For pen scenes, especially if you want a "desktop" like scene, a lamp is quite useful. Aside from adding that desktop look and feel, its also a light source, and can add useful illumination to your scene. You can pick up nice little lamps off Amazon for anywhere from $10-$30, incluidng ones with color temp selections (or even full RGB.)
If you want to use a prop, I highly recommend picking up at least one black notepad. If you want another, as odd as it may sound, go to a pet store and find Mopani Wood in the reptile terrarium/enclosure decoration area. Mopani Wood, as you can see below here, is AMAZING. I have several pieces now, and they make for EXCELLENT background props. Then just, figure out what your taste is, and how many props you even like in a scene, and buy what suits your fancy.
A Basic Scene
Lets walk through setting up a basic scene. In this scene, I'll be using my weathered wood as both backgound and base. I've come to use this material most often for most scenes, and I fall back to the faux leather for more specialized ideas. Sometimes I may use the leather as a base and the wood as a background, or vice versa. Together, these make the most versatile baseline scene material.
For now, lets use some weathered wood to create our background and base surface. Not much to it, if you can get ahold of some old decking wood, and cut it down to lengths around 1.5 feet. These will usually be 2x6" You can see my approach in the picture below here...vertically aligned for the background, horizontally for the base. I also placed a short length of 2x4" along the back where the "seam" between the base and background would be...this will act as a simple shelf to hold up a prop.
Alright, now for some props. I've added a lamp, set to a middle color temperature (neutral), along with an animal horn (not sure exactly what, bovine of some sort perhaps; picked up at an antique store), and a small box I turned a while back. Now, before adding the pen, I always like to use a clean, soft microfiber cloth to clean it. Fingerprints often show up much more readily in photos than to the naked eye, and a clean pen adds a professional touch.
For illumination, I'll start by using my bay window there, as well as my large softbox. The softbox I'm setting to a slightly warmer color, as the window light will be very white/neutral. I find its best not to have totally neutral light across the entire scene. If your primary light is warmer, your fill could be cooler (higher color temp, say 6500K.).
As my final prop, I am placing the pen on one of my notepads. For this particular pen, a chrome Elegant Sierra-type with Port Orford Cedar, I've chosen a light colored notepad. I also tossed a gold paperclip in there.
With no other setup, I captured the scene officially. Here is the result (in this case, with my Canon EF 16-35mm @ 35mm):
In this case, I did not fiddle a lot with the lighting, or try to do anything to manage the specular highlight lines or anything like that. The photo is good. It could be better, but its great for an initial photo. The highlight line can be improved, and another mistake I noticed in this final photo was the seam in the lamp shade. I rotated that around to the back so it is not present in future photos.
A Night Scene with Lighting
Alright. As I wrote the above, my daylight faded, so lets take a crack at a nighttime setup. Same scene, however we are going to fiddle with the lighting more. We need to replace our primary light source with an artificial one. For this, I'll be using my barn door light at maximum illumination, maximum color temp of 5600K (cool.) I have a large foam core craft board that I'll be using as a diffuser and reflector to bounce the light onto my scene. I'll adjust the barn doors to keep any direct light from the lamp from spilling onto the scene.
With the same scene, the goal now will be to force a better specular highlight line on the pen. This can be done a few ways. For this case, I'll use my reflecting panels to try and fill in the highlight line, just by reflecting the primary light and the lamp. The original scene withouot any reflectors is shown here:
Now, adding only a white reflecting panel, which primarily captures the table lamp light and reflects it back to the pen, we get the following:
Ok, but not great. I'd like a thinner highlight line, and one that does not overpower the pen but just shows its reflective. Using a silvered panel, the highlight line on the reflective pen nib improves, but still not quite what I'm looking for. The changes so far are primarily only affecting the nib as well:
Adding more white panels wrapped around the silver panel, we reflect more light onto more of the pen, and the highlight line does seem consistent in both the finial and the nib...but, its fat, not thin and specular:
Finally, I flip one of my reflecting panels into a tent, and then drape my reflecting fabric panel over that. Voila, a real nice, fine, thin specular highlight appears. I had to fiddle with the orientation of the panels to get the specular line to stretch across the whole pen, and it does not quite appear on some parts of the barrel, but this was more what I was looking for:
The final shot here was with a 100mm f/2.8 macro lens, which just produces nicer photos than the 16-35mm lens. Note the closeness of all the setup around the pen here:
The camera is set up on a tripod, and reaches over the intervening foreground reflecting panels in order to photograph the pen. You don't necessarily have to worry about placing reflecting panels in the foreground, and often that is the best place for them. Sometimes I may have the camera relatively low over the top of any panels to get the shot, but being able to utilize that foreground space is often critical to getting the most optimal light.
Reflecting panels bring a whole lot of light control power to the table. Panels are cheap, and with a combination of reflection (white, gold, silver) and blocking (black), you can gain an exceptional amount of control over your scene lighting, if you are interested in achieving very specific results like a fine, notable highlight line that does not overpower the pen itself.
Props as Prop-ups
Extending from this same prior scene, lets rearrange things a little bit. Instead of using the notepad as a prop, lets ise the horn as a way to prop up our pen for a different kind of shot. I rearranged the scene by removing the 2x4 that was acting as a "shelf", and put the horn between the lamp and the box. The idea is to have the pen cross over the pointed end of the horn in an interesting way.
After placing the pen (remember to clean off any fingerprints before your final placement, and it helps to only touch the barrel, as fingerprints often don't show up there, or at least not as well as on metal plating), I set about adjusting reflecting panels to maintain the highlight lines I wanted, and make sure that the whole scene was lit well enough. I placed a white reflecting panel to assist in filling in some of the background with light.
Once the scene was settled, and I was getting the reflections I wanted...from the vantage of the camera...I captured the shot:
After you have an initial scene set up, it takes a lot less effort to juggle things around and capture additional photos of the pen to show off different aspects, in different ways. I like to get a number of shots with each scene if I can. For certain pens that have particularly intriguing features, I will sometimes also capture close up macro shots of interesting aspects of the pen. Say details on a clip or band, any custom engraving, etc. A macro lens, or some extension tubes so you can make the lens you have macro, is very helpful for these cases.
Minimalist & Prop-Free Isolation
A propped scene is a great way to grab a prospective customer's initial attention. Views on my pen listings in my Etsy store, went from a handful a year (maybe, maybe 10 or so), to dozens or more per week once I started setting up these kinds of scenes. A simple pen on an isolated white or otherwise very neutral background, as your only way to grab attention...it seems to get lost in the sea of other sellers doing exactly the same thing. A more interesting scene creates something unique, something that can potentially stand out against the sea of pens dressed in whitewash...
However, isolating a pen in a photo doesn't have to be bland! You can leverage all of the above, to create well lit, quality photos of your pens in isolation. Perhaps with just the background and base surface (or even just the surface, with the right camera angles.) The biggest takeaway you should have from this article is the lighting. You can dispense with all the props, the lighting is still king! Utilizing the above scene, lets put our pen in isolation, but maintain our lighting, our specular highlights. I moved the lamp around until it left me with more pleasing highlights, which was mostly on the clip (in particular, the specular on the end of the clip):
Now, sometimes isolation doesn't mean 100% prop-free. The original photo at the top of this article showed two pens on top of some oak leaves. Something very minimal and simple can still often help show off a pen in near-isolation. The leaves in the first photo are more like a background texture...they don't distract much from the pens, but define a setting and a "feel"...ah, the feel of fall! Sometimes you may wish to prop your pen up. Pen stands can help you do that, and there are numerous clear acrylic and metal stands you can guy for relatively cheap. Another option is to craft your own stand...a simple piece of wood with a tapered hole for the nib of your pen, or perhaps crafting your own uniquely designed stand from wood, is another way to prop up your pen, but otherwise generally keep it isolated.
A simple, cheap but great way to prop up a pen is to use either the pen cap (if you have one) or to use a blank cutoff as a stand. I will usually set the finial end on the cap or cutoff. In this scene, I removed the lamp, and used one of my small RGB lights to tune the highlights, again mostly the specular on the top end of the finial:
The cutoff of the same wood as you used for the pen is a nice touch, but its not entirely necessary either. You could also rest the pen on other whole blanks as well. Finally, another great way to prop up a pen in an isolation photo, is to use any included (or optional) enclosure. A pen sleeve or box, especially if included with the pen, is a useful minimalistic additive to the scene.
When selling a pen, it is useful to include an isolated shot that shows the product (and ideally the whole product, including pen sleeve or box if one is included). Its not entirely necessary, my experience is buyers know what the product is based on the title and description of a listing, but isolating is still handy to make it very clear what they are getting, and to fully show off THE PEN in all of its own glory.
Continued Experimentation
Now that you have a scene set up and usable, keep exploring. Adjust the pen, the props, even the lighting. Swap out some props for different props, or eliminate them altogether. Try adding a pen box. Maybe try writing in a notepad with the pen to show off how its script looks. Once you have control over your lighting, then you have solved the most significant issue. From there on, its just a matter of tweaking and tuning the scene to your liking, and capturing the photos you think best show off the pen. That may even involve no props, and just a background and base texture, with effective lighting.
I will try to share additional threads in the future, covering different kinds of scenes. I have an upcoming pen that should provide an opportunity to get into more interesting lighting off the beaten path. I've been wanting to explore rim-lit dark objects in dark scenes for a while, which should push my existing still-photography skills to the limit. I'll try to document that and share again in the near future!
@Wayne Let me know if you would like to preserve this.
Attachments
Last edited:
") You can also pick up a couple yards of some nice faux leather (which can be perfect to simulate a nice, rich quality desktop surface...note the last two to the right in my photo, I use those a lot, they look really good, as does the maroon colored leather, as rich desktops.) A couple yards could be $15-20.
You can also pick up a couple yards of some nice faux leather (which can be perfect to simulate a nice, rich quality desktop surface...note the last two to the right in my photo, I use those a lot, they look really good, as does the maroon colored leather, as rich desktops.) A couple yards could be $15-20.


 Once I have the Glencairn with a shot in it, it inevitably gets sniffed and savored.
