Cigar paper and band blank casting issues

Signed-In Members Don't See This Ad

milothemeanie

Member
Joined
Jun 5, 2023
Messages
1
Location
Oklahoma
I have been trying to create pen blanks with tobacco paper from a cigar along with its band. I have been having this recurring problem where grey areas appear only when I either start barrel trimming or start turning the blank. Is it moisture, the sealant I am using, or the fact I am not using a pressure pot?

I have tried each of the following combinations:
Resin: PR, Amazing Deep pour epoxy
Adhesive: CA glue, 3M Super 77 Spray adhesive, Elmer's glue stick
Sealant: Modge Podge , Crystal Clear Acrylic Coating 1303

I have had one success but couldn't replicate the results with the combination of Amazing Deep Pour Epoxy, 3M Super 77 Spray Adhesive, Crystal Clear Acrylic Coating 1303.

Below are the results, any help is appreicated


PXL_20230830_034621840.jpg


PXL_20230830_034532924.MP.jpg


PXL_20230830_034400553.MP.jpg
 
Signed-In Members Don't See This Ad
As a cigar smoker (but not experienced caster), I would guess your issue is the moisture that is still in the wrapper leaf getting released into the casting material and fogging it up.

Are you doing anything to dry the leaf out before sealing?
 
I turned this one, an Arturo Fuente Opus X. I did NOT cast the blank however. I have never done any casting. It was cast by a IAP member who is a master. Hopefully he will see this and answer your questions. I do know he used Alumilite. I don't know if that contributed to the successful outcome. PS I concur with your taste in cigars My Father is one of my favorite smokes. There is a very small amount of variation on the color of the tobacco leaf which I don't see as a flaw but a natural variation in the leaf itself. I've never seen or smoked a cigar that has a perfectly consistent color in the wrapper. That will not change when it's been casted
6C66571E-8A1C-45D2-AB6E-E2E464BA7016.jpeg
 
Last edited:
I think it is just some of the smoke trying to get out. :)

Actually I agree completely with Don (its_virgil). It looks like a separation. Although I have not done label casting (yet anyway), I have seen this on some of my wood turnings. Mine usually showed up after I wet sanded with MicroMesh. Part of my regimen is to lightly clean off any CA buildup on the ends (I use non-stick HDPE cone bushings for finishing). What fixed it for me was to add a step. After cleaning up the ends I apply a few drops of thin CA to a blotter and use it to seal the ends up. Before that I'm pretty sure I had water infiltration on the ends from wet sanding that caused the CA to separate from the wood. The air infiltration looked exactly like the grey blotches in your pictures.

My suggestions are (if you are not already doing these):
1) Dry your paper/tube completely before adding your resin. (even high relative humidity can be a problem).
2) Square the blank by sanding -- don't use a barrel trimmer cutter as they are extremely aggressive.
3) Re-seal the ends after squaring using a blotter pad with a few drops of thin CA.

Good Luck finding a solution. Other than the issue you are dealing with, your blanks are gorgeous.

Best Regards,
Dave

Dave - can you share a photo or two of your setup to reseal the ends? I'd be curious to see it. It would be a great response to this post or you could probably even do a stand alone post.

Thanks
Kent
 
My $0.02 after having similar issues with cigar wrapper:

Mod Podge as an adhesive. CA off-gases for a long time...several days in my experience. If encapsulated before it is completely off gassed, the CA will cause the problem.
Let the Mod Podge 'cure/dry'. I have let it dry for 2 or 3 days.
With Mod Podge, do not use urethane resin. Yes. stating the bloody obvious, but...
As said above, seal the ends.
A pressure pot seems to help, but it may not have any actual value for this issue.

Good luck!
 
Like Don said, it's definitely separation from resin and material. Some natural materials have oils that obstruct adhesion with resins. If you're having problems with Epoxy sticking, more than likely the others resin types won't stick either. Try wiping the glued blanks down real good with acetone or denatured alcohol and then warm them up immediately prior to casting. That will help the resin stick. As for fixing the already cast blanksā€¦ A real thin CA might wick in but probably not as deep as you need it to on this one. I always seal the tube ends with ca prior to turning. You might be able to gently turn the damaged area down and build up with CA. If it's PR resin you can always recast over itself but that won't work with urethane resins. Epoxy would probably work also, just make sure you don't have any polish on the blank before you recast. Good luck!
 
Dave - can you share a photo or two of your setup to reseal the ends? I'd be curious to see it. It would be a great response to this post or you could probably even do a stand alone post.

Thanks
Kent
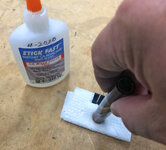
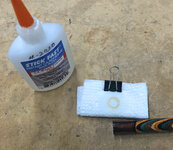
I essentially make a small pad by folding some paper towels. Sometimes I use a small binder clip to hold it together. Then, I apply 2 or 3 drops of thin CA to the pad and simply press the ends of the pen blank down onto the CA spot. The CA can penetrate the ends and only wraps around the edge a miniscule amount - not enough that it has ever been obvious and has not easily sanded off when I do my wet sanding with MicroMesh. Depending on the wood and how sealed the ends look (I know it's very subjective) I sometimes smear a little film of wax on the face of the bushings before I reinstall everything for wet sanding. I always wet sand with the bushings on to help prevent me from rounding over the edges by oversanding. Anyhow, here are some pictures that explain it better than I ever could. - Dave

IMG_3797 Cropped.jpg IMG_3798 Cropped.jpg Capture.JPG
 
I essentially make a small pad by folding some paper towels. Sometimes I use a small binder clip to hold it together. Then, I apply 2 or 3 drops of thin CA to the pad and simply press the ends of the pen blank down onto the CA spot. The CA can penetrate the ends and only wraps around the edge a miniscule amount - not enough that it has ever been obvious and has not easily sanded off when I do my wet sanding with MicroMesh. Depending on the wood and how sealed the ends look (I know it's very subjective) I sometimes smear a little film of wax on the face of the bushings before I reinstall everything for wet sanding. I always wet sand with the bushings on to help prevent me from rounding over the edges by oversanding. Anyhow, here are some pictures that explain it better than I ever could. - Dave

View attachment 359497 View attachment 359498 View attachment 359496
this is great, thanks a lot
 
Back
Top Bottom